Monday, June 30, 2014

Create a Wrench as an ‘iPart’ through-Autodesk Inventor 2013 (with caption and audio narration)


Create a Wrench as an 'iPart' through


Serial No. 214

Create a Wrench as an ‘iPart’ through-Autodesk Inventor 2013 (with caption and audio narration)

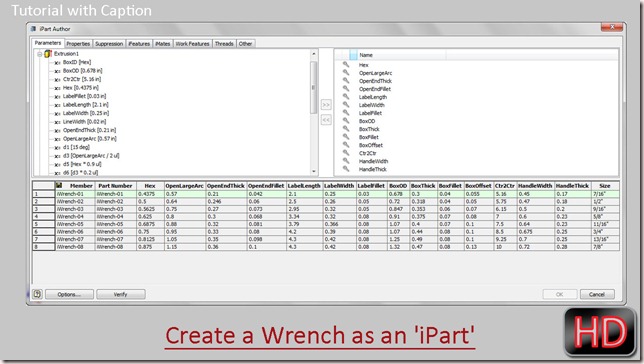
iParts are different from standard parts they are table driven part factories with a group of parts. The parts have the different parameter and different features that are controlled by table. The table is controlled by iPart Author or Spread Sheet.


  downloadLink13
  

Click the following link to get the model file: - http://bit.ly/2nRnT2d


Transcription of Video

  1. Activate the ‘Create iPart’ command.
  2. iPart Author dialogue box is visible in the graphics window.
  3. Notice that the columns for the named parameters had automatically displayed and iWrench-01 has been added to the current file to define the first family member’s part number.
  4. Discard all named parameters by clicking ‘Remove’ arrow button one by one and again place all these named parameters in desired sequence by using ‘Add’ arrow button.
  5. Click the Other tab button and fill the text in the ‘Name’ field.
  6. ‘Size’ column is automatically added in the table.
  7. Fill the value in size column.
  8. Right click the row of iWrench-01, and click Insert Row in the context menu.
  9. In the second row, change the value in each column for the new member.
  10. Click Verify button.
  11. Click OK to generate the iPart.
  12. Parameter Table has been added in the browser bar.
  13. Click the ‘+’ sign to expand the node.
  14. Right click the iWrench-02 node and choose ‘Activate’ option to change the size of the member.
  15. Activate the first member once again.
  16. Right-click the table icon and select ‘Edit via Spreadsheet’.
  17. The iPart table is opened in Microsoft Excel.
  18. Create another member in the excel file and enter the value in each column.
  19. More parameters can be added with the excel file.
  20. Save the spreadsheet and close it.
  21. Click Yes button to update the table.
  22. In the browser bar, the family members have been automatically added, it can also be seen from the Edit Table.
  23. Click Cancel button to close the dialogue box.
  24. Activate the each family member one by one and see the effect.
  25. Save the ‘iWrench’ file.

Sunday, June 29, 2014

iWrench (Autodesk Inventor 2013)

iWrench

Serial No. 213

iWrench (Autodesk Inventor 2013)

This video tutorial features the designing process of  a Wrench with the aid of Autodesk Inventor's part modelling functionality.
The highlight of the videos is the after creating the model with full parameters the iPart creation of the model is also displayed.

download-Link


Click the following link to get the model file: - http://bit.ly/2oIjPSX

Mounting Bracket || Creo Parametric 2.0 Sheet Metal Tutorial

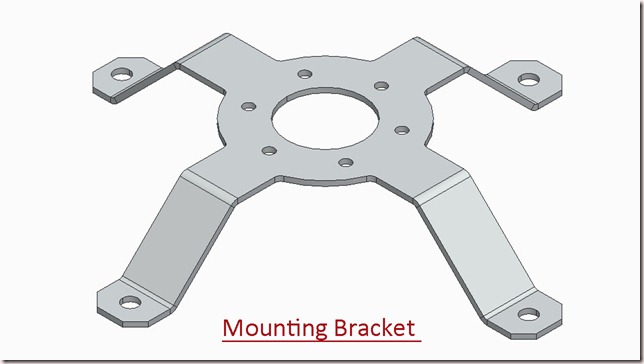
Mounting Bracket Image

In this tutorial I will create a Mounting Bracket by utilizing Sheet Metal capabilities of Creo Parametric 2.0

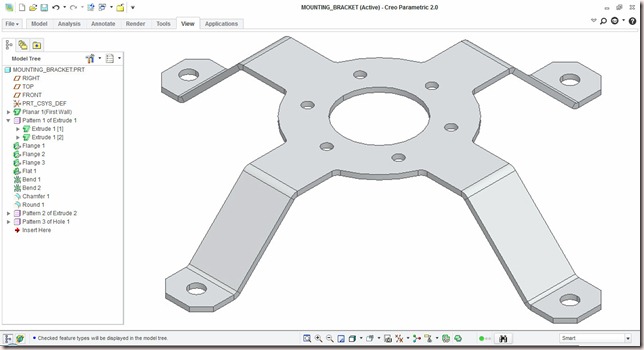
Mounting Bracket-3 - Copy

First of all base feature will be created using Planar Tool, afterward similar looking legs will be created using various tools like Extrude, Flange,Flat,Bend etc. Usage of Hole, Chamfer Round along with Flat Pattern Tool is also displayed.


Transcription of Video

  1. Start a new Sheet Metal Part file from scratch with the default template and give it a name ‘Mounting Bracket’.

  2. Select the Top Datum plane and create a new sketch on this plane.

  3. Click the Sketch View icon to orient the sketching plane parallel to the screen.

  4. Activate the Circle Tool and draw the sketch with the dimensions as displayed.

  5. Convert this circle into construction geometry.

  6. Create a line in the sketch and duplicate it to the other side, using a centerline with the aid of Mirror Tool.

  7. Draw a new line and repeat the previous process for this line also.

  8. Create arcs between these lines by picking its centre and ends.

  9. Duplicate these arcs to other side using the Mirror Tool.

  10. Exit the sketch and activate Planar Tool.

  11. Fill the thickness of the sheet and execute the command after selecting the sketch.

  12. Change the colour of the model as per your wish.

  13. Create a sketch over Front Datum Plane.

  14. First specify new references, with which new sketch will be constrained and dimensioned.

  15. Draw the sketch using the Line Tool as displayed.

  16. Exit the sketch and activate the Extrude Tool.

  17. Select the sketch and activate Extrude both side of sketch plane equally option.

  18. Fill the extrusion depth.

  19. From the option tab activate add bends on sharp edges command, which would be equal to thickness of the sheet.

  20. Execute the command.

  21. Activate Flange Tool.

  22. Select an edge to attach the wall and then fill the length and angle of the wall.

  23. In the similar way add two more flanges.

  24. Activate the Flat Tool and first specify placement edge.

  25. Execute the command after defining the angle and length of the flat.

  26. Start a new sketch over top face of the model and draw a sketch similar to this one.

  27. First specify new references and use Line to draw the sketch at the defined position.

  28. Activate Bend Tool.

  29. First define the bend line and then fill the bend angle.

  30. Execute the command.

  31. Again repeat the same process to perform another bend operation.

  32. Hide the visibility of sketch3.

  33. Select the leg created with the extrude tool in the model tree and activate Pattern tool.

  34. Open the visibility of Coordinate System.

  35. Set Axis as the type of pattern.

  36. Select Y axis of Coordinate System as axis of rotation.

  37. Enter the number of members to be patterned.

  38. Leave the default 90° Angle between the pattern members unchanged and execute the command.

  39. Save the file.

  40. Apply a Chamfer of 0.125 inch on the each of the legs.

  41. Activate the round tool and apply fillet of .06 inch on these edges of the model.

  42. Create a sketch on the top face of the model and draw a circle on this leg with the defined dimensions.

  43. Create a hole on the leg using this sketch and extrude tool.

  44. Open the visibility of Coordinate System and using its Y axis pattern the hole 4 times at an angle of 90°.

  45. Create a sketch on the top face of the model and create a point to define the position for the new hole.

  46. Activate the Hole Tool and select the point.

  47. Define the diameter of the hole and execute the command.

  48. Pattern this hole 6 times at an angle of 60°using Y axis of Coordinate System.

  49. The model is complete you can generate the Flat Pattern of the model.

Note:--

You may find holes inappropriate created with pattern tool on the leg, it is because the each leg is created with different feature and their flat pattern length is different. To clear this problem, create the holes no each leg separately.

downloadLink_thumb3


Get the Model file by visiting the following link:-
http://bit.ly/2ogQDSk

Tuesday, June 24, 2014

Create a Twist Drill as an ‘iPart’ through-Autodesk Inventor 2013 (with caption and audio narration)

Create an iPart through Autodesk Inventor


Serial No. 211

Create a Twist Drill as an ‘iPart’ through-Autodesk Inventor 2013 (with caption and audio narration)

iParts are different from standard parts they are table driven part factories with a group of parts. The parts have the different parameter and different features that are controlled by table. The table is controlled by iPart Author or Spread Sheet.


 download-Link


Click the following link to get the model file: - http://bit.ly/2mXVsjd


 Transcription of Video

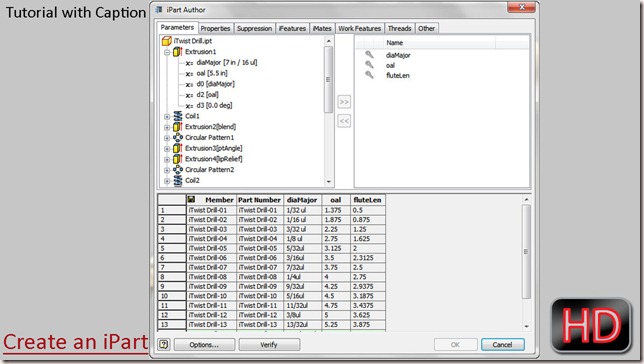
  1. Activate the ‘Create iPart’ command.
  2. iPart Author dialogue box is visible in the graphics window.
  3. Notice that columns for the named parameters were automatically displayed and iTwist Drill-01 has been added to the current file to define the first family member’s part number.
  4. Only 3 named parameters are required, so discard the other parameters by clicking Remove arrow button one by one each time.
  5. Right click the row of iTwist Drill-01, and click Insert Row in the context menu.
  6. In the second row change the value of diameter Major, Overall Length and Flute Length for the new member.
  7. Click OK to generate the iPart.
  8. Parameter Table has been added in the browser bar.
  9. Click the ‘+’ sign to expand the node.
  10. Right click the iTwist Drill-02 node and choose ‘Activate’ option to change the size of the member.
  11. Activate the first member once again.
  12. Right-click the table icon and select ‘Edit via Spreadsheet’.
  13. The iPart table is opened in Microsoft Excel.
  14. More parameters can be added with the excel file.
  15. Save the spreadsheet and close it.
  16. In the browser bar, expand the table node, the family members have been automatically added, it can also be seen from the Edit Table.
  17. Save the part file.

Friday, June 20, 2014

Modelling a Bolt and Nut in Creo Parametric

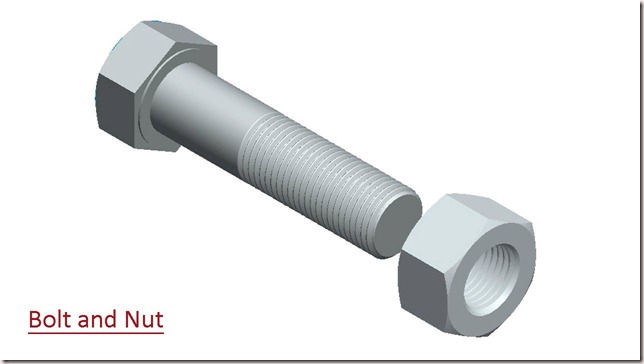
Bolt and Nut

In this tutorial we will create Bolt and Nut by utilizing part modelling and assembly modelling capabilities of Creo Parametric 2.0.

To animate this assembly read a related post. (Animation of ‘Bolt and Nut’ || Using Creo Mechanism)

Viewers will be able to watch application of many part modelling tools like Extrude, Revolve, Helical Sweep, Chamfer, Mirror and Section Views along with 2D sketching techniques and utilization of assembly mates.


Transcription of Video

  1. Create a new part file utilizing the default template and enter the name of the model ‘Bolt’.
  2. Start a new sketch over ‘Right Datum Plane’.
  3. Orient the sketching plane parallel to the screen by clicking Sketch View icon.
  4. Clear the screen by closing the visibility of Datum Planes, Axis, Points, Spin centre, etc.
  5. Activate the Circle tool and draw a circle along with dimension as displayed.
  6. Exit from the sketching mode and switch to Annotate Tab.
  7. Activate Show Annotation Tool and select the sketch.
  8. Applied dimension will be highlighted.
  9. Turn on its visibility by placing a checkmark in the show annotation dialogue box.
  10. Apply and save the changes.
  11. Select the dimension in Model Tree and open its property from the context menu.
  12. Change its display name to ‘D’ and apply changes.
  13. Switch back to Model Tab and activate Switch Symbol Command from the Model Intent Panel.
  14. This will display names of dimension in place of values.
  15. Re-edit the sketch.
  16. Convert this circle into construction geometry.
  17. This dimension sd0 or D will now onwards be used as a reference dimension and almost every new dimension would be relative to this dimension.
  18. Activate the Sketcher Palette and find the 6-Sided Hexagonal shape.
  19. Double click its icon to insert it in the active sketch.
  20. As soon as the 6-Sided Hexagonal shape is inserted in the active sketch the Rotate and Resize tool would be active.
  21. Move the sketch towards the intersection point of reference lines and rotate it 90 ° in an anticlockwise direction.
  22. Add a new dimension on this Hexagon by delegating the conflicting sd1 dimension.
  23. Fill the dimension values as displayed.
  24. The sketch is complete so exit from the sketching mode.
  25. Activate Extrude Tool and select the sketch.
  26. Change the extrude direction and fill the extrusion depth value.
  27. Execute the command.
  28. Save the model file.
  29. Change the colour of the model as per your choice.
  30. Create a new sketch over Left Face of the model.
  31. First specify new references, with which new sketch will be constrained to.
  32. Draw a circle tangent to these reference lines and finish the sketch.
  33. Create a new sketch over Front Datum Plane.
  34. Take the project of circle drawn on last sketch.
  35. Specify new references and draw the sketch as displayed.
  36. Delete the unnecessary lines and apply the dimensions as required.
  37. Finish the sketch and hide the visibility of sketch 2.
  38. Activate the Revolve tool and select the sketch.
  39. Now select the X axis of coordinate system to define the axis of rotation.
  40. Specify remove material option and execute the command.
  41. Start a new sketch on the Right face of the model and take the project of the circle drawn on sketch 2.
  42. Delete the projected sketch but you can see its reference is still present there that would be used to dimension new circle.
  43. Create a circle and add the dimension as displayed.
  44. Finish the sketch and activate the Extrude Tool.
  45. Select the sketch, then enter the depth value of extrude and execute the command.
  46. Start a new sketch on this face of the model and draw a circle with the dimensions as displayed.
  47. Extrude this sketch with a depth value of 2 inch.
  48. Activate Edge Chamfer Tool and set the dimension scheme to angle and distance.
  49. Fill the values in the input boxes, select the edge and execute the command.
  50. Switch to view tab and activate section along Z direction.
  51. Open the file named unf_external_thread_profile.
  52. Here you can see a sketch profile is drawn. The pitch of the profile is 1/20 inches which governs all the other dimensions by some relations.
  53. Copy the sketch present in the file and return to the previous file.
  54. Activate the Helical Sweep tool.
  55. Now define the Sweep profile for the Helical Sweep.
  56. Draw a sketch over Right Datum plane.
  57. Define the new references and draw a Center Line.
  58. Draw a line, the length of this line would be length of the thread.
  59. Exit the sketch.
  60. The tool has not selected the internal Center Line as axis of revolution so manually select X axis of coordinate system to define the axis of revolution.
  61. Activate internal sketcher to create the sweep section or profile.
  62. Place a Geometric point on the intersection of reference lines and lock it.
  63. Now paste the thread profile that was copied earlier and which is still in the Windows Clipboard.
  64. As soon as you paste the sketch the move tool will activate.
  65. In the scale field fill the value 1 and rotate the profile -90°.
  66. Move the profile near to the geometry point and click Ok.
  67. Make some minor correction in the profile, because in pasting it some constraints have gone missing.
  68. Add more constraints and lock the dimensions.
  69. Apply some more dimensions to move the sketch at the required position and exit from the sketch.
  70. Specify the pitch value as displayed.
  71. Activate the remove material option and execute the command.
  72. Supress the section view.
  73. Save the file.
  74. If you change the dimension sd0 or D in the sketch1, the model will change accordingly.
  75. Create an axis parallel to the X axis of coordinate system.
  76. Save and close the file.
  77. Start a new part file and give it the name ‘Nut’.
  78. Start a new sketch over ‘Right Datum Plane’.
  79. Create a circle and apply the dimensions as displayed.
  80. Exit from the sketching mode and switch to Annotate Tab.
  81. Activate Show Annotation Tool and select the sketch.
  82. Applied dimension will be highlighted.
  83. Turn on its visibility.
  84. Open the property of the dimension and change its display name as ‘D’.
  85. Display the names of dimension in place of values, by activating Switch Symbol Command.
  86. Re-edit the sketch.
  87. Convert this circle into construction geometry.
  88. Activate the Sketcher Palette and place the 6-Sided Hexagonal shape in the sketch.
  89. Rotate and Resize tool is active so move the sketch towards the intersection point of reference lines and rotate it 90 ° in an anticlockwise direction.
  90. Add a new dimension on this Hexagon by delegating the conflicting sd1 dimension.
  91. Exit the sketch and save the file.
  92. Activate the Extrude tool and select the sketch profile.
  93. Select Extrude both side of the sketch profile option.
  94. Fill the extrusion depth value and execute the command.
  95. Change the colour of the model as per your choice.
  96. Create a new sketch over this face of the model.
  97. Specify new references and draw a circle tangent to it.
  98. Draw a line and exit from the sketching mode.
  99. Create a new sketch over Front Datum Plane.
  100. Take the project of sketches drawn previously.
  101. Add a one more reference and draw more lines.
  102. Apply the dimensions and exit the sketch.
  103. Activate the Revolve tool and select the sketch.
  104. Define the axis of rotation by selecting X axis of coordinate system.
  105. Select remove material option and execute the command.
  106. Select Revolve feature in the Model Tree and activate Mirror tool.
  107. Define the Right Datum plane as mirroring plane and execute the command.
  108. Activate Hole tool and define the placement face.
  109. Set the Offset reference for the hole.
  110. Activate Standard Hole option and define the parameters of the hole.
  111. Execute the command.
  112. Activate Edge Chamfer Tool and set the dimension scheme to angle and distance.
  113. Select the edge and execute the command.
  114. Activate section along Z direction.
  115. Open the file named unf_internal_thread_profile.
  116. Here you can see a sketch profile is drawn. The pitch of the profile is 1/20 inches which governs all the other dimensions by some relations.
  117. Copy the sketch present in the file and return to the previous file.
  118. Activate the Helical Sweep tool.
  119. Now define the Sweep profile for the Helical Sweep.
  120. Now define the Sweep profile for the Helical Sweep.
  121. Draw a sketch over Right Datum plane.
  122. Define the new references and draw a line over it.
  123. Add a Center Line in the sketch and exit form the sketching mode.
  124. Specify the pitch value as displayed.
  125. Activate internal sketcher to create the sweep section or profile.
  126. Place a Geometric point on the intersection of reference lines and lock it.
  127. Now paste the thread profile that was copied earlier and which is still in the Windows Clipboard.
  128. As soon as you paste the sketch the move tool will activate.
  129. In the scale field fill the value 1 and rotate the profile 90°.
  130. Move the profile near to the geometry point and click Ok.
  131. Lock dimensions and apply some constraints to move the sketch at the required position and exit for the sketch.
  132. Convert some lines into construction geometry, add a line to close the open sketch profile and exit from the sketch.
  133. Activate the remove material option and execute the command.
  134. Supress the section view.
  135. Create an axis parallel to the X axis of coordinate system.
  136. Save the file and close it.
  137. Create a new assembly file with the name Bolt and Nut.
  138. Place the Bolt part in the assembly.
  139. Set the assembly constraint type to Default.
  140. Click green check mark to complete the placement of part.
  141. Place the Nut part in the assembly.
  142. Set the selection type to Axis.
  143. Select the Axis of Bolt and Nut a Coincident Constraint will be applied automatically.
  144. Change the selection type to All.
  145. Drag the Nut part away and select the faces of Bolt and Nut, a Distance assembly constraint would be applied.
  146. Change the constraint type to Coincident.
  147. Now part is fully constraint.
  148. Click green check mark to complete the placement of part.
  149. Save the file.

download-Link


Get the Model file by visiting the following link:-
http://bit.ly/2m39aRl

Monday, June 16, 2014

iTwist Drill (Autodesk Inventor 2013)

iTwist Drill

Serial No. 210

iTwist Drill (Autodesk Inventor 2013)
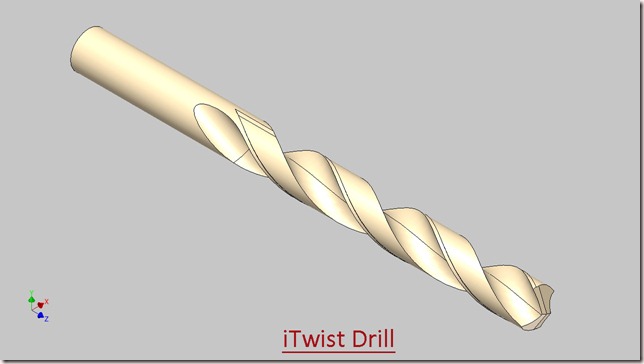
In this part modeling tutorial of ‘Autodesk Inventor’ we will create a model named ‘iTwist Drill ’. We will start our work by defining some User Parameters that will be used to create mathematical relation between the dimensions applied in the due course of modeling the ‘Twist Drill’.

Parameters used in iTwist Model with Autodesk Inventor
Then we will create a circle and extrude it. Next we will create some user defined work planes at specified spots. These planes will be used to draw some more sketches, to be used as base profile for cutting flute (rounded grove) over the round bar. Then a coil feature and an extrude feature with a cut operation will be applied to create flute. Then using a circular pattern tool we will duplicate the same at an angle of 180°. Next we will create some sketch profiles to cut lip and lip relief on the edge of drill bit. The process will be the same as applied earlier. Later more coil feature will be applied to complete the model.

Features applied in creation of iTwist with Autodesk Inventor

The highlight of the videos is the after creating the model with full parameters the iPart creation of the model is also displayed.
Watch the following video to understand all the process clearly


download-Link

  Click the following link to get the model file: - http://bit.ly/2mVhfIk


To properly understand the creation process of an iParts in Autodesk Inventor, read the related Blog Post mentioned below....

Create a Twist Drill as an 'iPart' (Autodesk Inventor 2013)

And to more understand twist drill geometry watch the following image and visit the associated  link..


TWIST DRILL GEOMETRY.