Showing posts with label 2D sketch. Show all posts

Saturday, May 21, 2016

Concept of Degrees of Freedom in Sketches || Autodesk Inventor Basics

Concept of Degrees of Freedom in Sketches - Autodesk Inventor Basics


In this tutorial we will learn what Degrees of Freedom (DOF) is and how it is utilized in 2D sketch environment to fully constrain a sketch.

..............................................................................
Transcription of Video
................................................................................

In Autodesk Inventor our ultimate goal in creation of 2D sketch is, a fully constrained sketch. This means the position of drawn sketch cannot be changed without any deliberate action. By turning on Degrees of Freedom (DOF) we examine how the geometry can be moved in an active sketch. We can remove displayed DOF and lock the sketch, by adding sketch and dimensions constraints.

In this video we are taking a very simple example to explain all the concept.

  1. Create a new part file with an English Template.
  2. First of all we will start a new 2D sketch.
  3. Project the X and Y axis in the active sketch and convert them into construction geometry.
  4. Draw a rectangle free hand in the design window.
  5. Activate Show All Degrees of Freedom command.
  6. Currently the software denotes degrees of freedom of the sketch with red marks and mentions that 4 dimension are needed to fully constrain the sketch.
  7. Next we will apply some sketch and dimension constraints to fully constraint the sketch as well as lock its movement.
  8. As we apply the constraints and dimension the red marks will disappear in relation with it, which will result a lock in its moment also.
  9. Now you can see there is no red marks of DOF and the sketch is fully constrain

Note:-

The video has a little caption assistance, but I have given sufficient amount of pause over the tool and their tip, so that they can be read easily. In addition this, annotations are also applied over important places…. so please focus on them to understand what is being done and how….

...................................................

Visit the following link to watch basic tutorial on Autodesk Inventor by us

https://www.youtube.com/playlist?list=PLb-IhKRMYSERYpB48aY-sZ10fN6CfXIL4

.........................................................................

To watch detailed tutorials on the same software visit the following link

https://www.youtube.com/playlist?list=PL74BDF7431ED13443

..........................................................................................

Sunday, January 19, 2014

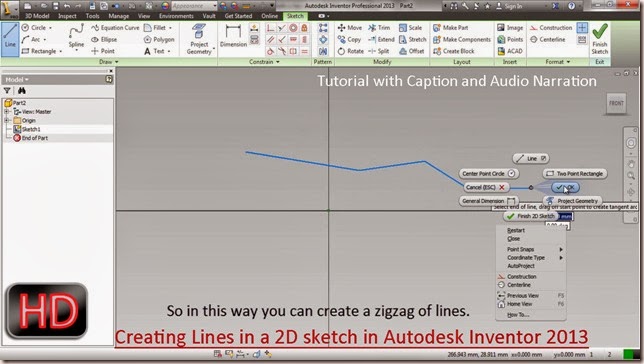
Creating Lines in a 2D sketch in Autodesk Inventor 2013

Creating Lines in a 2D sketch (Autodesk Inventor 2013)

Video Tutorial with caption and audio narration


Transcription of Video

  1. Open a new standard (mm).ipt file from the scratch.
  2. To start a new sketch, click Create 2D Sketch icon present on the sketch panel of 3D Model Tab.
  3. Select any of the work plane to start the sketching.
  4. Select Front in view cube to adjust the design window.
  5. If your design window looks different change the settings of your software in following way.
  6. Click the Tools Tab and activate the Application Option Tool.
  7. General Tab is displayed by default.
  8. Now click the Sketch Tab.
  9. Make sure the settings of your software should be same as displayed here.
  10. Applying the setting and close the dialogue box.
  11. Now activate the sketch Tab to display the sketching tools.
  12. Line tool is located in Draw Panel of Sketch Tab.
  13. Click on its Icon to activate the tool.
  14. Click anywhere in design window to place a start point of the line and then click again to place the end point of the line.
  15. So in this way you can create a zigzag of lines.
  16. To draw a defined length of line you can take the help of heads up display.
  17. If heads up display is not enabled in your software you can turn it on from the Application option.
  18. You can control the settings of heads up display by clicking its setting tab.
  19. By the heads up display you can define a point’s X and Y location.
  20. You can also define the length and angle of a line.
  21. A dimension will be automatically applied when a dimension is filled.
  22. You can activate line tool even by marking menu.
  23. Click Tab key on your keyboard and fill 0 in the X input box. Click tab key again to switch to Y tab and fill the value 50.
  24. Click Enter key to place the start of line.
  25. Use tab key of your keyboard to switch between heads up input box and use enter key to place the points in the design window.
  26. With the help of Line Tool, you can even create Tangent Arcs.