Showing posts with label Extrude Cut. Show all posts

Friday, March 24, 2017

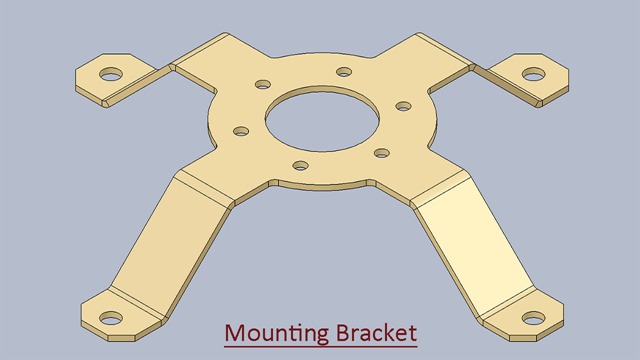
Mounting Bracket || SolidWorks Sheet Metal Tutorial

Mounting Bracket (1280x720)

This tutorial displays the modelling process of a model named 'Mounting Bracket' which is created by using Sheet Metal functionality of SolidWorks software.

The tutorial will give an intermediate level user of the software a good practice of following software tools:--

  1. Basic 2D sketching
  2. Base Flange/Tab
  3. Sketched Bend
  4. Edge Flange
  5. Break Corner
  6. Extrude Cut
  7. Simple Hole
  8. Circular Pattern
  9. Mirror
  10. Flat Pattern

The highlight of the tutorial is that we will apply different tools to create similar looking four legs of the model. Viewers may find this way of modelling process a bit tedious but it is deliberately done so that software users may know and learn about the application of different software tools.

To understand the video easily, focus over places where we have paused our mouse. This is done so as the viewers can easily read the tooltips generated by the software and understand what is being done and why.


download-Link


Visit the following link to get the model file…

http://bit.ly/31XO4D4


....................................................................................

Visit the following link to watch more sheet metal tutorials on SolidWorks by us

https://www.youtube.com/playlist?list=PLKWX3xUP3pPrJYXXG2_K2IlquWkPc59lf

....................................................................................

Visit the following link to watch basic tutorial on SolidWorks by us

https://www.youtube.com/playlist?list=PLb-IhKRMYSES3Zw3QHmQVqQ-rcFVzgYHy

.........................................................................

To watch more detailed tutorials on the same software visit the following link

https://www.youtube.com/playlist?list=PLKWX3xUP3pPo77gFCyy669sI76qJa5jKw

...................................................................................

Hope all of you enjoyed the tutorial. If you find the video useful please like it and share it with your friends/colleagues and do not forget to subscribe us to get latest updates about our new uploads.

http://www.youtube.com/user/nisheethsorjm?sub_confirmation=1

....................................................................................................
Wednesday, July 29, 2015

Creo Parametric Basic Tutorial || Revolve and Pattern

mhousing-YouTube Icon

In this tutorial, we will learn about the Revolve and Pattern Feature of Creo Parametric by developing a solid named ‘mhousing’.
Revolve Feature is used when we want to create a solid by revolving a closed sketch profile through a specified angle and along an axis.
Pattern Feature is used when we want to replicate a feature. This can be one or two-dimensional array of that feature.
In this tutorial addition to these tools, the general part modelling process of creating Basic Sketches, Shell Tool, Extrude Tool with cut operation etc. are also displayed.


Transcription of Video

  1. First we will define the Working Directory.
  2. Create a new part file utilizing the metric template and give it the name ‘mhousing’.
  3. Clear the screen by closing the visibility of Axis, Points, Spin centre, etc.
  4. Create a new sketch over ‘Front Datum Plane’.
  5. Orient the sketching plane parallel to the screen by clicking Sketch View icon.
  6. Activate the line tool and draw the sketch as displayed.
  7. Change the dimension values as displayed.
  8. Now draw a Rectangle.
  9. Convert these lines into construction geometry.
  10. Complete the sketch by adding some more lines.
  11. Apply the dimensions as displayed.
  12. Delete this automatic applied constrain to specify new dimension.
  13. Add a Centerline in the sketch.
  14. The sketch is complete so exit from the sketching mode.
  15. Activate the Revolve Tool.
  16. From the Placement Tab define the sketch.
  17. You can see the software has automatic selected Internal Centerline as Axis.
  18. Click green check mark to execute the command.
  19. Change the colour of the model as per your wish.
  20. Save the file.
  21. Activate Round Tool.
  22. Specify the radius for the ‘Round’.
  23. Select this edge of the model to apply the round.
  24. Activate the ‘Shell’ Tool.
  25. Specify the thickness of the model.
  26. Switch to Reference Tab and define the faces to be removed.
  27. Click green check mark to execute the command.
  28. Activate section along X direction.
  29. Now you can examine the internal view of the model.
  30. Deactivate the section view.
  31. Again create a new sketch over ‘Front Datum Plane’.
  32. Set the display of the model in ‘Hidden Line Display’.
  33. Draw the sketch as displayed.
  34. Activate the Extrude Tool.
  35. Select the sketch and activate remove material option.
  36. Click green check mark to execute the command.
  37. Select the Extrude Feature form the Model Tree and activate Pattern Tool.
  38. Select direction as type of the Pattern.
  39. Select Axis to define the direction reference.
  40. Fill the number of the members to be patterned.
  41. Enter the spacing between the patterned members.
  42. Click green check mark to execute the command.
  43. Select the previously created Pattern Feature from the Model Tree and again activate Pattern Tool.
  44. Select axis as type of the Pattern.
  45. Next define the axis.
  46. Number of the members to be patterned and angle between them has already filled so click the green check mark to execute the command.
  47. The model is complete so save the file and delete all the old version files that were saved on your hardware.

download-Link


Click the following link to get the model file: -http://bit.ly/2nkTKsn

Friday, July 17, 2015

Creo Parametric Basic Tutorial || Revolve and Sweep Feature

Creo Parametric Basic Tutorial -Revolve and Sweep Feature

In this tutorial, we would learn about the Revolve and Sweep Feature of Creo Parametric by developing a solid named ‘Candle Stick’.
Revolve Feature is used when we want to create a solid by revolving a closed sketch profile through a specified angle and along an axis.
Sweep Feature is used when we want to create a solid using a closed sketch profile and a path. First, the path or trajectory is created then the sketch profile.
In this tutorial addition to these tools general part modelling process of creating basic sketches, Extruded cut at an angle etc. are also displayed.


Transcription of Video

  1. Create a new part file utilizing the metric template and give it a name ‘Candle Stick’.
  2. Create a new sketch over ‘Front Datum Plane’.
  3. Clear the screen by closing the visibility of Datum Planes, Axis, Points, Spin centre, etc.
  4. Orient the sketching plane parallel to the screen by clicking Sketch View icon.
  5. Activate the line tool and draw the sketch as displayed.
  6. Change the dimension values as displayed.
  7. Again start creating sketch using the line and 3-Point/Tangent End tool.
  8. While sketch is being created the constraints are applied automatically.
  9. Apply the dimensions as displayed.
  10. The sketch is complete so exit from the sketching mode.
  11. Activate the Revolve Tool.
  12. In the placement Tab first define the sketch profile and then the Axis.
  13. Angle for the revolve is automatic filled 360°.
  14. Click green check mark to execute the command.
  15. Change the colour of the model as per your wish.
  16. Save the file.
  17. Again create a new sketch over ‘Front Datum Plane’.
  18. Draw the sketch as displayed.
  19. Activate the Sweep tool.
  20. Define the visible sketch as trajectory for the sweep.
  21. Click this icon to activate internal sketcher for creating the sweep cross section.
  22. Draw an ellipse at the end of trajectory and apply the dimensions as displayed.
  23. Click Ok to return to the Sweep tab.
  24. The preview of the feature is visible so click ok to execute the command.
  25. Create a sketch over top face of the model.
  26. Activate Extrude Command.
  27. Select remove material option.
  28. First select the sketch and then define the depth of the cut.
  29. Add a taper angle for the cut from the option tab.
  30. Click green check mark to execute the command.
  31. The model is complete so save the file and delete all the old version files that were saved on your hardware.

download-Link

Click the following link to get the model file: -http://bit.ly/2mvK1Pv