Showing posts with label Invetor tutorial. Show all posts

Wednesday, July 15, 2015

Autodesk Inventor Sheet Metal Tutorial || Contour Roll Tool

Contour Roll Tool

In this tutorial we are going to discuss about the Contour Roll Tool in detail. This tool is used when we want to create a sheet by revolving a profile consisting of lines arcs, splines or elliptical arcs around an axis.

..............................................................................
Transcription of Video
..............................................................................

  1. Here we have a sketch profile which is drawn previously.
  2. Activate Contour Roll tool from the Create Panel of Sheet Metal Tab.
  3. In the Contour Roll Tool Dialogue Box we can see Profile Selection is active.
  4. There are four different options available in Unroll Method.
  5. Let us first see the Centroid Cylinder option.
  6. First select the profile then Axis of revolution.
  7. Here we can see it is telling what would be Neutral Radius and Unfold / Unrolled Length of sheet.
  8. Click Apply button to create the feature.
  9. Activate Create Flat Pattern Tool and check out the extents of the sheets.
  10. The Length mentioned here is the same as it was in the Contour Roll dialogue Box.
  11. Let’s see the another option Custom Cylinder.
  12. Here we have to define Neutral Axis in addition to profile and Axis of revolution.
  13. Here it states that the Unrolled length would be 78.54 mm.
  14. Again check the Unfolded sheet to find the difference.
  15. The next option is the developed length or Unrolled Length…
  16. Here we will fill the same 78.54 length that we got in the Custom Cylinder unroll method.
  17. After defining the Profile and Axis we get the same 50 mm radius of Neutral Axis that is mentioned in our sketch.
  18. In the last method we will only define Neutral Radius along with Profile and Axis.
  19. Here we can see the Unroll Length will be 78.54 if we defining the Neutral Radius to 50mm.

Visit the following link to find some of our popular tutorials on Autodesk Inventor’s Sheet Metal functionality………   http://bit.ly/1JPIa9l

The file shown in the video is taken from the Book ‘Mastering Autodesk Inventor’.

Thursday, April 10, 2014

Chassis for Constant Voltage Transformer by Sheet Metal (Autodesk Inventor 2013)

Chassis for Constant Voltage Transformer by Sheet Metal

Serial No. 190

Chassis for Constant Voltage Transformer by Sheet Metal (Autodesk Inventor 2013)

Inside this video, viewers will watch full detailed process of creating this model through Autodesk Inventor Software's Sheet Metal design functionality.

download-Link 

Click the following link to get the model file: - http://bit.ly/2nD4jH4

Thursday, March 27, 2014

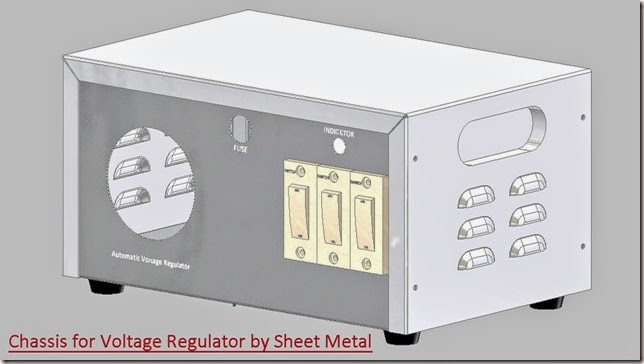
Chassis for Automatic Voltage Regulator by Sheet Metal (Autodesk Inventor 2013)

Chassis for Automatic Voltage Regulator by Sheet Metal _1

Chassis for Automatic Voltage Regulator by Sheet Metal _2

Serial No. 189

Chassis for Automatic Voltage Regulator by Sheet Metal (Autodesk Inventor 2013)

Inside this video, viewers will watch full detailed process of creating this model through Autodesk Inventor Software's Sheet Metal design functionality .

download-Link 

Click the following link to get the model file: - http://bit.ly/2omQj4E

Monday, March 24, 2014

Circular Tub through Sheet Metal-Autodesk Inventor 2013 (with caption and audio narration)

Circular Tub through Sheet Metal

Serial No. 188

Circular Tub through Sheet Metal-Autodesk Inventor 2013 (with caption and audio narration)

Inside this video, viewers will watch the full detailed process of creating this model through Autodesk Inventor Software's Sheet Metal design functionality.

download-Link 


Click the following link to get the model file: - http://bit.ly/2nJu6gA


Transcription of Video

  1. Create a new sheet metal part file with an English template.
  2. Go to Setup panel and activate Sheet Metal Defaults.
  3. Specify the thickness of the sheet manually and end the command.
  4. Create a new sketch over the XY plane.
  5. Take the project of Y Axis and convert this projected line into centreline.
  6. Draw a sketch along with dimensions by utilizing Line tool.
  7. Use constrains to position the geometry and fully constrain the sketch.
  8. The required sketch is complete, hence finish the sketch.
  9. Go to Create panel and activate Contour Roll tool.
  10. Profile geometry and rotation axis are automatically selected.
  11. Offset the material thickness to the other side of the selected profile.
  12. Fill up the Rolled Angle.
  13. Activate sweep the Contour Roll both side equally option.
  14. Terminate the command.
  15. Save the part file with the default name.
  16. Change the colour of the model to Flaked Reflective-Being.
  17. Activate Cross Section Analysis Tool to get the information about the interior of the part.
  18. This view provides a cutaway view of the part along XY plane.
  19. Now deactivate the command from the Browser Bar.
  20. Go to Flat Patten panel and activate Create Flat Pattern tool.
  21. Check the bend sequence of the part by activating the Bend Order Annotation command.
  22. Return back to folded Sheet Metal part.
  23. Save and close the file.
  24. Create a new assembly file with an English template.
  25. Place the previously created sheet metal part in the assembly.
  26. Save the assembly with the name ‘Circular Tub through Sheet Metal’.
  27. Create a new sheet metal part in the assembly using English template.
  28. Define XY Plane of the Assembly as the sketch plane for the base feature.
  29. Specify the thickness of the sheet by activating Sheet Metal Defaults command.
  30. Start a new sketch over the XY plane of the part.
  31. Take the project of Part 1 by using Project Cut edges command.
  32. Activate Project Geometry tool and take the project of Y axis.
  33. Convert all the projected lines into Construction Geometry.
  34. Finish the sketch and return back to assembly.
  35. Switch to View tab—Appearance panel and activate Half Section View along the XY plane of the assembly.
  36. Again edit the Part 2 and activate the previously created Sketch 1.
  37. Draw a sketch along with dimensions as displayed.
  38. The required sketch is complete so finish the sketch.
  39. Activate the Contour Roll tool.
  40. Profile geometry is automatically selected so define Y axis as axis of rotation.
  41. Offset the material thickness to both side of the selected profile.
  42. Activate sweep the contour roll both side equally option.
  43. The last applied Rolled Angle is filled up automatically.
  44. Execute the command.
  45. Change the colour of the part to Maple - Solid Natural Medium Gloss.
  46. Save the part file and return to assembly.
  47. In the assembly Half Section View is active, take a closer look of the assembly to get the information about the interior of the model.
  48. Switch to View tab and end the Half Section View command.
  49. Select the Part 2 in the browser bar and open it separately.
  50. Check the Flat Pattern of the model as well as Bend Order sequence.
  51. Close the part and return to assembly.
  52. At present there are degrees of freedom in the assembly.
  53. Apply a Mate constraint between Y Axis of Assembly and Y Axis of Part 2.
  54. Activate Flush Mate and click ‘Predict Offset and Orientation’ option.
  55. Select top face of Part 1 and top face of Part 2 and apply the flush mate.
  56. Now there is no degree of freedom left in the assembly.
  57. Switch to Inspect Tab and Analyze interface between the assembly parts.
  58. There were no interfaces detected.
  59. Save the file.

Friday, February 21, 2014

Tub-Rectangular through Sheet Metal-Autodesk Inventor 2013 (with caption and audio narration)

Tub-Rectangular through Sheet Metal

Serial No. 186

Tub-Rectangular through Sheet Metal-Autodesk Inventor 2013 (with caption and audio narration)

In this  video we will create a rectangular tub using sheet metal features (Face tool and Flange tool).


download-Link 


Click the following link to get the model file: - http://bit.ly/2ofTr23


 Transcription of Video

  1. Create a new Sheet Metal (in).ipt part file.
  2. Go on the ribbon > Setup panel > click Sheet Metal Defaults icon.
  3. The Sheet Metal Defaults dialogue box will be opened in the graphics window.
  4. Uncheck the ‘Use Thickness from Rule’ option to specify the thickness value 1/16 inch manually.
  5. Create a new sketch on the XY Plane.
  6. Draw a rectangle of dimension 32 ¼ inch x 27 inch with the help of ‘Three Point Centre Rectangle’ tool.
  7. Exit from the sketching environment.
  8. Activate the ‘Face’ tool from the marking menu.
  9. The sketch profile will be automatically selected.
  10. Click OK to apply face feature.
  11. Save the file with the name 'Tub (Rectangular)'.
  12. Change the colour of the model to ‘Flaked Reflective – Beige’.
  13. Activate the ‘Flange’ tool from the marking menu.
  14. On the Shape tab, click the ‘Loop Select Mode’ and click the bottom edge of the part.
  15. A preview of flange is visible in the graphics window.
  16. Click the Flip Direction button in the Height Extents field.
  17. And set the height extents value to 6 3/16 inch.
  18. Click OK to create the new flanges.
  19. Activate the ‘Flange’ tool once again.
  20. And select the four outer edges of the part.
  21. Fill the value 1 1/16 inch in the height extents field.
  22. Switch to the Corner tab, ‘Apply Auto-Mitering’ option is checked by default.
  23. Uncheck the Auto Mitering option to see the effect.
  24. Click OK to create the new flanges.
  25. Go on the ribbon > Flat Pattern panel > click Create Flat Pattern icon to generate the flat pattern of the model.
  26. Double-click the ‘Folded Model icon at the top of the Model browser to return to the folded model.