Showing posts with label Flange tool. Show all posts

Friday, August 21, 2015

Creo Parametric Basic Tutorial || Sheet Metal

YouTube Icon-Cover_1

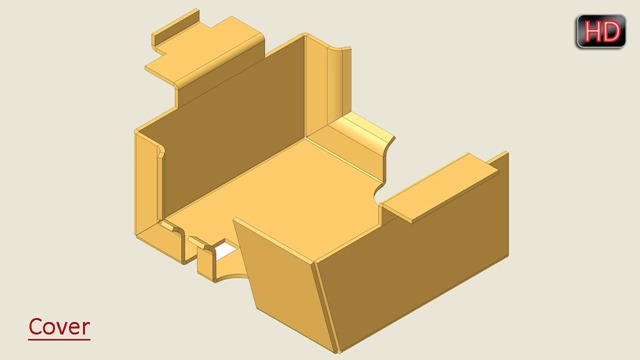
In this tutorial we will learn about the basic techniques related to ‘Sheet Metal’ functionality of ‘Creo Parametric’ by modelling a Cover.
In creation process of this model we will start our work by creating some basic sketches utilising the constrains and dimensions.
Next we will use Extrude Tool to create our first feature and use the same to remove some material form the model. Later we will use Flange Tool and take the help of ‘Mirror Tool’ to duplicate the Extrude Cut and Flange feature to the other side of the sheet. Then we will create another Flange that will also be mirrored to the other side as well. A Flat feature will be added next that will be bend along a line. Moving ahead we will unbend a previously created flange to remove some material form the model and then it would be bend back. Again a Flat feature at an angle of 75° will be created… Now we will create a corner between both the visible walls by using the Extend Tool along with a gap of 0.1 mm. So at the last we will create the Flat Pattern of the model. Next to place the flat pattern and solid model of the part in the drawing sheet we will use Family Table.
Next we will create a drawing file and put the Flat Pattern part in it along with Bend Lines… and export the drawing sheet to a PDF file…


Transcription of Video

  1. Start a new Sheet Metal Part file with the metric template and give it a name ‘Cover’.
  2. Select the Front Datum plane and create a new sketch on this plane.
  3. Draw the sketch using the line tool with the provided dimensions.
  4. Apply constrains time to time to full define the sketch.
  5. The sketch is complete so exit form sketching mode.
  6. Activate the Extrude Tool and specify the thickness of sheet along with extrude length.
  7. Change the material thickness direction and provide the bend radius.
  8. Click green checkmark to execute the command.
  9. Change the colour of the model as per your wish and save your work.
  10. Again activate the Extrude Tool to remove material form the sheet.
  11. This time activate internal sketcher to draw the sketch profile as displayed.
  12. First add some new references to create sketch.
  13. Click green checkmark to execute the command.
  14. Now activate the Flange Tool and select the user defined shape in the profile type option.
  15. Select these edges to specify on which edges new flanges will be created.
  16. Switch to Shape Tab and activate the internal sketcher to draw a shape for the flange.
  17. The sketch is complete so finish it and return back to the flange dialogue box…
  18. Set the Bend Relief type to Rectangular.
  19. Specify the Bend Radius which is by default inside of the thickness.
  20. In the Miter Cut details fill gap and offset values as displayed.
  21. Click green check mark to execute the command.
  22. Select Extrude and Flange Feature from the Model Tree and activate Mirror Tool.
  23. Select Front plane as mirroring plane and click OK.
  24. Now it is asking for new placement edges for the mirrored flanges so define it as shown.
  25. Click green checkmark to execute the command.
  26. Again we will create a new flange on the basis of user defined sketch…
  27. This time we will create the profile of the flange over the front plane.
  28. We do not need the flange, to go through all the way along the edge, so drag these nodes and specify the length from the front plane.
  29. All the other settings should be defined as done in the previous Flange creation.
  30. Now we will mirror this flange to the other side of the wall as done earlier.
  31. Activate the flat the Flat Tool.
  32. Fill the angle for the Flat and define the edge on which the feature is to be created.
  33. Define the length and width of the feature and here also, we do not need the feature to go all along the way, with edge so it should be changed by dragging the node.
  34. Click green check mark to execute the command.
  35. Activate Bend Tool.
  36. First define Bend surface from the Placement Tab.
  37. Draw a bend line by activating an internal sketcher.
  38. Fill the bend angle and side of the bend along with its radius.
  39. Click green check mark to execute the command.
  40. Activate Unbend Tool.
  41. Select Reference type as manual.
  42. Clear the Bend Geometries that are selected automatically and select only one bend.
  43. Click ok to execute the command.
  44. Now activate the Extrude Tool and cut the material from the unbended part.
  45. Ok now we will Bend Back this the flange…..
  46. Next we will create a Flat Feature at an angle of 75°.
  47. Hide the visibility of default Planes.
  48. Activate the Plane Tool and select the following face of the model to create a new plane at an offset distance of 0.1 mm.
  49. Repeat the same steps to create another plane.
  50. Press ALT key on your keyboard and select the following edge of the model.
  51. Activate Extend Tool and select Extend the wall to intersect the reference plane option.
  52. Next specify the reference plane and execute the command.
  53. In the same manner extend the other wall also…
  54. You can see a corner with a gap of 0.1 mm has been created between the two walls.
  55. The preview of flat pattern can be seen at this stage.
  56. Next we will actually create Flat Pattern of the model.
  57. From the Model Tree Setting open Tree Filters.
  58. In Tree Filters Items, turn on the display of Supressed Objects.
  59. From the Model Tree supress the Flat Pattern feature to bring back the folded part in front of us.
  60. Now activate the Family Table tool.
  61. Add the supressed Flat Pattern feature in the Family Table column.
  62. Insert another row where we put unsuppressed Flat Pattern feature which is defined by letter (Y).
  63. Next create a new drawing file.
  64. When select instance dialogue box appears select ‘The generic’ part to place sheet metal general part.
  65. Activate General View command and click anywhere on the screen to place the part.
  66. Orientation of the model is already set to default so now scale the size of model in the drawing sheet.
  67. Set the Display style of the model to Shaded with edges and click ok button.
  68. Unlock view movement and drag the view of the model to upper right part of the sheet.
  69. Press Drawing Models button and select Add Model from the Menu manger to place another instance of the model.
  70. In the Select Instance Dialogue Box click COVER_FLAT instance to place Flat Pattern of the model.
  71. Again repeat the same steps to place the second General View of the model.
  72. Only different setting this time is that we will place the Top view of the model, Display style be No Hidden, Tangent edges will be supressed and scale of the model will be 0.65 percent.
  73. We will remove some unnecessary dimensions.
  74. Click Model Annotations button and place bend lines in the sheet by placing the model datums and notes.
  75. Next we will clean some unnecessary lines and move the Bend Line notes to make it more descriptive.
  76. Our sheet is complete so we will save it and export it to a PDF file.

download-Link


Click the following link to get the model file: -http://bit.ly/2o9dejW
Sunday, June 29, 2014

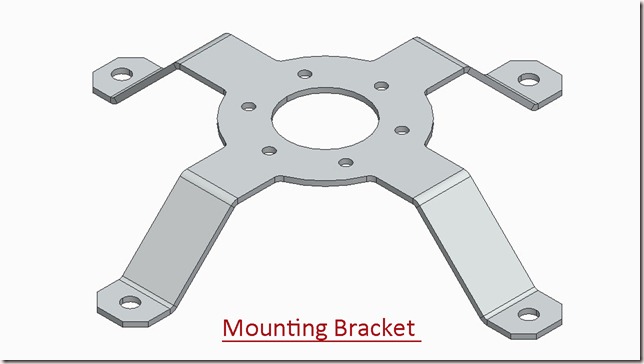
Mounting Bracket || Creo Parametric 2.0 Sheet Metal Tutorial

Mounting Bracket Image

In this tutorial I will create a Mounting Bracket by utilizing Sheet Metal capabilities of Creo Parametric 2.0

Mounting Bracket-3 - Copy

First of all base feature will be created using Planar Tool, afterward similar looking legs will be created using various tools like Extrude, Flange,Flat,Bend etc. Usage of Hole, Chamfer Round along with Flat Pattern Tool is also displayed.


Transcription of Video

  1. Start a new Sheet Metal Part file from scratch with the default template and give it a name ‘Mounting Bracket’.

  2. Select the Top Datum plane and create a new sketch on this plane.

  3. Click the Sketch View icon to orient the sketching plane parallel to the screen.

  4. Activate the Circle Tool and draw the sketch with the dimensions as displayed.

  5. Convert this circle into construction geometry.

  6. Create a line in the sketch and duplicate it to the other side, using a centerline with the aid of Mirror Tool.

  7. Draw a new line and repeat the previous process for this line also.

  8. Create arcs between these lines by picking its centre and ends.

  9. Duplicate these arcs to other side using the Mirror Tool.

  10. Exit the sketch and activate Planar Tool.

  11. Fill the thickness of the sheet and execute the command after selecting the sketch.

  12. Change the colour of the model as per your wish.

  13. Create a sketch over Front Datum Plane.

  14. First specify new references, with which new sketch will be constrained and dimensioned.

  15. Draw the sketch using the Line Tool as displayed.

  16. Exit the sketch and activate the Extrude Tool.

  17. Select the sketch and activate Extrude both side of sketch plane equally option.

  18. Fill the extrusion depth.

  19. From the option tab activate add bends on sharp edges command, which would be equal to thickness of the sheet.

  20. Execute the command.

  21. Activate Flange Tool.

  22. Select an edge to attach the wall and then fill the length and angle of the wall.

  23. In the similar way add two more flanges.

  24. Activate the Flat Tool and first specify placement edge.

  25. Execute the command after defining the angle and length of the flat.

  26. Start a new sketch over top face of the model and draw a sketch similar to this one.

  27. First specify new references and use Line to draw the sketch at the defined position.

  28. Activate Bend Tool.

  29. First define the bend line and then fill the bend angle.

  30. Execute the command.

  31. Again repeat the same process to perform another bend operation.

  32. Hide the visibility of sketch3.

  33. Select the leg created with the extrude tool in the model tree and activate Pattern tool.

  34. Open the visibility of Coordinate System.

  35. Set Axis as the type of pattern.

  36. Select Y axis of Coordinate System as axis of rotation.

  37. Enter the number of members to be patterned.

  38. Leave the default 90° Angle between the pattern members unchanged and execute the command.

  39. Save the file.

  40. Apply a Chamfer of 0.125 inch on the each of the legs.

  41. Activate the round tool and apply fillet of .06 inch on these edges of the model.

  42. Create a sketch on the top face of the model and draw a circle on this leg with the defined dimensions.

  43. Create a hole on the leg using this sketch and extrude tool.

  44. Open the visibility of Coordinate System and using its Y axis pattern the hole 4 times at an angle of 90°.

  45. Create a sketch on the top face of the model and create a point to define the position for the new hole.

  46. Activate the Hole Tool and select the point.

  47. Define the diameter of the hole and execute the command.

  48. Pattern this hole 6 times at an angle of 60°using Y axis of Coordinate System.

  49. The model is complete you can generate the Flat Pattern of the model.

Note:--

You may find holes inappropriate created with pattern tool on the leg, it is because the each leg is created with different feature and their flat pattern length is different. To clear this problem, create the holes no each leg separately.

downloadLink_thumb3


Get the Model file by visiting the following link:-
http://bit.ly/2ogQDSk

Sunday, April 13, 2014

Face tool and Flange tool-Autodesk Inventor 2013 (with caption and audio narration)

Face tool and Flange tool

Serial No. 203

Face tool and Flange tool-Autodesk Inventor 2013 (with caption and audio narration)

download-Link 


Click the following link to get the model file: - http://bit.ly/2mVWsV4


Transcription of Video

Face Tool is used to create sheet metal faces by utilizing a closed sketch profile. It is similar to extrude tool where height is automatically set to the thickness of the sheet. This tool is available on the Create panel of Sheet Metal Tab.

1. Open the Assembly file of ‘Chassis for Constant Voltage Transformer’.

2. In the Browser Bar double click the Part2 file to edit it.

3. A closed sketch profile is previously created in Sketch1 of this file.

4. Go on the ribbon, Create panel > Face tool.

5. The Face dialogue box is visible in the design window.

6. The rectangular profile is automatically selected in the design window.

7. Click the ‘Flip Offset’ button to change the direction of the extrusion.

8. And click OK to create sheet metal face.

Flange Tool is used to add a sheet metal planer face and a bend on an existing sheet metal edge. The depth and the angle of the flange can be specified. This tool is available on the Create panel of Sheet Metal Tab.

1. Rotate the model by using View Cube.

2. Go on the ribbon, Create panel > Flange tool.

3. The Flange dialogue box is visible in the design window.

4. In the Shape tab there are two options for creating a flange, first option is ‘Edge Select Mode’ and the other is ‘Loop Select Mode’.

5. Currently the Edge Select Mode button is active allowing you to select only one edge at a time.

6. Select four inside edges of the sheet one by one.

7. Delete the selections and try next option.

8. Click the ‘Loop Select Mode’ button, so you can select multiple edges at a time.

9. By default, ‘Inside of bend face’ option is selected as the ‘Bend Position’.

10. Change it to ‘Outside of base face’.

11. Fill the value in the Height Extents field.

12. Click OK to create new flange.

Friday, February 21, 2014

Tub-Rectangular through Sheet Metal-Autodesk Inventor 2013 (with caption and audio narration)

Tub-Rectangular through Sheet Metal

Serial No. 186

Tub-Rectangular through Sheet Metal-Autodesk Inventor 2013 (with caption and audio narration)

In this  video we will create a rectangular tub using sheet metal features (Face tool and Flange tool).


download-Link 


Click the following link to get the model file: - http://bit.ly/2ofTr23


 Transcription of Video

  1. Create a new Sheet Metal (in).ipt part file.
  2. Go on the ribbon > Setup panel > click Sheet Metal Defaults icon.
  3. The Sheet Metal Defaults dialogue box will be opened in the graphics window.
  4. Uncheck the ‘Use Thickness from Rule’ option to specify the thickness value 1/16 inch manually.
  5. Create a new sketch on the XY Plane.
  6. Draw a rectangle of dimension 32 ¼ inch x 27 inch with the help of ‘Three Point Centre Rectangle’ tool.
  7. Exit from the sketching environment.
  8. Activate the ‘Face’ tool from the marking menu.
  9. The sketch profile will be automatically selected.
  10. Click OK to apply face feature.
  11. Save the file with the name 'Tub (Rectangular)'.
  12. Change the colour of the model to ‘Flaked Reflective – Beige’.
  13. Activate the ‘Flange’ tool from the marking menu.
  14. On the Shape tab, click the ‘Loop Select Mode’ and click the bottom edge of the part.
  15. A preview of flange is visible in the graphics window.
  16. Click the Flip Direction button in the Height Extents field.
  17. And set the height extents value to 6 3/16 inch.
  18. Click OK to create the new flanges.
  19. Activate the ‘Flange’ tool once again.
  20. And select the four outer edges of the part.
  21. Fill the value 1 1/16 inch in the height extents field.
  22. Switch to the Corner tab, ‘Apply Auto-Mitering’ option is checked by default.
  23. Uncheck the Auto Mitering option to see the effect.
  24. Click OK to create the new flanges.
  25. Go on the ribbon > Flat Pattern panel > click Create Flat Pattern icon to generate the flat pattern of the model.
  26. Double-click the ‘Folded Model icon at the top of the Model browser to return to the folded model.