Showing posts with label Section Views. Show all posts

Friday, March 31, 2017

Solid Edge Beginners Tutorial || Piston

Piston


In this video, viewers will learn basic techniques of the Solid Edge ST9 by creating the head of a ‘Piston’. We will use the ordered modelling approach in creating this part.

While creating this model will learn the following topics/tools of the software:--

  1. Using the interface of the software.
  2. Creating a new part file on the basis of ISO Metric Template.
  3. Creating Basic 2D sketches.
  4. Application of Drawing, Geometric relationship and various Dimension Tools (especially way to apply diameter dimension using Symmetric Diameter tool) of sketching environment.
  5. Extrude Tool.
  6. Changing the colour of part using Part Painter.
  7. Setting up of lightning and saving them as View Style in the software by using View Overrides command.
  8. Creating section Views.
  9. Cut Tool.
  10. Round Tool.
  11. Creating Planes.
  12. Mirror Tool.
  13. Hole Tool.
  14. Revolved Cut Tool.
  15. Pattern Tool.

Addition to this there many more things that can be understood by watching the video.

Note:--
………………..

To understand the video easily, focus over places where we have paused our mouse. This is done so as the viewers can easily read the tooltips generated by the software and understand what is being done and why.

...................................................


download-Link


Visit the following link to get the model file… http://bit.ly/2q5zDiK


...................................................

Visit the following link to watch more tutorial on Solid Edge by us

https://www.youtube.com/playlist?list=PLKWX3xUP3pPq5ijHdni6jXNX445Il3MWJ

..........................................................................................

Hope all of you will enjoyed the tutorial. If you find the video useful please like it and share it with your friends/colleagues and do not forget to subscribe us to get latest updates about our new uploads.

http://www.youtube.com/user/nisheethsorjm?sub_confirmation=1

Wednesday, July 15, 2015

How to create and save section views in Autodesk Inventor

Half Section View

Section View is quite helpful to observe internal view of model and even sometime in sketching… Just take a look of the video and understand how it can be very easily applied.

Friday, June 20, 2014

Modelling a Bolt and Nut in Creo Parametric

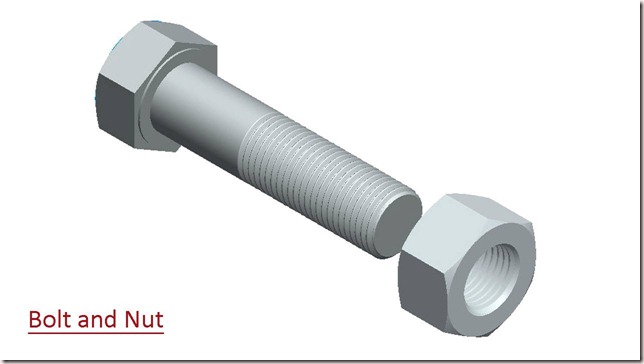
Bolt and Nut

In this tutorial we will create Bolt and Nut by utilizing part modelling and assembly modelling capabilities of Creo Parametric 2.0.

To animate this assembly read a related post. (Animation of ‘Bolt and Nut’ || Using Creo Mechanism)

Viewers will be able to watch application of many part modelling tools like Extrude, Revolve, Helical Sweep, Chamfer, Mirror and Section Views along with 2D sketching techniques and utilization of assembly mates.


Transcription of Video

  1. Create a new part file utilizing the default template and enter the name of the model ‘Bolt’.
  2. Start a new sketch over ‘Right Datum Plane’.
  3. Orient the sketching plane parallel to the screen by clicking Sketch View icon.
  4. Clear the screen by closing the visibility of Datum Planes, Axis, Points, Spin centre, etc.
  5. Activate the Circle tool and draw a circle along with dimension as displayed.
  6. Exit from the sketching mode and switch to Annotate Tab.
  7. Activate Show Annotation Tool and select the sketch.
  8. Applied dimension will be highlighted.
  9. Turn on its visibility by placing a checkmark in the show annotation dialogue box.
  10. Apply and save the changes.
  11. Select the dimension in Model Tree and open its property from the context menu.
  12. Change its display name to ‘D’ and apply changes.
  13. Switch back to Model Tab and activate Switch Symbol Command from the Model Intent Panel.
  14. This will display names of dimension in place of values.
  15. Re-edit the sketch.
  16. Convert this circle into construction geometry.
  17. This dimension sd0 or D will now onwards be used as a reference dimension and almost every new dimension would be relative to this dimension.
  18. Activate the Sketcher Palette and find the 6-Sided Hexagonal shape.
  19. Double click its icon to insert it in the active sketch.
  20. As soon as the 6-Sided Hexagonal shape is inserted in the active sketch the Rotate and Resize tool would be active.
  21. Move the sketch towards the intersection point of reference lines and rotate it 90 ° in an anticlockwise direction.
  22. Add a new dimension on this Hexagon by delegating the conflicting sd1 dimension.
  23. Fill the dimension values as displayed.
  24. The sketch is complete so exit from the sketching mode.
  25. Activate Extrude Tool and select the sketch.
  26. Change the extrude direction and fill the extrusion depth value.
  27. Execute the command.
  28. Save the model file.
  29. Change the colour of the model as per your choice.
  30. Create a new sketch over Left Face of the model.
  31. First specify new references, with which new sketch will be constrained to.
  32. Draw a circle tangent to these reference lines and finish the sketch.
  33. Create a new sketch over Front Datum Plane.
  34. Take the project of circle drawn on last sketch.
  35. Specify new references and draw the sketch as displayed.
  36. Delete the unnecessary lines and apply the dimensions as required.
  37. Finish the sketch and hide the visibility of sketch 2.
  38. Activate the Revolve tool and select the sketch.
  39. Now select the X axis of coordinate system to define the axis of rotation.
  40. Specify remove material option and execute the command.
  41. Start a new sketch on the Right face of the model and take the project of the circle drawn on sketch 2.
  42. Delete the projected sketch but you can see its reference is still present there that would be used to dimension new circle.
  43. Create a circle and add the dimension as displayed.
  44. Finish the sketch and activate the Extrude Tool.
  45. Select the sketch, then enter the depth value of extrude and execute the command.
  46. Start a new sketch on this face of the model and draw a circle with the dimensions as displayed.
  47. Extrude this sketch with a depth value of 2 inch.
  48. Activate Edge Chamfer Tool and set the dimension scheme to angle and distance.
  49. Fill the values in the input boxes, select the edge and execute the command.
  50. Switch to view tab and activate section along Z direction.
  51. Open the file named unf_external_thread_profile.
  52. Here you can see a sketch profile is drawn. The pitch of the profile is 1/20 inches which governs all the other dimensions by some relations.
  53. Copy the sketch present in the file and return to the previous file.
  54. Activate the Helical Sweep tool.
  55. Now define the Sweep profile for the Helical Sweep.
  56. Draw a sketch over Right Datum plane.
  57. Define the new references and draw a Center Line.
  58. Draw a line, the length of this line would be length of the thread.
  59. Exit the sketch.
  60. The tool has not selected the internal Center Line as axis of revolution so manually select X axis of coordinate system to define the axis of revolution.
  61. Activate internal sketcher to create the sweep section or profile.
  62. Place a Geometric point on the intersection of reference lines and lock it.
  63. Now paste the thread profile that was copied earlier and which is still in the Windows Clipboard.
  64. As soon as you paste the sketch the move tool will activate.
  65. In the scale field fill the value 1 and rotate the profile -90°.
  66. Move the profile near to the geometry point and click Ok.
  67. Make some minor correction in the profile, because in pasting it some constraints have gone missing.
  68. Add more constraints and lock the dimensions.
  69. Apply some more dimensions to move the sketch at the required position and exit from the sketch.
  70. Specify the pitch value as displayed.
  71. Activate the remove material option and execute the command.
  72. Supress the section view.
  73. Save the file.
  74. If you change the dimension sd0 or D in the sketch1, the model will change accordingly.
  75. Create an axis parallel to the X axis of coordinate system.
  76. Save and close the file.
  77. Start a new part file and give it the name ‘Nut’.
  78. Start a new sketch over ‘Right Datum Plane’.
  79. Create a circle and apply the dimensions as displayed.
  80. Exit from the sketching mode and switch to Annotate Tab.
  81. Activate Show Annotation Tool and select the sketch.
  82. Applied dimension will be highlighted.
  83. Turn on its visibility.
  84. Open the property of the dimension and change its display name as ‘D’.
  85. Display the names of dimension in place of values, by activating Switch Symbol Command.
  86. Re-edit the sketch.
  87. Convert this circle into construction geometry.
  88. Activate the Sketcher Palette and place the 6-Sided Hexagonal shape in the sketch.
  89. Rotate and Resize tool is active so move the sketch towards the intersection point of reference lines and rotate it 90 ° in an anticlockwise direction.
  90. Add a new dimension on this Hexagon by delegating the conflicting sd1 dimension.
  91. Exit the sketch and save the file.
  92. Activate the Extrude tool and select the sketch profile.
  93. Select Extrude both side of the sketch profile option.
  94. Fill the extrusion depth value and execute the command.
  95. Change the colour of the model as per your choice.
  96. Create a new sketch over this face of the model.
  97. Specify new references and draw a circle tangent to it.
  98. Draw a line and exit from the sketching mode.
  99. Create a new sketch over Front Datum Plane.
  100. Take the project of sketches drawn previously.
  101. Add a one more reference and draw more lines.
  102. Apply the dimensions and exit the sketch.
  103. Activate the Revolve tool and select the sketch.
  104. Define the axis of rotation by selecting X axis of coordinate system.
  105. Select remove material option and execute the command.
  106. Select Revolve feature in the Model Tree and activate Mirror tool.
  107. Define the Right Datum plane as mirroring plane and execute the command.
  108. Activate Hole tool and define the placement face.
  109. Set the Offset reference for the hole.
  110. Activate Standard Hole option and define the parameters of the hole.
  111. Execute the command.
  112. Activate Edge Chamfer Tool and set the dimension scheme to angle and distance.
  113. Select the edge and execute the command.
  114. Activate section along Z direction.
  115. Open the file named unf_internal_thread_profile.
  116. Here you can see a sketch profile is drawn. The pitch of the profile is 1/20 inches which governs all the other dimensions by some relations.
  117. Copy the sketch present in the file and return to the previous file.
  118. Activate the Helical Sweep tool.
  119. Now define the Sweep profile for the Helical Sweep.
  120. Now define the Sweep profile for the Helical Sweep.
  121. Draw a sketch over Right Datum plane.
  122. Define the new references and draw a line over it.
  123. Add a Center Line in the sketch and exit form the sketching mode.
  124. Specify the pitch value as displayed.
  125. Activate internal sketcher to create the sweep section or profile.
  126. Place a Geometric point on the intersection of reference lines and lock it.
  127. Now paste the thread profile that was copied earlier and which is still in the Windows Clipboard.
  128. As soon as you paste the sketch the move tool will activate.
  129. In the scale field fill the value 1 and rotate the profile 90°.
  130. Move the profile near to the geometry point and click Ok.
  131. Lock dimensions and apply some constraints to move the sketch at the required position and exit for the sketch.
  132. Convert some lines into construction geometry, add a line to close the open sketch profile and exit from the sketch.
  133. Activate the remove material option and execute the command.
  134. Supress the section view.
  135. Create an axis parallel to the X axis of coordinate system.
  136. Save the file and close it.
  137. Create a new assembly file with the name Bolt and Nut.
  138. Place the Bolt part in the assembly.
  139. Set the assembly constraint type to Default.
  140. Click green check mark to complete the placement of part.
  141. Place the Nut part in the assembly.
  142. Set the selection type to Axis.
  143. Select the Axis of Bolt and Nut a Coincident Constraint will be applied automatically.
  144. Change the selection type to All.
  145. Drag the Nut part away and select the faces of Bolt and Nut, a Distance assembly constraint would be applied.
  146. Change the constraint type to Coincident.
  147. Now part is fully constraint.
  148. Click green check mark to complete the placement of part.
  149. Save the file.

download-Link


Get the Model file by visiting the following link:-
http://bit.ly/2m39aRl