Showing posts with label Shell Tool. Show all posts

Thursday, March 17, 2016

Pipe Fittings || Creo Parametric Tutorial

Pipe Fittings (1280x720)

In this Creo Parametric tutorial, we will create the models of Pipe Fittings named Nipple, Socket, Elbow, Tee and Three Way Elbow.

This tutorial will give the intermediate-level user a good practice of Helical Sweep Tool along with Sweep Tool, Pattern/Geometry Pattern Tool, Extrude Tool, Shell Tool, Chamfer Tool, Mirror Tool, Creating Cross Sections and many 2D sketching techniques. .

download-Link
Visit the following link to find the files required to complete the tutorial along with finished model file:--
http://bit.ly/2N8AxTy

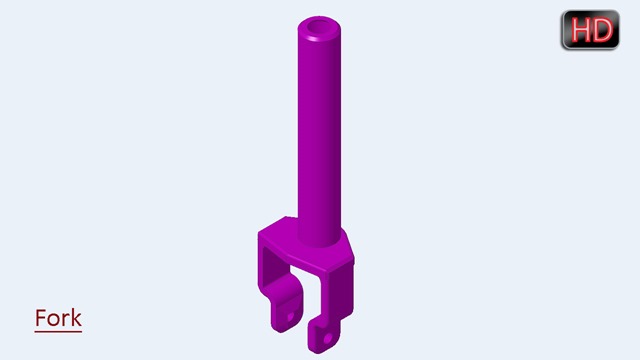
Creo Parametric Beginners Tutorial || Fork

Fork 1280x720

In this Creo Parametric tutorial, we will learn about the basic techniques that will give a beginner quick start-up knowledge of the software by developing a ‘Fork’ model. The model is the part of a Scooter Assembly.

The video demonstrates utilization of Extrude Tool, Shell Tool, Sweep Tool, Boundary Blend Tool, Mirror Tool, Round and Chamfer Tool along with basic 2D sketching.

download-Link


Get the model file by visiting the following link…
http://bit.ly/2Wbt1vl

Friday, April 3, 2015

Magnetized Pin Box (SolidWorks 2014 Tutorial)

Magnetized Pin Box_1

Magnetized Pin Box_2


Serial No. 107

Magnetized Pin Box (SolidWorks 2014 Tutorial)

In this video we will create the model of Magnetized Pin Box. It will be created in assembly modelling environment of SolidWorks. First we will start our work by creating the first part with the help of Extruded Boss/Base, Fillet, Shell, Extruded Cut and Circular Patten Tool. Then an assembly will be created by using the make assembly from part command. Next the second part will be created in the context of the assembly.


download-Link

Click the following link to get the model file: - http://bit.ly/31KsORZ

Thursday, January 23, 2014

Application of ‘Sweep’ tool and ‘Shell’ tool-Autodesk Inventor 2013 (with caption and audio narration)

Application of ‘Sweep’ tool and ‘Shell’ tool

Serial No. 196

Application of ‘Sweep’ tool and ‘Shell’ tool-Autodesk Inventor 2013 (with caption and audio narration)

In this exercise we will create a new part, related to our previously created full-fledged model ‘Elbow’.

In this part file we will create some 2D Sketches, work planes, sweep & shell features.

 download-Link


Click the following link to get the model file: - http://bit.ly/2nPe9Wf


Transcription of Video

  1. Create a New Standard (in).ipt file.
  2. Create a 2D Sketch on the XY Plane.
  3. Draw a line of length 1.1875 inch, coincident with the auto projected part origin and parallel to X axis.
  4. Right click in the graphics window and select ‘Create Line’ tool.
  5. Click the green point in the graphics window as start point of the line.
  6. And enter the value 1.1875 inch.
  7. Right click in the graphics window and click OK to finish the command.
  8. Create another line of length 1.1875 inch, parallel to Y axis and coincident with the origin.
  9. Select these two lines and change the colour to White.
  10. On the Ribbon click ‘Fillet’ icon on the Draw panel of Sketch tab.
  11. 2D Fillet dialogue box is visible in the graphics window.
  12. Enter the value 0.625 inch in the 2D fillet dialogue box.
  13. And select these two lines in the graphics window to apply the fillet.
  14. Right click in the graphics window and click OK to exit the command.
  15. Finish the 2D Sketch.
  16. On the Ribbon click ‘Plane’ icon on the Work Features panel of 3D Model tab.
  17. Click one of the end points of the line and select this line in the graphics window.
  18. Work Plane has been created, perpendicular to this line.
  19. Create a new sketch on this Work Plane.
  20. Draw a Circle of diameter 1 inch on the end point of the line.
  21. Finish the 2D Sketch.
  22. Activate the ‘Sweep’ tool from Create panel of 3D Model tab.
  23. Sweep dialog box is visible in the graphics window.
  24. Since there is only single closed profile, the profile drawn on sketch 2 is selected automatically.
  25. The path selection button is active in the Sweep dialogue box.
  26. Select the ‘Sketch1’ in the graphics window as sweep path.
  27. Click OK to execute the Sweep feature.
  28. Change the model colour to ‘Flaked Reflective – Beige’.
  29. Save the Part file with the name ‘Elbow’.
  30. On the Ribbon click ‘Shell’ tool icon on the Modify panel of 3D Model tab.
  31. Shell dialog box is visible in the graphics window.
  32. ‘Remove Faces’ selection button is activated by default.
  33. Select both blue faces of the Elbow.
  34. Enter the value 0.125 inch in the ‘Thickness’ field.
  35. Click OK to apply the Shell feature.