Serial No. 106
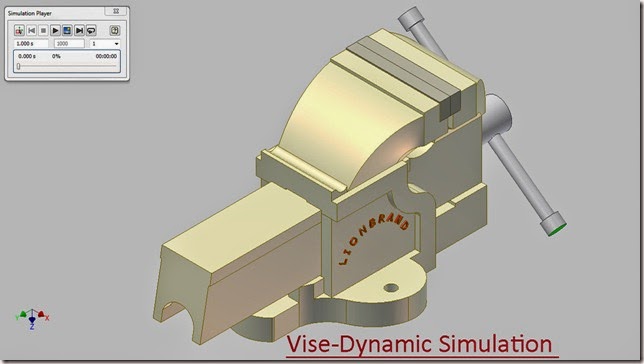
Vise-Dynamic Simulation-Autodesk Inventor 2012 (with caption and audio narration)
In this video, we will demonstrate how to apply the different type of mates in the assembly environment for creating the Dynamic Simulation of the ‘Vise’.
Click the following link to get the model file: - http://bit.ly/2ms77GX
Transcription of Video
Display of Motion in Vise through Dynamic Simulation
Sub Assembly-1:
- Create a New ‘Standard (in).iam’ Assembly and save it with the name ‘Sub Assembly-1’.
- Select Place component from the marking menu and place the ‘Base Housing’ in the Assembly.
- Re-orient the model in the design window by using View Cube.
- Set the current view as Home View by using the toggle next to View Cube.
- Place the ‘Part-1’ in the Assembly.
- Apply a Mate Constraint between the bottom face of Part-1 and inner face of Base Housing.
- Apply another Mate Constraint between YZ plane of Base Housing and YZ Plane of Part-1.
- Apply a Flush Mate between front face of Part-1 and front face of Base Housing.
- Fill the offset value 5.672 inch.
- Place the ‘Jaw Plate’ in the assembly.
- Apply a Mate Constraint between slotted face of Base Housing and back face of Jaw Plate.
- Next apply a Mate Constraint between lower face of slotted face and bottom Face of Jaw Plate.
- Apply a Flush Mate between the side face of Jaw Plate and side face of Base Housing.
- Place two identical ‘Screws’ in the Assembly.
- Fix both the Screws in the holes on Jaw Plate by using the Insert Mate.
- Save the Sub Assembly-1 and close it.
Sub Assembly-2:
- Create a New Assembly and save it with the name ‘Sub Assembly-2’.
- Select Place component from the marking menu and place the ‘Sliding Housing’ in the Assembly.
- Re-orient the model in the design window by using View Cube.
- Set the current view as Home View by using the toggle next to View Cube.
- Place the ‘Jaw Plate’ in the Assembly.
- Apply a Mate Constraint between slotted face of Sliding Housing and back face of Jaw Plate.
- Next apply a Mate Constraint between lower face of slotted face and bottom Face of Jaw Plate.
- Apply a Flush Mate between the side face of Jaw Plate and side face of Sliding Housing.
- Place two identical ‘Screws’ in the Assembly.
- Fix both the Screws in the holes on Jaw Plate by using the Insert Mate.
- Save the Sub Assembly-2 and close it.
Sub Assembly-3:
- Create a New Assembly and save it with the name ‘Sub Assembly-3’.
- Select Place component from the marking menu and place the ‘Threaded Spindle’ in the Assembly.
- Place the ‘Compress Spring’ in the Assembly.
- Apply a Mate Constraint between Y Axis of Compress Spring and Axis of Threaded Spindle.
- Apply a Mate Constraint between circular face of Threaded Spindle and face of Compress Spring.
- Place the ‘Washer’ in the Assembly.
- Apply an Axis Mate between Washer and Threaded Spindle.
- Apply a Mate Constraint between face of Washer and face of Compress Spring.
- Place the ‘Pin’ in the Assembly.
- Apply an Axis Mate between Pin and hole on the Threaded Spindle.
- Apply a Mate Constraint between XY Plane of Threaded Spindle and YZ Plane of Pin.
- Place the ‘Handle’ in the Assembly.
- Apply an Axis Mate between hole on the Threaded Spindle and Handle.
- Next apply a Mate Constraint between XZ plane of Threaded Spindle and YZ Plane of Handle.
- Save the Sub Assembly-3 and close it.
Main Assembly (Vise):
- Create a New Assembly and save it with the name ‘Vise-Dynamic Simulation’.
- Select Place component from the marking menu and place the ‘Sub Assembly-1’ in the Assembly.
- Re-orient the model in the design window by using View Cube.
- Set the current view as Home View by using the toggle next to View Cube.
- Place ‘Sub Assembly-2’ in the Assembly.
- Align the Sub Assembly-2 in front of Sub Assembly-1 by using Rotate Component Tool.
- Apply a Mate Constraint between the bed of Sub Assembly-1 and bottom face of Sub Assembly-2.
- Apply a Flush Mate between YZ Plane of Sub Assembly-1 and XY Plane of Sub Assembly-2.
- Place ‘Sub Assembly-3’ in the Assembly.
- Apply an Axis Mate between hole on the Sliding Housing and Threaded Spindle.
- Apply a Mate Constraint between outer rim of hole on Sliding Housing and rear face of Threaded Spindle.
- Apply a Mate Constraint between subsequent faces of Jaw in the Assembly.
- Select the previous applied ‘Mate:4’under the Sub Assembly-1 in the Browser Bar, Right click and choose ‘Supress’ from the context menu.
- Dynamic Simulation
- Activate the Dynamic Simulation Tool from the Begin Panel of Environments Tab.
- Select Insert Joint in the Marking menu.
- Select ‘Screw’ from the drop down menu of Insert Joint dialog box.
- In the Insert Joint dialog box, select Circular edge of Threaded Spindle in ‘Component 1’ selection option and select Circular edge of Part-1 in ‘Component 2’ selection option.
- Enter the value 1/7 in the ‘Pitch’ input box. Click OK.
- Select Revolution:2 joint in the Browser under the Standard Joints folder, right click and select Properties from the context menu.
- Click dof 1 (R) tab and select Edit imposed motion button and check the Enable imposed motion option.
- Click the arrow to expand the input choices, and click Constant Value.
- Enter the value -360*7 deg/s and click OK.
- In Simulation Player, fill the value 1000 in the Images field area.
- Clear the screen by activating the Clean Screen command.
- Click Run in the Simulation Player to display motion in Vise.
- Change the colour of Vise ‘Green (Clear)’ to watch its motion in transparent view.


No comments:
Post a Comment