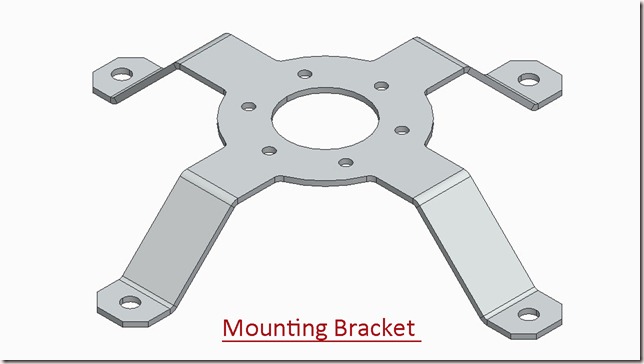
In this tutorial I will create a Mounting Bracket by utilizing Sheet Metal capabilities of Creo Parametric 2.0
First of all base feature will be created using Planar Tool, afterward similar looking legs will be created using various tools like Extrude, Flange,Flat,Bend etc. Usage of Hole, Chamfer Round along with Flat Pattern Tool is also displayed.
Transcription of Video
-
Start a new Sheet Metal Part file from scratch with the default template and give it a name ‘Mounting Bracket’.
-
Select the Top Datum plane and create a new sketch on this plane.
-
Click the Sketch View icon to orient the sketching plane parallel to the screen.
-
Activate the Circle Tool and draw the sketch with the dimensions as displayed.
-
Convert this circle into construction geometry.
-
Create a line in the sketch and duplicate it to the other side, using a centerline with the aid of Mirror Tool.
-
Draw a new line and repeat the previous process for this line also.
-
Create arcs between these lines by picking its centre and ends.
-
Duplicate these arcs to other side using the Mirror Tool.
-
Exit the sketch and activate Planar Tool.
-
Fill the thickness of the sheet and execute the command after selecting the sketch.
-
Change the colour of the model as per your wish.
-
Create a sketch over Front Datum Plane.
-
First specify new references, with which new sketch will be constrained and dimensioned.
-
Draw the sketch using the Line Tool as displayed.
-
Exit the sketch and activate the Extrude Tool.
-
Select the sketch and activate Extrude both side of sketch plane equally option.
-
Fill the extrusion depth.
-
From the option tab activate add bends on sharp edges command, which would be equal to thickness of the sheet.
-
Execute the command.
-
Activate Flange Tool.
-
Select an edge to attach the wall and then fill the length and angle of the wall.
-
In the similar way add two more flanges.
-
Activate the Flat Tool and first specify placement edge.
-
Execute the command after defining the angle and length of the flat.
-
Start a new sketch over top face of the model and draw a sketch similar to this one.
-
First specify new references and use Line to draw the sketch at the defined position.
-
Activate Bend Tool.
-
First define the bend line and then fill the bend angle.
-
Execute the command.
-
Again repeat the same process to perform another bend operation.
-
Hide the visibility of sketch3.
-
Select the leg created with the extrude tool in the model tree and activate Pattern tool.
-
Open the visibility of Coordinate System.
-
Set Axis as the type of pattern.
-
Select Y axis of Coordinate System as axis of rotation.
-
Enter the number of members to be patterned.
-
Leave the default 90° Angle between the pattern members unchanged and execute the command.
-
Save the file.
-
Apply a Chamfer of 0.125 inch on the each of the legs.
-
Activate the round tool and apply fillet of .06 inch on these edges of the model.
-
Create a sketch on the top face of the model and draw a circle on this leg with the defined dimensions.
-
Create a hole on the leg using this sketch and extrude tool.
-
Open the visibility of Coordinate System and using its Y axis pattern the hole 4 times at an angle of 90°.
-
Create a sketch on the top face of the model and create a point to define the position for the new hole.
-
Activate the Hole Tool and select the point.
-
Define the diameter of the hole and execute the command.
-
Pattern this hole 6 times at an angle of 60°using Y axis of Coordinate System.
-
The model is complete you can generate the Flat Pattern of the model.
Note:--
You may find holes inappropriate created with pattern tool on the leg, it is because the each leg is created with different feature and their flat pattern length is different. To clear this problem, create the holes no each leg separately.
Get the Model file by visiting the following link:-
http://bit.ly/2ogQDSk


No comments:
Post a Comment