Showing posts with label Flat Pattern tool. Show all posts

Friday, May 1, 2020

Basic Techniques-Sheet Metal (Siemens NX 1855 Tutorial)


Serial No. 130

Basic Techniques-Sheet Metal (Siemens NX 1855 Tutorial)

In this Sheet Metal Tutorial, we will learn the basics of Sheet Metal designing in the software.

In this lesson, you create a sheet metal part. This lesson demonstrates:---

  • Creating a Tab
  • Adding a Flange • Adding a Break Corner
  • Adding a Contour Flange
  • Mirroring the part and creating new bends
  • Mirroring a feature
  • Adding and bending a tab
  • Adding a cut across a bend by using 'Normal Cut-out' command.
  • Folding and unfolding bends by using 'Unbend' & 'Rebend' command.
  • Create a flat pattern feature from the form sheet metal part.
  • Create a drawing view of flat pattern feature.


Click the following link to get the model file: - https://bit.ly/2yhJVkj


.........................................................................
Visit the following link to watch more tutorial on Siemens NX by us
https://www.youtube.com/playlist?list=PLKWX3xUP3pPpUvtPuzEPoHimjTjpdbl_Q
.........................................................................
Hope all of you enjoyed the tutorial. If you find the video useful please like it and share it with your friends/colleagues and do not forget to subscribe me to get latest updates about my new uploads….
http://www.youtube.com/user/nisheethsorjm?sub_confirmation=1
....................................................................................................
Dear Viewers if you like our work and wanted to support us, to keep continuing the good work, then become a patron of ours at ‘Patreon’ site. Patreon is a simple way for you to contribute to the creator’s work every month/ every time they release their new work and get rewards in return. Please visit the following link to know all about our work and what we are offering as the reward to our patrons…
https://www.patreon.com/nisheethsri
..................................................................

Sunday, June 29, 2014

Mounting Bracket || Creo Parametric 2.0 Sheet Metal Tutorial

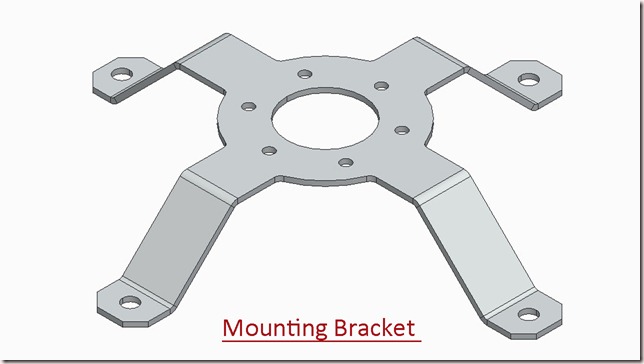
Mounting Bracket Image

In this tutorial I will create a Mounting Bracket by utilizing Sheet Metal capabilities of Creo Parametric 2.0

Mounting Bracket-3 - Copy

First of all base feature will be created using Planar Tool, afterward similar looking legs will be created using various tools like Extrude, Flange,Flat,Bend etc. Usage of Hole, Chamfer Round along with Flat Pattern Tool is also displayed.


Transcription of Video

  1. Start a new Sheet Metal Part file from scratch with the default template and give it a name ‘Mounting Bracket’.

  2. Select the Top Datum plane and create a new sketch on this plane.

  3. Click the Sketch View icon to orient the sketching plane parallel to the screen.

  4. Activate the Circle Tool and draw the sketch with the dimensions as displayed.

  5. Convert this circle into construction geometry.

  6. Create a line in the sketch and duplicate it to the other side, using a centerline with the aid of Mirror Tool.

  7. Draw a new line and repeat the previous process for this line also.

  8. Create arcs between these lines by picking its centre and ends.

  9. Duplicate these arcs to other side using the Mirror Tool.

  10. Exit the sketch and activate Planar Tool.

  11. Fill the thickness of the sheet and execute the command after selecting the sketch.

  12. Change the colour of the model as per your wish.

  13. Create a sketch over Front Datum Plane.

  14. First specify new references, with which new sketch will be constrained and dimensioned.

  15. Draw the sketch using the Line Tool as displayed.

  16. Exit the sketch and activate the Extrude Tool.

  17. Select the sketch and activate Extrude both side of sketch plane equally option.

  18. Fill the extrusion depth.

  19. From the option tab activate add bends on sharp edges command, which would be equal to thickness of the sheet.

  20. Execute the command.

  21. Activate Flange Tool.

  22. Select an edge to attach the wall and then fill the length and angle of the wall.

  23. In the similar way add two more flanges.

  24. Activate the Flat Tool and first specify placement edge.

  25. Execute the command after defining the angle and length of the flat.

  26. Start a new sketch over top face of the model and draw a sketch similar to this one.

  27. First specify new references and use Line to draw the sketch at the defined position.

  28. Activate Bend Tool.

  29. First define the bend line and then fill the bend angle.

  30. Execute the command.

  31. Again repeat the same process to perform another bend operation.

  32. Hide the visibility of sketch3.

  33. Select the leg created with the extrude tool in the model tree and activate Pattern tool.

  34. Open the visibility of Coordinate System.

  35. Set Axis as the type of pattern.

  36. Select Y axis of Coordinate System as axis of rotation.

  37. Enter the number of members to be patterned.

  38. Leave the default 90° Angle between the pattern members unchanged and execute the command.

  39. Save the file.

  40. Apply a Chamfer of 0.125 inch on the each of the legs.

  41. Activate the round tool and apply fillet of .06 inch on these edges of the model.

  42. Create a sketch on the top face of the model and draw a circle on this leg with the defined dimensions.

  43. Create a hole on the leg using this sketch and extrude tool.

  44. Open the visibility of Coordinate System and using its Y axis pattern the hole 4 times at an angle of 90°.

  45. Create a sketch on the top face of the model and create a point to define the position for the new hole.

  46. Activate the Hole Tool and select the point.

  47. Define the diameter of the hole and execute the command.

  48. Pattern this hole 6 times at an angle of 60°using Y axis of Coordinate System.

  49. The model is complete you can generate the Flat Pattern of the model.

Note:--

You may find holes inappropriate created with pattern tool on the leg, it is because the each leg is created with different feature and their flat pattern length is different. To clear this problem, create the holes no each leg separately.

downloadLink_thumb3


Get the Model file by visiting the following link:-
http://bit.ly/2ogQDSk

Wednesday, March 5, 2014

Latch created through Sheet Metal-Autodesk Inventor 2013 (with caption and audio narration)

Latch created through Sheet Metal

Serial No. 187

Latch created through Sheet Metal-Autodesk Inventor 2013 (with caption and audio narration)

In this video, the creation of an assembly of the latch is shown. First base body parts of the latch will be created using sheet metal template that will utilize Contour Flange, Cut and Mirror tools. Afterwards, a previously created part Sliding rod will be placed in the assembly to complete it.


download-Link 


Click the following link to get the model file: – http://bit.ly/2mRK1tf


 Transcription of Video

Latch created through Sheet Metal (Autodesk Inventor)

  1. Open the ‘Latch Body1’ part file.
  2. A ‘Base sketch of Latch’ is created in this file.
  3. Go on the ribbon > Setup panel > click Sheet Metal Defaults icon.
  4. Uncheck the ‘Use Thickness from Rule’ option to specify the thickness value 3/128 inch manually.
  5. Go on the ribbon > Create panel > click Contour Flange icon.
  6. The Profile selection button is active by default in the Contour Flange dialogue box.
  7. Select the sketch profile.
  8. A preview of contour flange is visible in the graphics window.
  9. The thickness of sheet should be inside of the sketch profile.
  10. Set the value 7 7/8 inch in the Distance field.
  11. Click OK to create the feature.
  12. Create a new sketch on the right face of the part.
  13. Take the project of this face by using Project Geometry tool.
  14. Convert the projected lines into construction geometry.
  15. Draw a rectangle with the given dimensions.
  16. Exit from the sketching environment.
  17. Go on the ribbon > Modify panel > click Cut icon.
  18. The sketch profile will be automatically selected.
  19. Choose ‘All’ option under the Extents field.
  20. Click OK to apply the cut feature.
  21. Create a new sketch on the selected face.
  22. Take the project of this edge and convert it to construction geometry.
  23. Draw a new line of length 9/16 inch.
  24. Apply a coincident constraint between midpoint of the line and midpoint of the projected line.
  25. Finish the 2D Sketch.
  26. Activate the Contour Flange tool once again.
  27. Select the line.
  28. Click more button to expand the dialogue box.
  29. Set the Width Extents type to ‘Distance’.
  30. Enter the value 0.35156 inch in Distance field.
  31. Click OK to create the new flange.
  32. Go on the ribbon > Pattern panel > click Mirror icon.
  33. Select the Contour Flange3 in the graphics window as feature to pattern.
  34. Click Mirror Plane button.
  35. In the Model browser, pick YZ plane under the Origin folder.
  36. Click OK to mirror the feature.
  37. Pick the ‘Corner Round’ tool from Modify Panel.
  38. And select these four corner edges of the part.
  39. In the Corner Round dialogue box, set the radius to 1/64 inch.
  40. Click OK to place the fillet.
  41. Go on the ribbon > Flat Pattern panel > click Create Flat Pattern icon to generate the flat pattern of the model.
  42. Activate the ‘Bend Order Annotation’ tool from the marking menu.
  43. The flat pattern will display numbers that represent the order in which the part would be folded.
  44. Right click in the graphics window; click OK to finish the bend order annotation command.
  45. Double-click the ‘Folded Model’ icon at the top of the Model browser to return to the folded model.
  46. Save the part file and close it.
  47. Start a new Standard (in) assembly.
  48. Place the ‘Latch Body1’ part file by using ‘Place Component’ tool.
  49. Save the assembly with the name ‘Latch’.
  50. Create a new component using sheet metal template with the name ‘Latch Body2’ in this assembly.
  51. Select back face of the Latch Body1 to define the sketch plane for the base feature of the new part.
  52. Open the visibility of ‘Base sketch of Latch’ in the Browser Bar.
  53. Create a new sketch on this face.
  54. Take the project of end points of the sketch and centre point of arc.
  55. Close the visibility of ‘Base sketch of Latch’ in the Browser Bar.
  56. Recreate the base sketch by joining these projected points.
  57. Activate the ‘Sheet Metal Defaults’ command.
  58. Uncheck the ‘Use Thickness from Rule’.
  59. Set the value 3/128 inch in the Thickness field.
  60. Activate the ‘Contour Flange’ tool.
  61. And select the sketch profile.
  62. Click the ‘Flip Side’ button to set the thickness of sheet inside of the sketch profile.
  63. Fill the value 7/8 inch in the ‘Distance’ field.
  64. Click OK to create the new flange.
  65. Return back to the assembly environment.
  66. Save the assembly.
  67. Open the ‘Latch Body2’ part file separately.
  68. Change the model colour to ‘‘Flaked Reflective - Beige’.
  69. Check the Flat Pattern and Bend sequence of the folded sheet.
  70. Place the ‘Sliding rod’ in the Assembly.
  71. Apply an axis mate between Sliding rod and Latch Body1.
  72. Double click the ‘Latch Body1’ in browser bar to edit it.
  73. Start a new sketch on this face of the part.
  74. Take the project of the face and draw a line connecting the mid points of the projected edges.
  75. Convert all the sketches into construction geometry.
  76. Create a circle over this line of 1/8 inch diameter that would be 3/8 inch away from the front face of the model.
  77. Finish the sketch and start the Cut Tool from modify panel.
  78. Select All option in the dropdown of Extents and apply the command.
  79. Create 3 more identical holes at an offset distance of 2 3/8 inch between each hole on the same face of the model by using ‘Rectangular Pattern’ tool.
  80. Activate Mirror command and duplicate these four holes on the other side of the model.
  81. Return back to the assembly and double click the ‘Latch Body2’ to edit it.
  82. Create a hole on this face by applying the same procedure as done in the previous part.
  83. First create the sketch and then remove the material from the part using Cut feature.
  84. Duplicate this hole on the other side of the model by using Mirror command.
  85. The fully developed model will look like this.