Serial No. 49
Hinge-Autodesk Inventor 2012 (with caption and audio narration)
Click the following link to get the model file: - http://bit.ly/2lHZ1cO
Transcription of Video
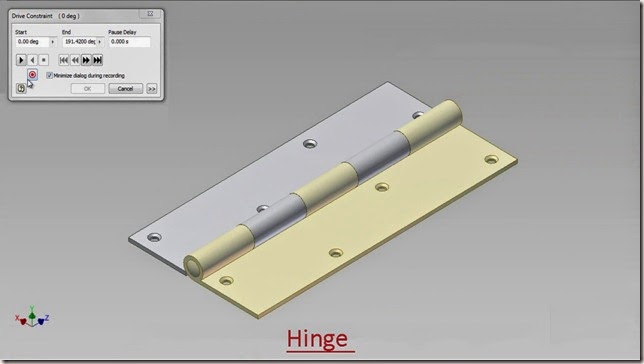
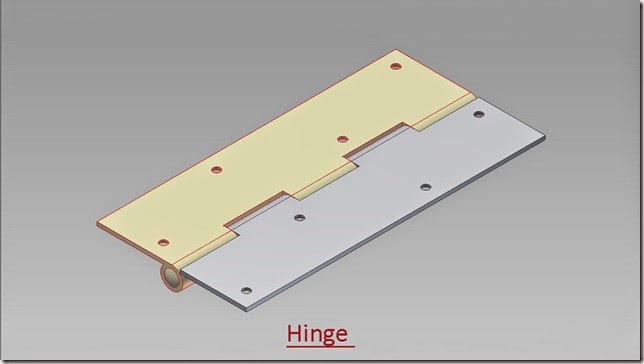
Hinge Modelling and apply motion in it through Drive-Constraint.
- Create a New ‘Standard (in).ipt’ Part file.
- Sketch1 is active by default.
- Draw a Rectangle 1.25 in. x 0.0625 in., coincident with Auto project part origin.
- Draw a Circle of 0.375 in. diameter.
- Apply a Tangent Constraint between circle and base line of the rectangle.
- Apply a Vertical Constraint between centre point of Circle and Auto project part origin.
- Draw another Circle of 0.25 in. diameter, Concentric with the previous one.
- Finish the Sketch.
- Start the Extrude command, select rectangle and the profile formed between the two circles.
- Enter the distance value 5 in. and select Symmetric option in the direction field.
- Click OK.
- Change the existing colour of the part into Popcorn.
- Save the file with the name Part 1.
- Create a new work plane 1 in. away from the front face of part.
- Start a new sketch on this Work Plane.
- Take the project of this edge of the part with Project Geometry Tool.
- Right click in the design window and select Slice Graphic from the context menu.
- By doing so hidden sketches behind the part will be seen clearly.
- Draw two lines to close the profile.
- Finish the Sketch.
- Start the Extrude command. It will automatic select the last drawn sketch profile, choose Cut option to remove the material from the part.
- Enter the distance value 1 in.
- Click ok.
- Start the Rectangular Pattern tool.
- Select Extrusion2 in the design window as feature.
- Click the ‘Direction 1’ button, and then select the outer edge of the Part1.
- Enter the value 2 in the column count input box.
- Enter the value 2 in. in the column spacing input box.
- Click OK.
- Take the project of edges of the model.
- Draw a rectangle coincident with the end point of the projected lines.
- Start the Offset tool, select the rectangle and drag the profile inside.
- A new Rectangle will be created.
- Place the dimension .25 in. as offset distance between the two rectangles.
- Start the Rectangular Pattern tool.
- Select bottom line of the rectangle.
- Click the ‘Direction 1’ button, and then select the vertical line of the rectangle. Click Flip button to change the direction of pattern.
- Enter the value 4 in the column count input box.
- Click the arrow button to expand the input choices in the column spacing input box.
- Choose ‘Measure’ option then select the vertical line of rectangle.
- Click more button to expand the dialogue box.
- Select ‘Fitted’ option and click OK.
- Convert all sketches into construction geometry.
- Hold the Ctrl Key and select the end points of these lines and convert them to centre point.
- Start the Hole Tool. The Points which we converted into centre point will be automatically selected.
- Set the diameter of the hole to 0.125 in.
- In the termination drop down menu select Through All option and Click OK.
- Start the Chamfer Tool.
- Select the top edges of all the holes.
- Enter the value 1/32 in. in the Distance field.
- Click OK.
- Save the file.
- Save As the same file with the name Part 2 also.
- This file will be used later in creation of Hinge Assembly.
- Close the file.
- Create a New Standard (in).iam Assembly file.
- Place the ‘Part 1’ file in the Assembly with aid of Place Component Tool.
- Save the Assembly with name ‘Hinge’.
- Place the ‘Part 2’ in the Assembly.
- Align ‘Part 2’ in correct position by using Rotate Component Tool.
- Some modifications are needed here in ‘Part 2’, so as to match it with Part 1.
- Select the Part 2 and double click it, to edit in the part modelling environment.
- Edit the Extrusion2 feature in the Browser Bar by double clicking it.
- In the Extrude2 dialogue box, change the direction of extrusion.
- In the same way, edit the Rectangular Pattern1.
- In the Column count input box, enter the value 3 and click OK.
- Click the Return icon, to return back in the Assembly modelling environment.
- Apply a mate constraint between the Axis of Part 1 and Part 2.
- Apply a Flush mate between the Front face of Part 1 and Part2.
- Right Click in the design window and select Create Component Tool from the marking menu.
- Give name of the part as ‘Centre Pin’.
- Click Ok.
- Select XY plane of Assembly, as a base plane for the new component.
- At present sketch1 is active of newly created Centre Pin.
- Take the project of edge of the hole.
- Finish the sketch.
- Start Extrude command. The sketch profile is automatically selected.
- In the extents drop down menu, select Between option.
- Select front face of part and then rear face of the part.
- Click ok.
- Change the model colour to Popcorn to distinguish it more clearly.
- Create a new sketch on the YZ plane of the Centre Pin.
- Take the project of front edge of the Centre Pin.
- Activate Slice Graphic Command from the Right click context menu.
- Draw a Three Point Rectangle, coincident with the midpoint and end point of the projected line.
- Apply a horizontal dimension of 0.03125 in. on the rectangle.
- Draw a Thee Point Arc inside the rectangle.
- Finish the sketch.
- Start Revolve command, first select the sketch profile and later the axis.
- Click OK.
- Start the Mirror Command from the Pattern Panel of the Model Tab.
- Select Revolve1 feature in the browser bar.
- Select Mirror Plane button in the Mirror dialogue box, then select XY plane of Centre Pin.
- Click Ok and return back to the assembly.
- Change the view of Assembly by using View Cube.
- Apply an Angle Constraint between Part1 and Part2, to show the motion in the Assembly of ‘Hinge’.
- Activate an Angle Constraint, first select the top face of Par1, then top face Part2, at last select the front face Part2.
- Click OK.
- Set the browser Assembly View to Modelling View using the toggle at the top of the Browser Bar.
- Select the Angle:1 constraint under Constraints folder in the Browser Bar and change its name as ‘Drive’ by clicking twice slowly.
- Right click the ‘Drive’ Constraint and select Drive Constraint from the context menu.
- In the Drive Constraint dialogue box, set End value to 191.42 deg.
- Click more button to expand the dialogue box and set the value for Increment 0.25 deg.
- In the Repetitions field select Start/End/Start and enter value 2.
- Clear the screen by activating the Clean Screen command, Click the Forward Button to display the motion in the ‘Hinge’ Assembly.


No comments:
Post a Comment