Showing posts with label Gear. Show all posts

Friday, April 10, 2020

Gear Pump Body (Solid Edge ST9 Tutorial)

Serial No. 112

Gear Pump Body along with Drawing Sheet (Solid Edge ST 9 Tutorial)

Designing a machine part from the 2D sketch. Dear Viewers, In this video we will show how to create a 3D model 'Gear Pump Body' with the help of 2D drawing sheet in Solid Edge Tutorial Software.


Download the 2D drawing sheet in PDF form by visiting the following link: -- http://bit.ly/37TDoIi


...............................................................................................................................
Visit the following link to watch more tutorial on Solid Edge by us
https://www.youtube.com/playlist?list=PLKWX3xUP3pPq5ijHdni6jXNX445Il3MWJ
..........................................................................................
Hope all of you will enjoy the tutorial. If you find the video useful please like it and share it with your friends/colleagues and do not forget to subscribe us to get latest updates about our new uploads.
http://www.youtube.com/user/nisheethsorjm?sub_confirmation=1m
....................................................................................................
Dear Viewers if you like our work and wanted to support us, to keep continuing the good work, then become a patron of ours at ‘Patreon’ site. Patreon is a simple way for you to contribute to the creator’s work every month/ every time they release their new work and get rewards in return. Please visit the following link to know all about our work and what we are offering a reward to our patrons…
https://www.patreon.com/nisheethsri
.............................................................

Saturday, March 10, 2018

Autodesk Inventor Modelling and Animation Tutorial--'Worm Gear'

Autodesk Inventor Modelling and Animation Tutorial--'Worm Gear'

Serial No. 294

In this video, we will demonstrate how to create Worm & Worm Gear with the help of Autodesk Inventor Software later we will create the assembly of the aforesaid part and demonstrate how to animate it using Dynamic Simulation.

download-Link


Click the following link to get the model file: - http://autode.sk/2IeGiMv

Monday, January 2, 2017

Spur Gear (Internal) with Animation (Solid Edge ST9 Tutorial)

Spur Gear (Internal) with Animation

Serial No. 20

Spur Gear (Internal) with Animation (Solid Edge ST9 Tutorial)

In this tutorial you have learned how to use Spur Gear (Internal) Module to design and create a 3D model of gear and pinion for the given inputs with the help of 'Spur Gear Designer' command in Engineering Reference Application in the assembly environment. This tutorial gives step by step instructions to design and create a model of Spur Gear (Internal) and animate it by ‘Rotational Motor’ command.

It will cover the following topics.

........................................................................................................

• How to mate the Spur Gear (Internal) and Pinion in the assembly.

• How to mate the gears by using ‘Flash Fit’ command in the assembly.

• Use assembly constraints such as Axial Align mate, Connect mate, Mate command etc.


download-Link


Click the following link to get the model file: - http://bit.ly/30VmCFw

Sunday, January 1, 2017

Rack and Pinion with Animation (Solid Edge ST9 Tutorial)

Rack and Pinion with Animation

Serial No. 19

Rack and Pinion with Animation (Solid Edge ST9 Tutorial)

This tutorial has been picked up from Solid Edge ST9 Help file.

This tutorial gives step by step instructions to design and create a model of Rack gear, in this Tutorial you have learned how to use Rack Gear Module to design and create a 3D model of Rack and Pinion for the given inputs and animate it by ‘Rotational Motor’ command.

It will cover the following topics.

........................................................................................................

• How to mate the Rack and Pinion in the assembly.

• How to change the Face Width of rack and pinion by using ‘Edit in Solid Edge Rack and Pinion Gears Designer’ command.

• How to mate the gears by using ‘Flash Fit’ command in the assembly.

• Use assembly constraints such as Axial Align mate, Angle mate, Mate command etc.


download-Link


Click the following link to get the model file: - http://bit.ly/2OtgL7G

Saturday, December 31, 2016

Worm Gear with Animation (Solid Edge ST9 Tutorial)

Worm Gear with Animation

Serial No. 18

Worm Gear with Animation (Solid Edge ST9 Tutorial)

This tutorial has been picked up from Solid Edge ST9 Help file. 

This tutorial gives step by step instructions to design and create a model of worm gear. No prior experience of using Solid Edge or Engineering Reference is required for this tutorial. However an engineering knowledge on the design of worm gear will be useful. In this Tutorial you have learned how to use Worm Gear Module to design and create a 3D model of Worm and Worm Gear for the given inputs by using Engineering Reference Application and animate it by ‘Rotational Motor’ command.

It will cover the following topics.

........................................................................................................

• How to mate the worm and worm gear in the assembly.

• How to mate the gears by using ‘Flash Fit’ command in the assembly.

• Use assembly constraints such as Gear mate, Axial Align mate, Tangent mate etc.


download-Link


Click the following link to get the model file: - http://bit.ly/2IzQroz

Bevel Gear with Animation (Solid Edge ST9 Tutorial)

Bevel Gear with Animation

Serial No. 17

Bevel Gear with Animation (Solid Edge ST9 Tutorial)

This tutorial has been picked up from Solid Edge ST9 Help file.

This tutorial gives step by step instructions to design and create a model of bevel gear. In this Tutorial you have learned how to use Bevel Gear Module to design and create a 3D model of bevel gear and pinion for the given inputs by using Engineering Reference Application and animate it by ‘Rotational Motor’ command.


download-Link


Click the following link to get the model file: - http://bit.ly/2INn3LV

Helical Gear with Animation (Solid Edge ST9 Tutorial)

Helical Gear with Animation

Serial No. 16

Helical Gear with Animation (Solid Edge ST9 Tutorial)

This tutorial gives step by step instructions to design and create a model of Helical Gear, in this tutorial you have learned how to use Helical Gear Module to design and create a 3D model of Gear and Pinion for the given inputs by using Engineering Reference Application and animate it by ‘Rotational Motor’ command.
Different type of mates will be applied on the gear and pinion to rotate the gears during the assembly.

download-Link


Click the following link to get the model file: - http://bit.ly/35mcWY7

Friday, May 6, 2016

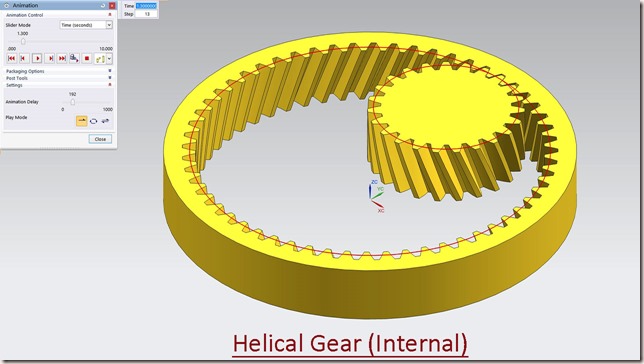
Helical Gear (Internal) - Motion Simulation (Video Tutorial) Siemens NX 10

Helical Gear 1

Serial No. 22

Helical Gear (Internal) - Motion Simulation (Video Tutorial) Siemens NX 10

In this video we will describe, how to simulate the ‘Helical Gear (Internal)’ with different joints, Gear joint, Revolute joint and so on in Motion Simulation Application Environment.


download-Link


Click the following link to get the model file: -http://bit.ly/35bb4RJ

Tuesday, May 3, 2016

Worm Gear-Motion Simulation (Video Tutorial) Siemens NX 10

Worm Gear

Serial No. 20

Worm Gear - Motion Simulation (Video Tutorial) Siemens NX 10

In this video we will describe, how to simulate the ‘Worm Gear’ with different joints, Gear joint, Revolute joint and so on in Motion Simulation Application Environment.


download-Link


Click the following link to get the model file: -http://bit.ly/2OqTm6W

Monday, May 2, 2016

Bevel Gear-Motion Simulation (Video Tutorial) Siemens NX 10

Bevel Gear

Serial No. 19

Bevel Gear - Motion Simulation (Video Tutorial) Siemens NX 10

In this video we will describe, how to simulate the ‘Bevel Gear’ with different joints, Gear joint, Revolute joint and so on in Motion Simulation Application Environment.

download-Link


Click the following link to get the model file: -http://bit.ly/359dmAO

Saturday, April 30, 2016

Helical Gear - Motion Simulation (Video Tutorial) Siemens NX 10

Helical Gear

Serial No. 18

Helical Gear - Motion Simulation (Video Tutorial) Siemens NX 10

In this video we will describe, how to simulate the ‘Helical Gear’ with different joints, Gear joint, Revolute joint and so on in Motion Simulation Application Environment.


download-Link


Click the following link to get the model file: -http://bit.ly/2ItRLt1

Friday, November 21, 2014

Bevel Gear with Animation (Video Tutorial) SolidWorks 2014

Bevel Gear with Animation

Serial No. 39

Bevel Gear with Animation (Video Tutorial) SolidWorks 2014

In this video, we create Bevel Gear with the aid of SolidWorks Design Library Tool Box and Animate it by Motion Study.


download-Link


Click the following link to get the model file: - http://bit.ly/2OVUlwd

Thursday, November 20, 2014

Helical Gear with Animation (Video Tutorial) SolidWorks 2014

Helical with Animation

Serial No. 38

Helical Gear with Animation (Video Tutorial) SolidWorks 2014

In this video, we create Helical Gear with the aid of SolidWorks Design Library Tool Box and Animate it by Motion Study.


download-Link


Click the following link to get the model file: - http://bit.ly/2pmY770

Wednesday, November 20, 2013

Worm Gear-Dynamic Simulation-Autodesk Inventor 2012 (with caption and audio narration)

Worm Gear-Dynamic Simulation


Serial No. 109

Worm Gear-Dynamic Simulation-Autodesk Inventor 2012 (with caption and audio narration)
…….........................................................
In this video, we will demonstrate how to apply the different type of mates in the assembly environment for creating the Dynamic Simulation of the ‘Worm Gear’.


download-Link 


Click the following link to get the model file: - http://bit.ly/2mAv1zO


Transcription of Video

Display motion in Worm Gear through Dynamic Simulation

  1. Create a ‘New Assembly’ and save it with the name ‘Worm Gear–Dynamic Simulation’.
  2. Select Place component from the marking menu and place the Worm in the Assembly.
  3. Select the Worm in the Design window, right click and deselect Grounded from the context menu.
  4. At present there are six Degrees of Freedom in Worm and it can be moved in any direction in the Assembly.
  5. Open the visibility of X Axis of Assembly and X Axis of Worm from the Browser Bar and then apply a Mate Constraint between them.
  6. Apply another Mate Constraint between Centre Point of the Assembly and Centre Point of the Worm.
  7. Now only one Degree of Freedom is left and Worm can be moved only on its X Axis.
  8. Select Place component from the marking menu and place the Worm Gear in the Assembly.
  9. Align the Worm Gear in correct position by using Rotate Component Tool.
  10. Open the visibility of XZ Plane of Assembly and XY Plane of Worm Gear from the Browser Bar and then apply a Mate Constraint between them.
  11. Close the visibility of Work Planes to clear the screen.
  12. Set the browser from Assembly View to Modeling View using the toggle at the top of the browser.
  13. Open the visibility of Pitch Diameter of Worm Gear and Pitch Diameter of Worm and then apply a Tangent Mate between them.
  14. Apply another Mate Constraint between the Z Axis of Worm Gear and YZ Plane of Assembly.
  15. Create a Work Axis in the Assembly, coincident with the axis of surface of Pitch Diameter of Worm Gear.
  16. Activate the Work Axis command from the Work Features Panel of Assemble Tab, and then select Through Revolved Face or Feature in the Axis drop down menu.
  17. Select Pitch Diameter of Worm Gear to create the Work Axis.
  18. In the Quick Access toolbar, click the selection tool dropdown list and choose Select Sketch Features.
  19. Convert this Work Axis to ‘Grounded’.
  20. Activate the Motion Constraint, first select the side face of Worm and then the top face of Worm Gear. In the Ratio input box, enter the value 1/40 and click Ok.
  21. Once again, check the Degrees of Freedom of Worm Gear and Worm in the assembly, this time both the gears are rotating on their own Axis.
  22. Activate the Dynamic Simulation Tool from the Begin Panel of Environments Tab.
  23. Activate Insert Joint from the Marking menu.
  24. Select ‘Worm Gear’ from the drop down menu of Insert Joint dialog box.
  25. In the Insert Joint dialog box, select Pitch Diameter of Worm in ‘Gear option’ and select Pitch Diameter of Worm Gear in ‘Screw option’. Enter the value (- 1/40 ) in the Pitch input box. Click Ok.
  26. Select Revolution:1 joint in the Browser under the Standard Joints folder, right click and select Properties from the context menu.
  27. Click dof 1 (R) tab and select Edit imposed motion button and check the Enable imposed motion option.
  28. Click the arrow to expand the input choices, and click Constant Value.
  29. Enter the value 360*40 deg/s and click Ok.
  30. Close the visibility of Pitch diameter of Worm Gear and Worm.
  31. In Simulation Player, fill the value 1000 in the Images field area.
  32. Clear the screen by activating the Clean Screen command.
  33. Click Run in the Simulation Player to display motion in Worm and Worm Gear.

Note: - The worm gear is always driven by the worm.

Helical Gear (Internal)-Dynamic Simulation-Autodesk Inventor 2012 (with caption and audio narration)

Helical Gear (Internal) Dynamic Simulation

Serial No. 46

Helical Gear (Internal)-Dynamic Simulation-Autodesk Inventor 2012 (with caption and audio narration)

In this video, we will demonstrate how to give the different type of mates in the assembly environment for creating the Dynamic Simulation of the ‘Helical Gear-Internal’.


download-Link 


Click the following link to get the model file: - http://bit.ly/2nfFoJi


 Transcription of Video

Display motion in Helical Gear (Internal) through Dynamic Simulation

  1. Create a ‘New Assembly’ and save it with the name ‘Helical Gear (Internal)-Dynamic Simulation’.
  2. Select Place component from the marking menu and place the Helical Gear in the Assembly.
  3. Align the Gear in correct position by using View Cube.
  4. Select the Gear in the Design window, right click and deselect Grounded from the context menu.
  5. At present there are six Degrees of Freedom in Gear and it can be moved in any direction in the Assembly.
  6. Open the visibility of Z Axis of Assembly and Z Axis of Gear from the Browser Bar and then apply a Mate Constraint between them.
  7. Apply another Mate Constraint between Centre Point of the Assembly and Centre Point of the Gear.
  8. Now only one Degree of Freedom is left and Gear can be moved only on its Z Axis.
  9. Select Place component from the marking menu and place the Pinion in the Assembly.
  10. Activate the Constraint command and change the constraint type to Flush in the Solution field, select the top face of Pinion and top face of Gear, and click OK.
  11. Set the browser from Assembly View to Modeling View using the toggle at the top of the browser.
  12. Open the visibility of Pitch Diameter of Gear and Pitch Diameter of Pinion.
  13. Activate the Tangent Mate, change the Solution type to Inside, then select Pitch Diameter of Pinion and Pitch Diameter of Gear, and click OK.
  14. Apply a Mate Constraint between the Z Axis of Pinion and YZ Plane of Assembly.
  15. Create a Work Axis in the Assembly, coincident with the axis of surface of Pitch Diameter of Pinion.
  16. Activate the Work Axis command from the Work Features Panel of Assemble Tab, and then select Through Revolved Face or Feature in the Axis drop down menu.
  17. Select Pitch Diameter of Pinion to create the Work Axis.
  18. In the Quick Access toolbar, click the selection tool dropdown list and choose Select Sketch Features.
  19. Convert this Work Axis to ‘Grounded’.
  20. Activate the Motion Constraint, first select the top face of Gear and then the top face of Pinion. In the Ratio input box, enter the value 23/57 and click Ok.
  21. Once again, check the Degrees of Freedom of Helical Gear and Pinion in the assembly, this time both the gears are rotating on their own Axis.
  22. Activate the Dynamic Simulation Tool from the Begin Panel of Environments Tab.
  23. Select Insert Joint in the Marking menu.
  24. Select ‘Rolling: Cylinder in Cylinder’ from the drop down menu of Insert Joint dialog box.
  25. Select Rolling constraint option.
  26. In the Insert Joint dialog box, select Pitch Diameter of Gear in ‘Outer Component option’ and select Pitch Diameter of Pinion in ‘Inner Component option’. Click Ok.
  27. Select Revolution:2 joint in the Browser under the Standard Joints folder, right click and select Properties from the context menu.
  28. Click dof 1 (R) tab and select Edit imposed motion button and check the Enable imposed motion option.
  29. Click the arrow to expand the input choices, and click Constant Value.
  30. Enter the value 360 deg/s and click Ok.
  31. Close the visibility of Pitch diameter of Helical Gear and Pinion.
  32. In Simulation Player, fill the value 1000 in the Images field area.
  33. Clear the screen by activating the Clean Screen command.
  34. Click Run in the Simulation Player to display motion in Helical Gear and Pinion.

Helical Gear-Dynamic Simulation-Autodesk Inventor 2012 (with caption and audio narration)

Helical Gear-Dynamic Simulation

Serial No. 48

Helical Gear-Dynamic Simulation-Autodesk Inventor 2012 (with caption and audio narration)

In this video, we will demonstrate how to give the different type of mates in the assembly environment for creating the Dynamic Simulation of the ‘Helical Gear’.


download-Link 


Click the following link to get the model file: - http://bit.ly/2ncOwOW


 Transcription of Video

Display motion in Helical Gear through Dynamic Simulation

  1. Create a ‘New Assembly’ and save it with the name ‘Helical Gear–Dynamic Simulation’.
  2. Select Place component from the marking menu and place the Helical Gear in the Assembly.
  3. Align the Gear in correct position by using View Cube.
  4. Select the Gear in the Design window, right click and deselect Grounded from the context menu.
  5. At present there are six Degrees of Freedom in Gear and it can be moved in any direction in the Assembly.
  6. Open the visibility of Z Axis of Assembly and Z Axis of Gear from the Browser Bar, and then apply a Mate Constraint between them.
  7. Apply another Mate Constraint between Centre point of the Assembly and Centre point of the Gear.
  8. Now this time only one Degrees of Freedom is left and Gear can be moved only on its Z Axis.
  9. Select Place component from the marking menu and place the Pinion in the Assembly.
  10. Activate the Constraint command and change the constraint type to Flush in the Solution field, select the top face of Pinion and top face of Gear, click apply.
  11. Apply a Mate Constraint between YZ Plane of Gear and YZ Plane of Pinion.
  12. Set the browser from Assembly View to Modeling View using the toggle at the top of the browser.
  13. Open visibility of Pitch Diameter of Gear and Pitch Diameter of Pinion and then apply a Tangent Mate between them.
  14. Create a Work Axis in the Assembly, coincident with the axis of surface of Pitch Diameter of Pinion.
  15. Activate the Work Axis command from the Work Features Panel of Assemble Tab, and then select Through Revolved Face or Feature in the Axis drop down menu.
  16. Select Pitch Diameter of Pinion to create the Work Axis.
  17. In the Quick Access toolbar, click the selection tool dropdown list and choose Select Sketch Features.
  18. Convert this Work Axis to ‘Grounded’.
  19. Activate the Motion Constraint, first select the top face of Pinion and then top face of Gear. In the Ratio input box, enter the value 23/57 and click Ok.
  20. Suppress the Mate:3 Constraint in the Browser.
  21. Once again, check the Degrees of Freedom of gear and pinion in the assembly, this time both the gears are rotating on their own Axis.
  22. Activate the Dynamic Simulation Tool from the Begin Panel of Environments Tab.
  23. Select Insert Joint in the Marking menu.
  24. Select ‘Rolling: Cylinder on Cylinder’ from the drop down menu of Insert Joint dialog box.
  25. Select Rolling constraint option.
  26. First select the Pitch Diameter of Pinion and then the Pitch Diameter of Gear. Click Ok.
  27. Select Revolution:3 joint in the Browser under the Standard Joints folder, right click and select Properties from the context menu.
  28. Click dof 1 (R) tab and select Edit imposed motion button and check the Enable imposed motion option.
  29. Click the arrow to expand the input choices, and click Constant Value.
  30. Enter the value 360.000 deg/s, and click Ok.
  31. In the Images field, enter the value 1000.
  32. Close the visibility of Pitch diameter of Helical Gear and Pinion.
  33. Mesh the teeth of Gear and Pinion manually in front of each other, after Suppressing the Motion Constraint.
  34. Once again Un-suppress the Motion Constraint.
  35. Clear the screen by activating the Clean Screen command.
  36. Click Run in the Simulation Player to display motion in Helical Gear and Pinion.

Worm Gear-Drive Constraint-Autodesk Inventor 2012 (with caption and audio narration)

Worm Gear-Drive Constraint

Serial No. 108

Worm Gear-Drive Constraint-Autodesk Inventor 2012 (with caption and audio narration)

In this video, we will demonstrate how to apply the different type of mates in the assembly environment for creating the animation of the ‘Worm Gear’.

download-Link 


Click the following link to get the model file: - http://bit.ly/2o3ZHKc


Transcription of Video

Display motion in Worm Gear through Drive Constraint.

  1. Create a ‘New Assembly’ and save it with the name ‘Worm Gear - Drive Constraint’.
  2. Hold the Ctrl key, and click the Worm Gear tool on the Power Transmission panel of the Design Tab.
  3. The Worm Gears Component Generator dialog box will open with its default values. Click ok.
  4. Click anywhere in the Design Window, to place the Worm and Worm Gear.
  5. Align the model in correct position by using View Cube.
  6. Make the Worm Gear Assembly flexible from the Browser Bar.
  7. Open the Visibility of X Axis of Assembly and X Axis of Worm in the Browser; later apply a Mate Constraint between them.
  8. Place a Mate Constraint between Centre Point of Assembly and Centre Point of Worm.
  9. Open the visibility of XY Plane of Assembly.
  10. Place a Mate Constraint between XY Plane of Assembly and XY Plane of Worm Gear.
  11. Place an Angle Constraint between XZ Plane of Worm and XY Plane of Assembly. In the solution field area, select Directed Angle option.
  12. Turn off the visibility of Work Plane to make the screen clear.
  13. Set the browser from Assembly View to Modeling View using the toggle at the top of the browser.
  14. Select the Angle Constraint in the Browser and change its name as ‘Drive’ by clicking twice slowly.
  15. Right click the Drive Constraint and select Drive Constraint Tool from the context menu.
  16. In the Drive Constraint dialog box, set the End value to 360*10 deg.
  17. Expand the dialog box and set the value for Increment 4 deg.
  18. Clear the screen by activating the Clean Screen command.
  19. Click the Forward Button to display motion in Worm and Worm Gear.

Bevel Gear-Drive Constraint-Autodesk Inventor 2012 (with caption and audio narration)

Bevel Gear-Drive Constraint


Serial No. 4

Bevel Gear-Drive Constraint-Autodesk Inventor 2012 (with caption and audio narration)

In this video, we will demonstrate how to create the 'Bevel Gear and Pinion' with the help of 'Bevel Gears Component Generator' command in the assembly. Application of the different type of mates in the assembly environment for creating the animation has been implemented through 'Drive Constraints' command.


download-Link


Click the following link to get the model file:-  http://bit.ly/2nyXDK4


 Transcription of the Video

  1. Create a ‘New Assembly’ and save it with the name ‘Bevel Gear - Drive Constraint’.
  2. Hold the Ctrl key, and click the Bevel Gear tool on the Power Transmission panel of the Design tab.
  3. The Bevel Gears Component Generator dialog box will open with its default values. Click ok.
  4. Click anywhere in the Design Window, to place the Bevel Gear 2 and Bevel Gear 1.
  5. Align the model in correct position by using View Cube.
  6. Make the Bevel Gear Assembly flexible from the Browser Bar.
  7. Apply a Mate Constraint between Z Axis of Bevel Gear 2 and the Y Axis of the Assembly.
  8. Place a Mate Constraint between Centre Point of Assembly and Top Point of Bevel Gear 2.
  9. Place another Mate Constraint between Z Axis of Assembly and Z Axis of Bevel Gear 1.
  10. Open the visibility of XZ Plane of Bevel Gear 2.
  11. Place an Angle Constraint between YZ Plane of Assembly and previously opened XZ Work Plane of Bevel Gear 2. In the solution field area, select Directed Angle option.
  12. Turn off the visibility of Work Plane to make the screen clear.
  13. Set the browser from Assembly View to Modeling View using the toggle at the top of the browser.
  14. Select the Angle Constraint in the Browser and change its name as ‘Drive’ by clicking twice slowly.
  15. Right click the Drive Constraint and select Drive Constraint Tool from the context menu.
  16. In the Drive Constraint dialog box, set the End value to 360 deg.
  17. Expand the dialog box and the set the value for Increment 0.25 deg.
  18. Clear the screen by activating the Clean Screen command, Click the Forward Button to display motion in Bevel Gear 2 and Bevel Gear 1.