Showing posts with label Helical Cutout. Show all posts

Wednesday, February 22, 2017

Gimlet (Solid Edge ST9 Tutorial)

Gimlet_1

Gimlet_2

Serial No. 33

Gimlet (Solid Edge ST9 Tutorial)

In this Solid Edge ST9 Tutorial we will describe how to build the model of a ‘Gimlet’. How to cutting thread along with sketch profile on the cylindrical surface and taper cylindrical surface (Part1) by sweeping a cross section along a helical path with ‘Axis length & Turns’ and ‘Taper by Angle’ option by using ‘Helical Cutout’ command. It is a part modelling and assembly modelling tutorial, first of all create a ‘Gimlet’ and afterward create a Handle in context of an assembly with the help of ‘Create Part In-Place’ command.

It will cover the following topics.

........................................................................................................

• Creating 2D Sketches on different Planes.

• Use some sketch constraints as Connect, Parallel, Concentric, Collinear, Perpendicular, Symmetric, Horizontal/Vertical, Equal etc. that are applied on during sketch creation to prepare the fully defined sketches.

• Use feature commands such as Extrude, Cut, Revolved Cut, Helical Cutout etc.

• Use the Cut command to removes a defined portion of the part.

• How to create ‘Helical Cutout’ feature with various operations such as ‘Axis length & Turns’ and ‘Taper by Angle’ by selecting a sketch profile.

• Use Extrude command with various operations such as symmetric, extrude-through all, finite extend.

• Use the ‘Copy Sketch’ command, how to copy sketches from a source document to a target document within the context of the active assembly which has been linked to the base part file, this command is very useful for constructing the new component in an assembly.


download-Link


Click the following link to get the model file: - http://bit.ly/2p0sQ9Q

Thursday, January 26, 2017

Pipe Wrench (Volume-1)—Solid Edge ST9 Tutorial

Pipe Wrench_1

Pipe Wrench_2

Serial No. 24-A.

Pipe Wrench (Volume-1)—Solid Edge ST9 Tutorial

(Rest of the design of the model is completed in Volume-2)

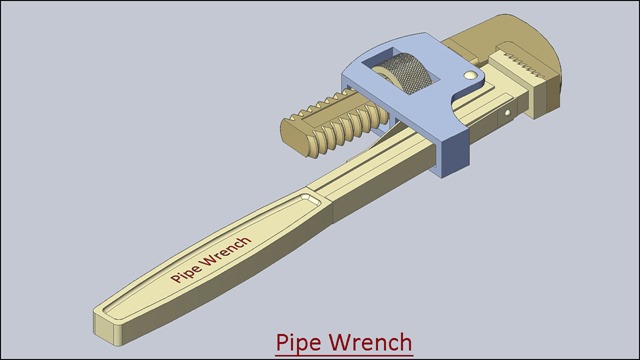
In this Solid Edge Tutorial we will describe how to build the model ‘Pipe Wrench’. It is a Part and Assembly modelling tutorial. This assembly consist 1 Assembly and 9 part files (Handle, Jaw, Threading Wheel with realistic knurling, 2 rivets, etc.) that are positioned according to design intent by using Assembly Constraints. This tutorial will give you a good practice of applying constraints in an assembly and give you an idea of Pipe Wrench mechanism.

To watch the video ‘Pipe Wrench (Volume-2)’, how to create a realistic knurling on cylindrical face of the part with the help of ‘Helical Curve’ command in Solid Edge software.

It will cover the following topics.

........................................................................................................

• Creating 2D Sketches on different Planes.

• Use some sketch constraints as Connect, Parallel, Horizontal/Vertical, Equal etc. that are applied on during sketch creation.

• Use features command such as Revolved, Extrude, Cut, Pattern, Helical Cutout, Helical Curve, Rectangular and Circular Pattern, Mirror Copy Feature, Round etc.

• How to create a helical path along the cylindrical face with the ‘Length and Turns’ option by using ‘Helical Curve’ command.

• Use the Mirror Copy Feature command to construct a mirror copy of selected features. The copy is associative to the original features. If the original features are changed or deleted, the mirror features update. You cannot directly edit the mirror features.

• How to create a realistic thread in our model Part3 and Part4 (BSP Thread Profile) by sweeping a cross section along a helical path by using ‘Helical Cutout’ command.

• How to change the color of the model by using ‘Part Painter’ tool.

• Use assembly commands such as Flash Fit, Angle mate, Axial Align mate, Connect mate, Mate/Planar Align command etc.

•How to create an Angular relationship between face of two components by applying an angle value (4.77 degree) by using ‘Angle Relationship’ command.

•How to check the interface between two components by using ‘Check Interference’ command.

• How to insert component into the assembly using drag and drop from parts library by using ‘Insert Component’ command.

• How to mate the parts by using ‘Flash Fit’ command in the assembly.

• How to lock the rotation of the component by using ‘Lock Rotation’ option in ‘Flash Fit’ command in the assembly.

• How to flip the component by using ‘Flip Side’ option in ‘Flash Fit’ command in the assembly.

• How to rotate and moving part by using ‘Drag Component’ command.

• Use ‘Show/Hide Component’ option in the assembly to mate the components more easily.


download-Link


Click the following link to get the model file: - http://bit.ly/2ns7jGu

Pipe Wrench (Volume-2)—Solid Edge ST9 Tutorial

Pipe Wrench_1

Pipe Wrench_2

Serial No. 24-B.

Pipe Wrench (Volume-2)—Solid Edge ST9 Tutorial

(Starting design of the model is created in Volume -1)

In this Solid Edge Tutorial we will describe how to build the model ‘Pipe Wrench’. It is a Part and Assembly modelling tutorial. This assembly consist 1 Assembly and 9 part files (Handle, Jaw, Threading Wheel with realistic knurling, 2 rivets, etc.) that are positioned according to design intent by using Assembly Constraints. This tutorial will give you a good practice of applying constraints in an assembly and give you an idea of Pipe Wrench mechanism.

To watch the video ‘Pipe Wrench (Volume-2)’, how to create a realistic knurling on cylindrical face of the part with the help of ‘Helical Curve’ command in Solid Edge software.

It will cover the following topics.

........................................................................................................

• Creating 2D Sketches on different Planes.

• Use some sketch constraints as Connect, Parallel, Horizontal/Vertical, Equal etc. that are applied on during sketch creation.

• Use features command such as Revolved, Extrude, Cut, Pattern, Helical Cutout, Helical Curve, Rectangular and Circular Pattern, Mirror Copy Feature, Round etc.

• How to create a helical path along the cylindrical face with the ‘Length and Turns’ option by using ‘Helical Curve’ command.

• Use the Mirror Copy Feature command to construct a mirror copy of selected features. The copy is associative to the original features. If the original features are changed or deleted, the mirror features update. You cannot directly edit the mirror features.

• How to create a realistic thread in our model Part3 and Part4 (BSP Thread Profile) by sweeping a cross section along a helical path by using ‘Helical Cutout’ command.

• How to change the color of the model by using ‘Part Painter’ tool.

• Use assembly commands such as Flash Fit, Angle mate, Axial Align mate, Connect mate, Mate/Planar Align command etc.

•How to create an Angular relationship between face of two components by applying an angle value (4.77 degree) by using ‘Angle Relationship’ command.

•How to check the interface between two components by using ‘Check Interference’ command.

• How to insert component into the assembly using drag and drop from parts library by using ‘Insert Component’ command.

• How to mate the parts by using ‘Flash Fit’ command in the assembly.

• How to lock the rotation of the component by using ‘Lock Rotation’ option in ‘Flash Fit’ command in the assembly.

• How to flip the component by using ‘Flip Side’ option in ‘Flash Fit’ command in the assembly.

• How to rotate and moving part by using ‘Drag Component’ command.

• Use ‘Show/Hide Component’ option in the assembly to mate the components more easily.

download-Link


Click the following link to get the model file: - http://bit.ly/2ns7jGu

Saturday, January 21, 2017

Drill Machine (Volume-1)—Solid Edge ST9 Tutorial

Drill Machine_1

Drill Machine_2

Serial No. 23-A.

Drill Machine (Volume-1)—Solid Edge ST9 Tutorial

(Rest of the design of the model is completed in Volume-2)

In this Solid Edge Tutorial we will describe how to build the model ‘Drill Machine’. It is a Part and Assembly modelling tutorial. This assembly consist 1 Assembly and 22 part files (Drill Machine frame (Multi Body part) Spindle, Drill chuck, Gear, Pinion, Gear hub, Washer, Handle etc.) that are positioned according to design intent by using Assembly Constraints. This tutorial will give you a good practice of applying constraints in an assembly and give you an idea of Drill Machine mechanism.

How to construct the part ‘Drill Machine Frame’ (Multi body part). After creating the frame convert all multi body parts into a single solid body with the help of ‘Union’ command.

It will cover the following topics.

........................................................................................................

• Creating 2D Sketches on different Planes.

• Use the sketch constraints that are applied on during sketch creation.

• Use features command such as Revolved, Extrude, Cut, Subtract, Intersection, Union, Add Body, Normal Cutout, Helical Cutout etc.

• Use the ‘Add Body’ command to create multiple bodies in a single part file (‘Drill Machine Frame’).

• Use the ‘Revolve’ command with different options.

• How to create a realistic thread in our model Spindle and Part1 (UNF Screw External &Internal Thread Profile) by sweeping a cross section along a helical path by using ‘Helical Cutout’ command.

• How to apply knurl image on the face of the model with the help of ‘Styles’ tool.

• How to change the color of the model by using ‘Part Painter’ tool.

• Use assembly commands such as Flash Fit, Axial Align mate, Connect mate, Mate/Planar Align command etc.

• How to mate the parts by using ‘Flash Fit’ command in the assembly.

• How to mating between the vertex point of gear and pinion by using ‘Connect Mate’ command.

• How to create gear relationship between gear and pinion by using ‘Gear’ mate command and how to define the number of teeth of the gear and pinion (15/56) to define the gear interaction.

• How to lock the rotation of the component by using ‘Lock Rotation’ option in ‘Flash Fit’ command in the assembly.

• How to flip the component by using ‘Flip Side’ option in ‘Flash Fit’ command in the assembly.

• How to rotate and moving part by using ‘Drag Component’ command.

• How to insert component into the assembly using drag and drop from parts library by using ‘Insert Component’ command.

• Use ‘Show/Hide Component’ option in the assembly to mate the components more easily.

• How to hide all components except the selected components by using ‘Isolate’ command in the assembly.


download-Link


Click the following link to get the model file: - http://bit.ly/2LWL8BP

Drill Machine (Volume-2)—Solid Edge ST9 Tutorial

Drill Machine_1

Drill Machine_2

Serial No. 23-B.

Drill Machine (Volume-2)—Solid Edge ST9 Tutorial

(Starting design of the model is created in Volume -1)

In this Solid Edge Tutorial we will describe how to build the model ‘Drill Machine’. It is a Part and Assembly modelling tutorial. This assembly consist 1 Assembly and 22 part files (Drill Machine frame (Multi Body part) Spindle, Drill chuck, Gear, Pinion, Gear hub, Washer, Handle etc.) that are positioned according to design intent by using Assembly Constraints. This tutorial will give you a good practice of applying constraints in an assembly and give you an idea of Drill Machine mechanism.

How to construct the part ‘Drill Machine Frame’ (Multi body part). After creating the frame convert all multi body parts into a single solid body with the help of ‘Union’ command.

It will cover the following topics.

........................................................................................................

• Creating 2D Sketches on different Planes.

• Use the sketch constraints that are applied on during sketch creation.

• Use features command such as Revolved, Extrude, Cut, Subtract, Intersection, Union, Add Body, Normal Cutout, Helical Cutout etc.

• Use the ‘Add Body’ command to create multiple bodies in a single part file (‘Drill Machine Frame’).

• Use the ‘Revolve’ command with different options.

• How to create a realistic thread in our model Spindle and Part1 (UNF Screw External &Internal Thread Profile) by sweeping a cross section along a helical path by using ‘Helical Cutout’ command.

• How to apply knurl image on the face of the model with the help of ‘Styles’ tool.

• How to change the color of the model by using ‘Part Painter’ tool.

• Use assembly commands such as Flash Fit, Axial Align mate, Connect mate, Mate/Planar Align command etc.

• How to mate the parts by using ‘Flash Fit’ command in the assembly.

• How to mating between the vertex point of gear and pinion by using ‘Connect Mate’ command.

• How to create gear relationship between gear and pinion by using ‘Gear’ mate command and how to define the number of teeth of the gear and pinion (15/56) to define the gear interaction.

• How to lock the rotation of the component by using ‘Lock Rotation’ option in ‘Flash Fit’ command in the assembly.

• How to flip the component by using ‘Flip Side’ option in ‘Flash Fit’ command in the assembly.

• How to rotate and moving part by using ‘Drag Component’ command.

• How to insert component into the assembly using drag and drop from parts library by using ‘Insert Component’ command.

• Use ‘Show/Hide Component’ option in the assembly to mate the components more easily.

• How to hide all components except the selected components by using ‘Isolate’ command in the assembly.


download-Link


Click the following link to get the model file: - http://bit.ly/2LWL8BP

Tuesday, January 10, 2017

Vise (Volume-2)—Solid Edge ST9 Tutorial

Vise_1_thumb[2]

Vise_2_thumb[2]

Serial No. 21-B.

Vise (Volume-2)—Solid Edge ST9 Tutorial

(Starting design of the model is created in Volume-1)

In this Solid Edge Tutorial we will describe how to build the model ‘Vise’. It is a Part and Assembly modelling tutorial. This assembly consist of 1 Main assembly, 3 Subassemblies and 12 part files (Jaw Plate, threaded stud, Handle, washer, spring etc.) that are positioned according to design intent by using Assembly Constraints. This tutorial will give you a good practice of applying constraints in an assembly and give you an idea of Vise mechanism.

It will cover the following topics.

........................................................................................................

• Creating 2D Sketches on different Planes.

• Use the sketch constraints that are applied on during sketch creation.

•. Use features command such as Extrude, Revolved, Loft, Cut, Chamfer, Round, Text Profile, Mirror, Hole features Revolved Cut etc.

•. ‘Lofted Protrusion’ command constructs a protrusion by fitting through a series of cross sections. You can define the cross sections using profiles drawn within the command, sketches, or edges of existing features. The cross sections must be closed elements.

• How to create a text on the model by using Text Profile command and emboss the text by using Extrude command.

• Use Extrude feature command to extrude a profile along a straight path.

• Use the Hole command to construct threaded holes.

• Use Mirror copy feature command to construct a mirror copy of selected features.

• How to create a realistic thread (Acme Thread) by sweeping a cross section along a helical path by using ‘Helical Cutout’ command.

• How to apply knurl image on the face of the model with the help of ‘Styles’ tool.

• How to change the color of the model by using ‘Part Painter’ tool.

• Use assembly constraints such as Axial Align mate, Planer Align mate, Mate command etc.

• How to insert component into the assembly using drag and drop from parts library by using ‘Insert Component’ command.

• Use ‘Show Reference Planes’ option in the assembly to mate the components more easily.

• How to use the Planar Align command to apply a relationship between selected parts.

• How to mate the parts by using ‘Flash Fit’ command in the assembly.

• How to rotate and moving part by using ‘Drag Component’ command. 

download-Link[6]


Click the following link to get the model file: - http://bit.ly/2VniPiY

Vise (Volume-1)—Solid Edge ST9 Tutorial

Vise_1

Vise_2

Serial No. 21-A.

Vise (Volume-1)—Solid Edge ST9 Tutorial
(Rest of the design of the model is completed in Volume-2)

In this Solid Edge Tutorial we will describe how to build the model ‘Vise’. It is a Part and Assembly modelling tutorial. This assembly consist of 1 Main assembly, 3 Subassemblies and 12 part files (Jaw Plate, threaded stud, Handle, washer, spring etc.) that are positioned according to design intent by using Assembly Constraints. This tutorial will give you a good practice of applying constraints in an assembly and give you an idea of Vise mechanism.

It will cover the following topics.

........................................................................................................

• Creating 2D Sketches on different Planes.

• Use the sketch constraints that are applied on during sketch creation.

•. Use features command such as Extrude, Revolved, Loft, Cut, Chamfer, Round, Text Profile, Mirror, Hole features Revolved Cut etc.

•. ‘Lofted Protrusion’ command constructs a protrusion by fitting through a series of cross sections. You can define the cross sections using profiles drawn within the command, sketches, or edges of existing features. The cross sections must be closed elements.

• How to create a text on the model by using Text Profile command and emboss the text by using Extrude command.

• Use Extrude feature command to extrude a profile along a straight path.

• Use the Hole command to construct threaded holes.

• Use Mirror copy feature command to construct a mirror copy of selected features.

• How to create a realistic thread (Acme Thread) by sweeping a cross section along a helical path by using ‘Helical Cutout’ command.

• How to apply knurl image on the face of the model with the help of ‘Styles’ tool.

• How to change the color of the model by using ‘Part Painter’ tool.

• Use assembly constraints such as Axial Align mate, Planer Align mate, Mate command etc.

• How to insert component into the assembly using drag and drop from parts library by using ‘Insert Component’ command.

• Use ‘Show Reference Planes’ option in the assembly to mate the components more easily.

• How to use the Planar Align command to apply a relationship between selected parts.

• How to mate the parts by using ‘Flash Fit’ command in the assembly.

• How to rotate and moving part by using ‘Drag Component’ command.


download-Link


Click the following link to get the model file: - http://bit.ly/2VniPiY

Sunday, December 4, 2016

Bolt and Nut (Solid Edge ST9 Tutorial)

Bolt and Nut_1

Bolt and Nut_2

Serial No. 9

Bolt and Nut (Solid Edge ST9 Tutorial)

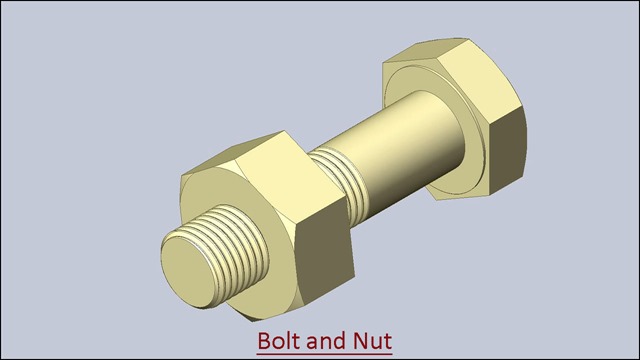
In this Solid Edge Tutorial we will describe how to build the model ‘Bolt and Nut’ and cut the UNF External/Internal thread with the help of ‘Helical Cutout’ command. After creating the model, place the parts in to the assembly.

It will cover the following topics.

........................................................................................................

• How to set the variable name by using Variables tool.

• How to convert the dimensions into the equations.

• Creating 2D Sketches on different Planes.

• Use the sketch constraints that are applied on during sketch creation.

• Use features command such as Extrude, Revolved Cut, Cut, Intersection, Chamfer etc.

• Use the Intersection Curve command to create in intersection between model face and Work plane.

• Use a 3D section view in a PMI model view.

• How to place part the in the assembly.

• How to rotate and moving part in assembly.


download-Link


Click the following link to get the model file: - http://bit.ly/2Ou6sAd