Showing posts with label SolidWorks. Show all posts

Saturday, December 28, 2019

Propeller (SolidWorks 2015 Tutorial)

Serial No. 228

Propeller (SolidWorks 2015 Tutorial)

The Design of ‘Propeller’ has been taken from Assembly of 'Blower' → ‘Sample files’ → Autodesk Inventor.
_____________________________________________________________
In this SolidWorks tutorial we will describe how to build the model of ‘Propeller’. It is a part modeling tutorial, it will cover the following topics.
________________________________________________________
• Creating 2D Sketches on different Planes of the model.
• Use the sketch constraints with the aid of ‘Add/Relation’ tool that are applied on during sketch creation.
• Use feature commands such as Extruded Boss/Base, Extruded Cut with ‘Flip side to cut’ option, Circular Pattern, Revolved Surface, Revolved Boss/Base, Thicket and the Fillet tool.
• Use Circular Pattern tool to create multiple instances of one feature.


Click the following link to get the model file: - http://bit.ly/2ZCwPaQ


...........................................................................................
Visit the following link to watch the basic tutorial on SolidWorks by us
https://www.youtube.com/playlist?list=PLb-IhKRMYSES3Zw3QHmQVqQ-rcFVzgYHy
.........................................................................
To watch more detailed tutorials on the same software visit the following link
https://www.youtube.com/playlist?list=PLKWX3xUP3pPo77gFCyy669sI76qJa5jKw
...................................................................................
Hope all of you enjoyed the tutorial. If you find the video useful please like it and share it with your friends/colleagues and do not forget to subscribe us to get latest updates about our new uploads.
http://www.youtube.com/user/nisheethsorjm?sub_confirmation=1
....................................................................................................
Dear Viewers if you like our work and wanted to support us, to keep continuing the good work, then become a patron of ours at ‘Patreon’ site. Patreon is a simple way for you to contribute to the creator’s work every month/ every time they release their new work and get rewards in return. Please visit the following link to know all about our work and what we are offering a reward to our patrons…
https://www.patreon.com/nisheethsri
.............................................................................


#solidworks #solidworkstutorial #solidworksassembly #solidworks #solidworkspart

AC-Motor (SolidWorks 2015 Tutorial)


Serial No. 227

AC-Motor (SolidWorks 2015 Tutorial)

In this SolidWorks tutorial, we have created a model named ‘AC-Motor’. This assembly consists of two parts one is motor and second is the motor shaft. AC-Motor is a Subassembly of ‘Blower’. The Design of ‘AC-Motor’ has been taken from Assembly of 'Blower' → ‘Sample files’ → Autodesk Inventor.

In this SolidWorks tutorial, we will describe how to build the model of ‘AC-Motor’. It will cover the following topics. • Creating 2D Sketches on different Planes of the model. • Use the sketch constraints with the aid of ‘Add/Relation’ tool that is applied on during sketch creation. • Use feature commands such as Revolved Boss/Base, Extruded Boss/Base, Extruded Cut, Circular Pattern, Linear Pattern, Mirror, Chamfer and the Fillet tool. • Adds the Extruded Cut feature to create a hole on the face of the model. • Use the Circular Pattern and Linear Pattern tool to create multiple instances of one feature.


Click the following link to get the model file: - http://bit.ly/365vbRc


...........................................................................................
Visit the following link to watch the basic tutorial on SolidWorks by us
https://www.youtube.com/playlist?list=PLb-IhKRMYSES3Zw3QHmQVqQ-rcFVzgYHy
.........................................................................
To watch more detailed tutorials on the same software visit the following link
https://www.youtube.com/playlist?list=PLKWX3xUP3pPo77gFCyy669sI76qJa5jKw
...................................................................................
Hope all of you enjoyed the tutorial. If you find the video useful please like it and share it with your friends/colleagues and do not forget to subscribe us to get latest updates about our new uploads.
http://www.youtube.com/user/nisheethsorjm?sub_confirmation=1
....................................................................................................
Dear Viewers if you like our work and wanted to support us, to keep continuing the good work, then become a patron of ours at ‘Patreon’ site. Patreon is a simple way for you to contribute to the creator’s work every month/ every time they release their new work and get rewards in return. Please visit the following link to know all about our work and what we are offering a reward to our patrons…
https://www.patreon.com/nisheethsri
.............................................................................


#solidworks #solidworkstutorial #solidworksassembly #solidworks #solidworkspart

Thursday, September 6, 2018

Creating a custom template in Solid Works 2017 (with caption and audio narration)

Creating a custom template in Solid Edge ST9

Serial No. 222

Creating a custom template in Solid Works 2017 (with caption and audio narration)


Transcription of the Video

  1. Create the new part in SolidWorks 2017 software.
  2. 'Trimetric' view is selected by default, choose 'Isometric' view.
  3. Create a new sketch over front plane.
  4. Draw a sketch and apply the dimension.
  5. Activate the 'Edit Document Units' button.
  6. In the Unit system section, select the 'Custom' button.
  7. Change the decimal value up to 3 places (under Basic Units → Length).
  8. If you want to measure linear length in two different units (i.e. millimetres and inches), then go to the Dual Dimension Length and select decimal value up to 3 places.
  9. Activate the Smart Dimension tool and apply on 'Dual Dimension' option.
  10. Once again activate the 'Edit Document Units' button.
  11. Set the fraction value 32(under Basic Units → Length).
  12. Click OK.
  13. Save this file by using 'Save As' command.
  14. In the 'Save as type' section, choose 'Part Templates' option.
  15. Save the template file by giving it proper name, in a SolidWorks template folder.
  16. Reopen the previously created template file to watch the effect.

Friday, August 24, 2018

'Elbow' SolidWorks 2014 Tutorial (with caption and audio narration)

Elbow

Serial No. 20

'Elbow' SolidWorks 2014 Tutorial (with caption and audio narration)

In this video, we create an Elbow by SolidWorks. In modelling of this part, Sweep Boss/Base, Shell, Helix/Spiral Curve, Circular Pattern, Fillet etc. tools are used. To cut thread, British Standard Pipe Thread profile is taken to be used.


  Click the following link to get the model file: - http://bit.ly/2nvXVBT


Transcription of the Video

  1. Open a new part file in SolidWorks.
  2. Activate the 'Edit Document Units' command.
  3. Set the digit in decimal up to 5 places and in fraction column-- 1/16 inches.
  4. Create a new sketch on the Top Plane.
  5. Draw the vertical and horizontal line from the part origin.
  6. Set the dimension of the line and convert it into construction geometry.
  7. Draw a 3 Point Arc, which lies on these two lines.
  8. Apply the radius of this arc and constraint it.
  9. Draw the line on the construction line.
  10. Exit the sketch.
  11. Create a new work-plane on this point of the line.
  12. Draw a circle on this plane.
  13. Activate the 'Swept Boss/Base' command.
  14. First select a circle as a profile and select the arc as a path.
  15. Click OK to finish the command.
  16. Activate the 'Shell' command.
  17. Select these two faces of the part and set the thickness value 1/8 inch.
  18. Save the part file, name it as 'Elbow'.
  19. Change the colour of the internal face of the model.
  20. Create a sketch on this face and take a project of this circular edge.
  21. Go to the 'Curves' panel and activate the 'Helix and Spiral' command.
  22. Select 'Sketch3' from feature manager design tree.
  23. Choose 'Height and Pitch' option.
  24. Select reverse direction and set height and pitch value.
  25. Click OK to finish the command.
  26. Create a new sketch on the Top Plane.
  27. Activate the section view button and choose Top Plane.
  28. Open 'BSP Thread Profile' part file.
  29. Copy the sketch profile and paste into the previous file.
  30. Take the project of helix curve and place the sketch on the endpoint of helix curve.
  31. Convert the helix curve into construction geometry.
  32. Finish the sketch and exit from the section view.
  33. Go to the 'Features' tab and activate the 'Swept Cut' command.
  34. First select BSP Thread Profile and then next select helix curve.
  35. Click OK to finish the command.
  36. Open the visibility of part origin.
  37. Activate the 'Axis' button.
  38. Create an Axis between origin point and Top Plane.
  39. Activate the 'Circular Pattern' command.
  40. First select the axis and then select the Cut-Sweep1 feature.
  41. Set the angle 270 degree and choose reverse direction.
  42. Click OK to finish the command.
  43. Apply the fillet on these two edges.

Tuesday, January 30, 2018

Animation displayed in 'Vise' Assembly--SolidWorks 2017 (with caption and audio narration)

SolidWorks Animation Tutorial ‘Vise’ Assembly_1

SolidWorks Animation Tutorial ‘Vise’ Assembly_2

Serial No. 220

Animation displayed in 'Vise' Assembly--SolidWorks 2017 (with caption and audio narration)

To watch full sketching video of this model 'Vise', please visit my another associated video named as 'Vise' (Video Tutorial --- Volume-1 and 2) SolidWorks.

download-Link


Click the following link to get the model file: - http://bit.ly/2VffJ0i


Transcription of the Video

  1. Create a new assembly within an English template.
  2. The ‘Begin Assembly’ command is already activated in the assembly design window.
  3. Browse the ‘Part1’ file from the Vise → ‘Subassembly-1’ folder, here select ‘Part1’ file and open it.
  4. Go to the ‘View (Heads-Up)’ toolbar, click on the ‘Visibility Off’ icon.
  5. Turn on the ‘View Origins’ button, the assembly origin button will be visible in the assembly design window.
  6. Place the ‘Part1’ file over the assembly origin.
  7. Now the ‘Part1’ file has fixed in the centre of the assembly.
  8. Choose Isometric view.
  9. Turn off the ‘View Origins’ button.
  10. Save the assembly, name it as ‘Subassembly1’.
  11. Activate the ‘Insert Components’ command and place the ‘Part2’ file in the assembly.
  12. Apply a ‘Coincident’ mate between the selected face of ‘Part1’ and selected face of ‘Part2’.
  13. Apply a ‘Coincident’ mate between the Right Plane of ‘Part1’ & Right Plane of ‘Part2’.
  14. Activate the ‘Mate’ command, choose ‘Distance’ option in the ‘Standard Mates’ section.
  15. Fill value 5.672 inches in the Distance input box and select the face of ‘Part1’ and select the face of ‘Part2’.
  16. Click Ok to apply the Distance mate.
  17. Now the ‘Part2’ file is fixed on the base of ‘Part1’, it can’t be moved.
  18. Save the subassembly.
  19. Place the ‘Part3’ file in the assembly by using ‘Insert Components’ command.
  20. Apply a ‘Coincident’ mate between the slotted face of ‘Part1’ and back face of ‘Part3’.
  21. Apply a ‘Coincident’ mate between the slotted face of ‘Part1’ & selected face of ‘Part3’ file.
  22. Apply a ‘Coincident’ mate between the side face of ‘Part3’ & side face of ‘Part1’ file.
  23. Now the ‘Part3’ component is fixed over the slot of ‘Part1’, it can’t rotate or drag it.
  24. Go to the ‘Task Pane’ tab, choose the ‘Design Library’ button and select the ‘Toolbox’ icon.
  25. Click ‘Add-in now’ button, here more types of ‘component standards’ are available, select one of them according to your choice.
  26. Open ‘ANSI Inch’ standard folder, next click ‘Bolts and Screws’ folder.
  27. Next click the ‘Countersunk Head’ folder and select ‘Countersunk Bolt’ item.
  28. Drag the bolt in graphics area of the assembly as shown.
  29. Select 5/16-18 from the Size area and set the length value to 0.875inch.
  30. Click OK to accept it and place one more similar bolt, click OK to finish the command.
  31. Apply a Concentric mate between the cylindrical face of ‘Countersunk bolt’ & hole of ‘Part3’.
  32. Go to the ‘Mates’ folder in the Model Tree, edit the ‘Concentric1’ mate and activate the ‘Lock Rotation’ button to stop the rotation of the bolt.
  33. Apply a Coincident mate between the selected face of the bolt and selected face of ‘Part3’.
  34. In the same way, fix another countersunk bolt over the second hole of ‘Part3’ by using ‘Mate’ command.
  35. Change the colour of bolts ‘Polished Brass’, it looks good.
  36. Save the ‘Subassembly1’.
  37. Close the ‘Subassembly1’.
  38. Create a new assembly file.
  39. Browse the ‘Part4’ file in the ‘Subassembly-2’ folder, select ‘Part4’ file and open it.
  40. Fix the aforesaid part in the assembly origin as stated in the previous section.
  41. Go to the View Cube and choose Isometric View.
  42. Activate the ‘Insert Components’ command and place the ‘Part5’ file in the assembly.
  43. Apply a ‘Coincident’ mate between the slotted face of ‘Part4’ and back face of ‘Part5’.
  44. Apply a ‘Coincident’ mate between the slotted face of ‘Part4’ & selected face of ‘Part5’ file.
  45. Apply a ‘Coincident’ mate between the side face of ‘Part5’ & side face of ‘Part4’ file.
  46. Save the assembly, name it as ‘Subassembly-2’.
  47. Place the two countersunk bolts from the SolidWorks Design Library which was explained earlier.
  48. Apply a Concentric mate between the cylindrical face of ‘Countersunk bolt’ & hole of ‘Part5’.
  49. Choose ‘Lock Rotation’ option.
  50. Apply a Coincident mate between the selected face of the bolt and selected face of ‘Part5’.
  51. In the same way, fix another countersunk bolt over the second hole of ‘Part5’ by using ‘Mate’ command.
  52. Change the colour of bolts ‘Polished Brass’, it looks good.
  53. Close the ‘Subassembly-2’.
  54. Create a new assembly file.
  55. Browse the ‘Part6’ file in the ‘Subassembly-3’ folder, select ‘Part6’ file and open it.
  56. Fix the aforesaid part in the assembly origin.
  57. Save the assembly, name it as ‘Subassembly-3’.
  58. Place the ‘Handle’ in the assembly.
  59. Apply a Concentric mate between the cylindrical face of ‘Handle’ & hole of ‘Part6’.
  60. Apply a Coincident mate between the Top Plane of ‘Part6’ and Front Plane of ‘Handle’.
  61. Now the Handle is fixed on the ‘Part6’ file, it can’t drag it.
  62. Go to the ‘Mates’ folder and edit the ‘Concentric1’ mate, choose ‘Lock Rotation’ option.
  63. Click Ok to finish the command.
  64. Save the assembly.
  65. Place the ‘Spring’ in the assembly.
  66. Change the colour of Spring ‘Brushed Aluminum’, it looks good.
  67. Go to the ‘View’ tab → select ‘Hide/Show’ button → click on ‘Axes’ icon.
  68. Open the visibility of ‘Axis1’ of Spring.
  69. Now the ‘Axis1’ of spring is visible in the assembly design window.
  70. Apply a Concentric mate between the Axis1 of ‘Spring’ & cylindrical face of ‘Part6’.
  71. Apply a Coincident mate between the circular face of ‘Part6’ & selected face of ‘Spring’.
  72. Turn-off the ‘Axes’ button.
  73. Insert the ‘Washer’ & ‘Pin’ in the assembly.
  74. Apply a Concentric mate between the hole of ‘Washer’ & cylindrical face of ‘Part6’.
  75. Apply a Coincident mate between the selected face of the Spring and selected face of ‘Washer’.
  76. Fix the Pin on the hole of ‘Part6’ by the aid of ‘Mate’ command.
  77. Now the subassembly is complete, save and close it.
  78. Create a new assembly within an English template.
  79. It is a main assembly to create the animation of Vise. Here three subassemblies will be placed which were created earlier.
  80. Browse the ‘Subassembly-1’ and open it.
  81. Place the ‘Subassembly-1’ on the assembly origin.
  82. Now the ‘Subassembly-1’ is fixed in the centre of the assembly.
  83. Choose Isometric view.
  84. Save the assembly, name it as ‘Vise with Animation’.
  85. Insert the ‘Subassembly-2’ in the assembly design area.
  86. Rotate the ‘Subassembly-2’ in front of ‘SubAssembly-1’ by using ‘Move with Triad’ tool.
  87. Apply a Coincident mate between the bed of ‘Subassembly-1’ and the bottom face of ‘Subassembly-2’.
  88. Apply a Coincident mate between the Right Plane of ‘Subassembly-1’ and Front Plane of ‘Subassembly-2’.
  89. Drag the ‘Subassembly-2’ to see the result, it can run on the bed of ‘Subassembly-1’.
  90. Insert the ‘Subassembly-3’ in the assembly design window.
  91. Rotate the ‘Subassembly-3’ in front of ‘SubAssembly-1’ by using ‘Move with Triad’ tool.
  92. Pick-up the ‘Part6’ & ‘Part2’ from the Model Tree, right-click and choose ‘Isolate’ option.
  93. Go to the ‘View’ tab → select ‘Hide/Show’ button → click on ‘Temporary Axes’ icon.
  94. Now the Axes of ‘Part6’ & ‘Part2’ are visible in the assembly design window.
  95. Activate the ‘Mate’ command, go to the ‘Mechanical Mates’ tab in the Mate dialogue box.
  96. Different types of mechanical mates are available here, choose any suitable mate according to need of the design.
  97. In this case we have selected ‘Screw’ mate button.
  98. Choose ‘Distance/revolution’ option and select the Axis of ‘Part6’ & Axis of ‘Part2’.
  99. Fill the value 1/7 inch in the ‘Distance/revolution’ input box, it will be designated by the ‘Mate Selections’ area.
  100. Click OK to execute the ‘Screw Mate’ command.
  101. Switch-off the ‘Temporary Axes’ button.
  102. Disable the ‘Exit Isolate’ button.
  103. Apply a Coincident mate between the circular face of ‘Part4’ and circular face of ‘Part6’.
  104. Rotate the Handle of Vise to examine the working of ‘Screw Mate’.
  105. When the Handle is rotated either in clockwise or anticlockwise direction, the ‘Subassembly-2’ will run closure or farther from the ‘Subassembly-1’.
  106. Activate the ‘Mate’ command, choose ‘Distance’ mate button.
  107. Set the value at 0 and select Jaw faces of ‘Subassembly-1’ & ‘Subassembly-2’.
  108. Click OK to finish the command.
  109. Go to the ‘Motion Study1’ tab and expand the animation timeline.
  110. Move the timebar at 1.5 second and go to the ‘Mates’ folder.
  111. Place a new key adjacent to ‘Distance1’ mate by the aid of ‘Place Key’ command.
  112. Move the timebar at 21.5 second and add a new key.
  113. Edit the ‘Distance1’ mate key and set the value 1inch in the Modify dialogue box.
  114. Click OK to accept it.
  115. ‘Subassembly2’ will open from start point 0 to 1 inch and it will consume time from 1.5 sec. to 21.5 sec. (i.e. time taken 20 seconds)
  116. Move the timebar at 29.5 second and place the new key.
  117. Move the timebar at 49.5 second, copy the ‘Distance1’ mate key and paste it.
  118. Now return back ‘Subassembly-2’ from 1 inch to start point 0, in this case time consumed from 29.5 to 49.5 seconds.
  119. Close the Mates folder.
  120. In the next section of this video, we will create two additional views to see different positions of the ‘Vise’.
  121. These saved views will be used next in the animation timeline.
  122. Minimize the animation timeline and clear the screen to see full view of the model.
  123. Set the position of the model in following way.
  124. Choose ‘New View’ button from the ‘Orientation’ dialogue box.
  125. A ‘Named View’ dialogue box will be visible in the design window and change its name as ‘View-1’ and click OK.
  126. Now ‘View1’ is added in the Orientation dialogue box.
  127. In the same manner, rotate the model in opposite side by using View Cube command and save the view name it as ‘View-2’.
  128. Save the assembly and return back to full screen view.
  129. Expand the animation timeline.
  130. Go to the ‘Orientation and Camera Views’ tab, select the ‘Isometric’ key.
  131. Select ‘View-1’ from the ‘Orientation’ dialogue box.
  132. Select the ‘Isometric’ key, right-click and choose ‘Replace Key’ option.
  133. Now the ‘Isometric’ key is replaced from ‘Isometric’ view to ‘View1’ by using ‘Replace Key’ command.
  134. Move the timebar at 23 second and place the new key.
  135. The ‘View-1’ of the model will be in still position from start point 0 to 23 sec. (i.e. time taken 23 seconds)
  136. Move the timebar at 28 second and select ‘View-2’ from the ‘Orientation’ dialogue box.
  137. Place the new key, time consumed 5 seconds from ‘View-1’ to ‘View-2’ position.
  138. Move the timebar at 51 second and place the new key.
  139. The ‘View-2’ of the model will be in still position from 28 to 51 sec. (i.e. time taken 23 seconds).
  140. Move the timebar at 56 second, copy the View-1 key and paste it.
  141. Time taken 5 seconds to return back in previous position of the model.
  142. Move the timebar at 28 second and go to the ‘Subassembly-1’ folder.
  143. Select the ‘Part1’ file and click ‘Add/Update Key’ button.
  144. A new key is added at 28 sec. in the animation timeline.
  145. Move the timebar at 29.5 second, select the ‘Part1’ file.
  146. Activate the ‘Edit Appearance’ command and change the color of ‘Part1’ as reflective green glass.
  147. Click OK to accept it.
  148. The time is taken 1.5 seconds for change the default color to transparent color of ‘Part1’ file.
  149. In the same manner, place two more keys at 49.5 and 51 seconds in the animation timeline.
  150. Go to the ‘Subassembly-2’ folder and select ‘Part4’ file.
  151. In the same manner, change the color of ‘Part4’ as reflective green glass and add 4 new keys at 28, 29.5, 49.5 & 51 seconds in the animation timeline.
  152. Click ‘Calculate’ button to check the animation.
  153. Click ‘Stop’ button, now see here the handle of vise is cut in the assembly design area while running of the animation. It’s not good in practice.
  154. Now we will create a new View and replace ‘View-2’ by this new view with the help of ‘Replace Key’ command.
  155. Set the desired view of the model and develop a new view, name it as ‘View-3’.
  156. And replace the key from ‘View-2’ to ‘View-3’ in the animation timeline.
  157. In the same way, replace another view key.
  158. Finally click calculate button and click ‘Play form Start’ button to observe the animation of ‘Vise’ mechanism.
  159. Save the assembly.
  160. Return back to the Model view.

Thursday, January 18, 2018

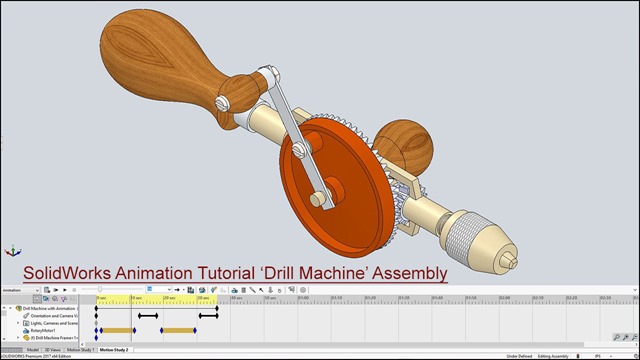
Animation displayed in 'Drill Machine' Assembly--SolidWorks 2014 (with caption and audio narration)

SolidWorks Animation Tutorial ‘Drill Machine’ Assembly_1

SolidWorks Animation Tutorial ‘Drill Machine’ Assembly_2

Serial No. 219

Animation displayed in 'Drill Machine' Assembly--SolidWorks 2014 (with caption and audio narration)

In this video, we will demonstrate how to  apply the different type of mates in the assembly environment for creating the animation.
..................................................................................
To watch full sketching video of this model 'Drill Machine', please visit my another associated video named as 'Drill Machine' (Video Tutorial) SolidWorks.

download-Link


Click the following link to get the model file: - http://bit.ly/2LMF9zg


Transcription of the Video

  1. Create a new assembly within an English template.
  2. The ‘Begin Assembly’ command is preactivated in the assembly design window.
  3. Go to the View tab, turn on the ‘Origins’ button.
  4. Place the ‘Drill Machine Frame’ in the assembly.
  5. Turn off the visibility of ‘Origins’ button.
  6. Save the file, call it as ‘Drill Machine with Animation’.
  7. Right-click on the design window and choose ‘New View’ tool in the Orientation dialogue box.
  8. Save the view as ‘Custom View’ in the Named View dialogue box and click OK.
  9. Activate the ‘Insert Components’ command and place the ‘Part9’ & ‘Part10’ file in the assembly.
  10. Rotate the ‘Part9’ file to the proper position by using ‘Move with Triad’ command.
  11. Apply a ‘Concentric’ mate between the selected inner cylindrical face of ‘Part9’ and outer cylindrical face of ‘Part10’.
  12. Choose ‘Lock Rotation’ option to stop the movement of the part, click OK to execute the command.
  13. Drag the ‘Part9’ file and apply ‘Coincident’ mate between the selected face of ‘Part10’ and selected inner circular face of ‘Part9’.
  14. Apply a ‘Concentric’ mate between the hole of ‘Part10’ and selected cylindrical face of ‘Drill Machine Frame’, which is highlighted in blue color.
  15. Choose ‘Lock Rotation’ option and click OK.
  16. Apply a ‘Coincident’ mate between the selected face of ‘Part9’ and selected face of ‘Drill Machine Frame’.
  17. Place the ‘Spindle’ in the assembly.
  18. Rotate the ‘Spindle’ in a proper position by using ‘Move with Triad’ command.
  19. Apply a ‘Concentric’ mate between the cylindrical face of ‘Spindle’ and the selected face of the hole of ‘Drill Machine Frame’.
  20. Drag the ‘Spindle’ and apply ‘Coincident’ mate between the selected face of ‘Spindle’ and selected face of ‘Drill Machine Frame’.
  21. Place the ‘Partr1’ file in the assembly.
  22. Apply a ‘Concentric’ mate between the cylindrical face of ‘Part1’ and cylindrical face of ‘Spindle’.
  23. Apply a ‘Coincident’ mate between the selected face of ‘Spindle’ and inner circular face of ‘Part1’.
  24. Apply another ‘Coincident’ mate between the Top Plane of ‘Spindle’ and Front Plane of ‘Part1’.
  25. Drag the chuck of a drill, you can observe here it is moving with the spindle.
  26. Save the assembly.
  27. Place the ‘Part2’ file in the assembly.
  28. Select the ‘Part2’ file from the Model Tree and drag two more copies of ‘Part2’ in the design window.
  29. Go to the View tab, turn on the ‘Temporary Axes’ button.
  30. The centre axis is visible in the assembly design window.
  31. Select the three copies of ‘Part2’ and rotate it.
  32. Apply a ‘Coincident’ mate between the ‘Axis1’ of first copy of ‘Part2’ and ‘Axis1’ of second copy of ‘Part2’.
  33. Next, apply a ‘Coincident’ mate between their slant edges.
  34. In the same way, apply a ‘Coincident’ mate between the second copy of ‘Part2’ and third copy of ‘Part2’.
  35. At the last, apply a ‘Coincident’ mate between their selected faces of ‘Part2’ files.
  36. Select all the components and rotate it.
  37. Apply a ‘Coincident’ mate between the Axis1 of ‘Part2’ and centre axis of the assembly.
  38. Apply a ‘Coincident’ mate between the inside circular face of ‘Part1’ and selected face of ‘Part2’.
  39. Turn off the ‘Temporary Axes’ button.
  40. Drag the ‘Part2’ file to examine the mate.
  41. Now see, the ‘Part2’ is moving on its own axis, so we will attach the planes of ‘Part1’ & ‘Part2’ by using ‘Coincident’ mate command.
  42. Select the Right Plane of ‘Part2’ and Front Plane of ‘Part1’ and activate the ‘Mate’ command.
  43. Click OK to execute the command.
  44. Now drag the ‘Part1’ to see the result.
  45. ‘Part1’, ‘Part2’ & Spindle of drill machine, each are rotating simultaneously.
  46. Save the assembly.
  47. Place the ‘Pinion-1’ in the assembly.
  48. Rotate the ‘Pinion-1’ in a suitable position by using ‘Move with Triad’ command.
  49. Apply a ‘Concentric’ mate between the center hole of ‘Pinion-1’ and selected cylindrical face of ‘Drill Machine Frame’.
  50. Place the ‘Pinion-2’ in the assembly.
  51. Apply another ‘Concentric’ mate between the center hole of ‘Pinion-2’ and cylindrical face of ‘Spindle.
  52. Apply a ‘Concentric’ mate between the side hole of the ‘Pinion-2’ and hole of ‘Spindle’.
  53. Place the ‘Revit’ in the assembly and fix it with the ‘Pinion’ by using ‘Mate’ command.
  54. Now drag the Pinion to examine the result.
  55. Place the ‘Bevel Gear’ & ‘Part7’ in the assembly.
  56. Rotate the ‘Bevel Gear’ & ‘Part7’ models in a desired position by using ‘Move with Triad’ command.
  57. Apply a ‘Concentric’ mate between the inner cylindrical face of ‘Bevel Gear’ & outer cylindrical face of ‘Part7’.
  58. Choose ‘Lock Rotation’ option and click OK to finish the command.
  59. Apply a ‘Coincident’ mate between the selected face of ‘Part7’ & selected face of ‘Bevel Gear’.
  60. Apply a ‘Concentric’ mate between the hole of ‘Part7’ & selected cylindrical face of ‘Drill Machine Frame’.
  61. Select the ‘Pinion-1’ & ‘Pinion-2’ from the model tree, right-click and choose ‘Isolate’ option.
  62. Go to the View tab, switch on the ‘Points’ button.
  63. The two points of ‘Pinion-1’ & ‘Pinion-2’ are visible in the design window.
  64. Whose names are ‘Intersection’ points, these points are also called as Vertices.
  65. Drag the Pinion-1 and activate the ‘Mate’ command, select intersection points of ‘Pinion-2’ & ‘Pinion-1’.
  66. And apply a ‘Coincident’ mate, disable the ‘Exit Isolate’ button.
  67. Drag the ‘Part7’ and switch-on the ‘Temporary Axes’ button.
  68. Apply a ‘Coincident’ mate between the Intersection point of ‘Bevel Gear’ and center axis of the assembly.
  69. Switch-off the ‘Points’ & ‘Temporary Axes’ button.
  70. Select the ‘Pinion-1’, ‘Pinion-2’ & ‘Bevel Gear’ part files from the model tree, right-click and choose ‘Isolate’ option.
  71. Activate the ‘Mate’ command, go to the ‘Mechanical Mates’ tab in the Mate dialogue box.
  72. Different types of mechanical mates are available here, choose any mate as you need according to your design.
  73. Choose the ‘Gear’ mate button, select the cylindrical face of ‘Pinion2’ and select the cylindrical face of ‘Bevel Gear’, this will be notified in the ‘Mate Selections’ area.
  74. In the ‘Ratio’ area, set the value 15:56 inch and click OK to finish the command.
  75. In the same manner, apply another gear mate between second pinion and bevel gear.
  76. Disable the ‘Exit Isolate’ button.
  77. Place the ‘Part4’ and ‘Washer’ in the assembly.
  78. Apply a ‘Concentric’ mate between the hole of ‘Part7’ and hole of ‘Washer’.
  79. Apply a ‘Coincident’ mate between the selected face of ‘Part7’ & selected face of ‘Washer’ which is highlighted in blue color.
  80. Apply a ‘Concentric’ mate between the hole of ‘Part4’ and selected cylindrical face of ‘Drill Machine Frame’.
  81. Apply a ‘Coincident’ mate between the selected circular face of ‘Drill Machine Frame’ and selected face of ‘Part4’.
  82. Apply a ‘Concentric’ mate between the hole of ‘Washer’ and hole of ‘Part4’.
  83. Now we will place ‘ANSI Inch Machine Screw Bolt’ in the assembly from the SolidWorks ‘Design Library’.
  84. Go to the ‘Task Pane’ tab and select the ‘Design Library’ button, expand the Toolbox icon and now see different kinds of ‘component standards’ are available here.
  85. Click ANSI Inch standard then click ‘Bolts and Screws’ folder.
  86. Next, click the Machine Screws folder and select ‘Pan Slot Head’ item.
  87. Drag the bolt in graphics area of the assembly as shown.
  88. Drop the bolt into the hole of ‘Part4’ in the following way.
  89. Select #10-24inch from the Size area and click OK to accept it.
  90. Select the ‘pan slot head’ bolt, right-click and choose ‘Edit Toolbox component’ option.
  91. Change the length value of the bolt 0.5 inch and click OK.
  92. Place the ‘Part3’ and ‘Part5’ file in the assembly.
  93. Apply a ‘Concentric’ mate between the selected circular face of ‘Part5’ & hole of ‘Part3’.
  94. Choose Lock Rotation option and click OK to finish the command.
  95. Apply a ‘Coincident’ mate between the selected circular face of ‘Part3’ and selected circular face of ‘Part5’.
  96. Apply a ‘Concentric’ mate between the hole of ‘Part4’ and outer cylindrical face of ‘Part3’.
  97. Apply a ‘Coincident’ mate between the selected face of ‘Part4’ and selected face of ‘Part3’.
  98. Bring another ‘Pan Slot Head’ bolt from the design library and insert it on the handle of drill machine as narrated in the earlier section.
  99. Change the length of the bolt as per our requirement and click OK.
  100. Insert the ‘Machine Screw Nut Hex’ in the assembly design window.
  101. Fix the hex nut on the bolt of the handle by using ‘Mate’ command.
  102. Save the assembly.
  103. Place the ‘Part6’ and ‘Part8’ files in the assembly by using ‘Insert Components’ command.
  104. Rotate the ‘Part6’ in the desired position by using ‘Move with Triad’ command.
  105. Apply a ‘Concentric’ mate between the outer cylindrical face of ‘Part8’ & outer cylindrical face of ‘Part6’.
  106. Apply a ‘Coincident’ mate between the selected circular face of ‘Part8’ and selected circular face of ‘Part6’.
  107. Apply a ‘Concentric’ mate between the selected cylindrical face of ‘Drill Machine Frame’ & selected circular face of ‘Part8’.
  108. Choose ‘Lock Rotation’ option and click OK to finish the command.
  109. Apply a ‘Coincident’ mate between the selected face of ‘Drill Machine Frame’ & selected face of ‘Part8’.
  110. Drag the handle of drill machine to examine the result, when the Bevel Gear rotates in an anti-clockwise direction then the Pinion of the drill machine rotates in a clockwise direction.
  111. Now we will do some alterations in the two ‘Gear’ mates.
  112. Go to the ‘Mates’ folder, select the ‘GearMate2’, right-click and choose ‘Edit feature’ option.
  113. Activate the ‘Reverse’ button and click OK.
  114. In the same manner, edit the ‘GearMate1’.
  115. Rotate the handle of drill machine to see the action.
  116. Apply a ‘Coincident’ mate between the Top Plane of ‘Part4’ & Right Plane of assembly.
  117. Suppress the ‘Parellel1’ mate.
  118. Activate the ‘New Motion Study’ command and expand the animation timeline.
  119. Activate the ‘Motor’ button in the animation timeline and rotate the model by using View Cube.
  120. In the Component/Direction section, Motion Location option is preactive in the Motor dialogue box.
  121. Select the cylindrical face of Bevel Gear as shown and set the value 6 RPM in the motion area.
  122. Click OK to execute the command.
  123. ‘Rotary Motor1’ key has added to the animation timeline at 0 second.
  124. Move the timebar at 1.5 second, right-click on the animation timeline and choose ‘Place Key’ option.
  125. Switch-off the ‘Rotary Motor1’ key at 0 second.
  126. Pause the motor for 1.5 second before the start of the animation.
  127. Move the timebar at 11.5 second and place a new key.
  128. Add another key at 19.5 second on the animation timeline.
  129. Switch-off the ‘Rotary Motor1’ key at 11.5 second.
  130. Move the timebar at 29.5 second and place one more key.
  131. Minimize the animation timeline and set the position of the model as shown.
  132. Choose ‘New View’ button from the ‘Orientation’ dialogue box.
  133. A ‘Named View’ dialogue box will be visible in the design window and change its name as ‘View-1’ and click OK.
  134. In the same manner, rotate the model in opposite direction and save it as ‘View-2’.
  135. Expand the animation timeline, go to the ‘Orientation and Camera’ tab and select the ‘Custom’ view key.
  136. Go to the View Cube and set ‘View-1’ from the view list.
  137. Select the ‘Custom’ view key, right-click and choose ‘Replace Key’ option.
  138. Now the Orientation and Camera key is replaced by change from the ‘Custom’ view to ‘View1’ with the aid of ‘Replace Key’ command.
  139. Move the time bar at 13 second and place a new key.
  140. Add a new key once again at 18 second, go to the View Cube and set ‘View-2’ from the view list.
  141. Time consume 5 seconds from changing ‘View-1’ to ‘View-2’ position.
  142. In the same way, add two more view keys at 31 & 36 seconds on the animation timebar.
  143. Select ‘Rotary Motor1’ key, right-click and choose ‘Off’ option.
  144. Click ‘Calculate’ button to check the motion study.
  145. Finally, click ‘Play from Start’ button to watch the full animation.
  146. Exit from the motion study environment and return back to assembly.
  147. Save the assembly.

Sunday, January 7, 2018

Animation displayed in 'Pipe Wrench' Assembly--SolidWorks 2014 (with caption and audio narration)

Pipe Wrench with Animation

Serial No. 35

Animation displayed in 'Pipe Wrench' Assembly--SolidWorks 2014 (with caption and audio narration)

In this video, we will demonstrate how to apply the different type of mates in the assembly environment for creating the animation.
..................................................................................
To watch full sketching video of this model 'Pipe Wrench', please visit on my another associated video named as 'Pipe Wrench' (Video Tutorial) SolidWorks.

download-Link


Click the following link to get the model file: - http://bit.ly/2VlqBK7


Transcription of the Video

  1. Create a new assembly inside an English template.
  2. The ‘Begin Assembly’ command is preactivated in the assembly design window.
  3. Go to the View tab and turn on the ‘Origins’ button.
  4. Place the ‘Part1’ file in the assembly.
  5. Turn off the visibility of ‘Origins’ button.
  6. Save the file call it as ‘Pipe Wrench with Animation’.
  7. When the first part file is placed in the assembly, the part remains as a grounded component.
  8. Activate the ‘Insert Components’ command and place the ‘Part2’ file in the assembly.
  9. Apply a ‘Concentric’ mate between the two holes of the Part.
  10. Apply a ‘Coincident’ mate between the Top Plane of ‘Part1’ and Top Plane of ‘Part2’.
  11. Apply an ‘Angle’ mate between these two edges of the parts.
  12. Fill the angle value 4.77 degrees in angle input box.
  13. Go to the View Cube and select the top view.
  14. Now you can examine here, how the angle mate works.
  15. Click OK to execute the command.
  16. Click the ‘Previous View’ button to return back to the Isometric view.
  17. Place the ‘Part5’ file in the assembly.
  18. Select the part file and precisely rotate it by using ‘Move with Triad’ command.
  19. Apply a ‘Concentric’ mate between inside cylindrical face of ‘Part5’ and hole of ‘Part2’.
  20. And choose ‘Lock Rotation’ option to check the movement of the part.
  21. Apply a ‘Coincident’ mate between the top face of ‘Part2’ and back face of ‘Part5’.
  22. Place the ‘Part6’ and ‘Part7’ file in the assembly.
  23. Apply a ‘Coincident’ mate between the top face of ‘Part7’ and side face of ‘Part1’.
  24. Apply a ‘Concentric’ mate between hole of ‘Part1’ and hole of ‘Part7’.
  25. Apply a ‘Coincident’ mate between the Top Plane of ‘Part1’ and Plane1 of ‘Part7’.
  26. Apply a ‘Concentric’ mate between the cylindrical face of ‘Part6’ and inner cylindrical face of hole of ‘Part7’.
  27. Apply a ‘Coincident’ mate between the side face of ‘Part7’ and back face of ‘Part6’.
  28. Place the ‘Part8’ file in the assembly.
  29. And rotate the part to a suitable position.
  30. Apply a ‘Concentric’ mate between holes of ‘Part8’ and ‘Part1’.
  31. Apply a ‘Coincident’ mate between the side face of ‘Part1’ and back face of the ‘Part8’.
  32. Apply a ‘Coincident’ mate between the Top Plane of ‘Part1’ and the Right Plane ‘Part8’.
  33. Place a copy of ‘Part6’ file in the assembly and mate it.
  34. Place the ‘Part3’ file and rotate in a proper position.
  35. Apply a ‘Coincident’ mate between the Top Plane of ‘Part2’ and Front Plane of ‘Part3’.
  36. Apply another ‘Coincident’ mate between the Top Plane of ‘Part3’ and Plane3 of ‘Part2’.
  37. Place the ‘Part4’ file in the assembly.
  38. Apply a ‘Coincident’ mate between the Plane2 of ‘Part2’ and the Right Plane of ‘Part4’.
  39. Go to the ‘Mechanical Mates’ tab in the Mate dialogue box.
  40. Different types of mechanical mates are available here, choose any mate as you need according to your design.
  41. Choose the ‘Screw’ mate button and select the ‘Distance/Revolution’ option.
  42. Set the ‘Distance/Revolution’ value 0.205 inches and choose ‘Reverse’ option.
  43. And apply the screw mate between Axis1 of ‘Part4’ and Axis1 of ‘Part3’.
  44. Click OK to finish the command.
  45. Drag the wheel of the wrench to check the screw mate and observe the result.
  46. The wheel rotates the jaw of Pipe Wrench with the help of ‘Screw’ mate command.
  47. Activate the ‘Move Component’ command and select the ‘Collision Detection’ option.
  48. Choose ‘These components’ option and select the ‘Part1’ and ‘Part3’ file.
  49. Make sure the ‘Stop at collision’ option should be selected.
  50. Activate the ‘Resume Drag’ button and drag the ‘Part3’ file until it touches to the opposite ‘Part1’ file.
  51. Now highlighted face shows here to stop the motion of the component at the moment of touch of any other entity.
  52. Click OK to finish the command.
  53. Apply a ‘Distance’ mate between the side face of ‘Part1’ and side face of ‘Part2’.
  54. The ‘Distance’ mate will automatically calculate the distance value of two components.
  55. Click OK to finish the command.
  56. Click on the ‘Motion Study’ tab and change the position of the model for creating the new view.
  57. Activate the ‘View Orientation’ command and select the ‘New View’ option.
  58. Set the ‘Named View’ as ‘View-1’ and click OK.
  59. Expand the animation timeline and go on the ‘Orientation and Camera’ tab.
  60. Right-click on the Orientation and Camera key, choose ‘Replace Key’ option.
  61. Now the Orientation and Camera key is replaced by changing from the ‘Isometric’ view to ‘View1’ with the help of ‘Replace Key’ command.
  62. Go to the ‘Distance2’ mate and move the timebar at 3 second.
  63. Copy the ‘Distance2’ mate key and paste it.
  64. Pause the animation for 3 seconds.
  65. Move the timebar at 33 second and double click on the distance mate to modify it.
  66. Fill the value (1.5831-1.00) inches in the Modify dialogue box and click OK.
  67. A new ‘Distance2’ key will be added at 33 second.
  68. Move the timebar at 53 second, copy above said key and paste it.
  69. A new ‘Distance2’ key will be added at 53 second.
  70. Move the timebar at 83 second, copy the ‘Distance2’ mate key and paste it.
  71. Go to the ‘Orientation and Camera Views’ tab.
  72. Copy the ‘Orientation and Camera Views’ key, whose name is ‘View-1’.
  73. Move the timebar at 38 second and paste the ‘View-1’ key.
  74. Move the timebar at 48 second and minimize the animation timeline.
  75. Go to the View Orientation toolbar and choose ‘Bottom View’.
  76. Right-click in the design window and go to the ‘Set Current View As’ option, select ‘Top’ view.
  77. Go to the View Orientation toolbar and choose back face of view cube.
  78. And set the current view as Front view.
  79. Go to the View Orientation toolbar and select this face, it will change into Isometric view.
  80. Activate the ‘New View’ and set the ‘Named View’ as ‘View-2’ and click OK.
  81. Expand the animation timeline and place the new key.
  82. The time consume 10 seconds in changing from View-1 to View-2 position.
  83. Copy the ‘View-2’ key and paste the key at 88 second.
  84. Move the timebar at 98 second, copy the ‘View1’ key and paste it.
  85. Move the timebar at 48 second and Right-click on the ‘Lights, Camera and Scene’ folder.
  86. Choose ‘Add Directional Light’ option.
  87. Now we will do some changes here in the basic light and light direction.
  88. Click OK to execute the command.
  89. The ‘Directional5’ light has been added to the Lights folder.
  90. Select the ‘Directional5’ light and activate the ‘Add/Update Key’ button.
  91. Now the light key is added at 48 second in the animation timeline by using ‘Add/Update Key’ command.
  92. In the same manner, add another light key at 38 second in the animation timeline.
  93. The time is being taken 10 seconds in changing from Default Light to ‘Directional5’ light to change the light direction of the model.
  94. Right-click on the ‘Directional5’ light and choose ‘Off in SolidWorks’ option.
  95. Copy the ‘Directional5’ light key and paste the key at 0 second.
  96. The Default light remains in still position for 38 seconds.
  97. In the same way, place two more ‘Directional5’ light keys at 88 second and 98 second in the animation timeline.
  98. Click ‘Calculate’ button and stop the animation.
  99. Clear the screen for a full view of the model and save the assembly.
  100. Play the animation.
  101. Stop the animation, here we have edited on the ‘View1’ position with the help of ‘Update Standards Views’ command.
  102. Expand the animation timeline, go on the ‘Orientation and Camera Views’ tab.
  103. Minimize the animation timeline and set position of the model.
  104. Right-click on the design window and activate the ‘Update Standards Views’ command and select ‘View1’ position.
  105. Go to the View Orientation tab and choose ‘View1’ position.
  106. Right-click on the ‘Custom’ view key and select ‘Replace Key’ option.
  107. In the same manner, update the two more view keys.
  108. At the last, click ‘Play from Start’ button to see the animation.

Sunday, December 31, 2017

Animation displayed in 'Nose Pliers' Assembly--SolidWorks 2017 (with caption and audio narration)

Animation displayed in Nose Pliers

Serial No. 32

Animation displayed in 'Nose Pliers' Assembly--SolidWorks 2017 (with caption and audio narration)

In this video, we will demonstrate how to apply the different type of mates in the assembly environment for creating the animation.
..................................................................................
To watch full sketching video of this model 'Nose Pliers', please visit on my another associated video named as 'Nose Pliers' (Video Tutorial) SolidWorks.

download-Link


Click the following link to get the model file: - http://bit.ly/2oUp3Lb


Transcription of the Video

  1. Create a new assembly inside an English template.
  2. The ‘Begin Assembly’ command is preactivated in the assembly design window.
  3. Place the ‘Part1’ file in the assembly.
  4. Save the assembly, name it as ‘Nose Pliers with Animation’.
  5. When the first part file is placed in the assembly, the part remains as a grounded component.
  6. So we will do unground the part with the help of ‘Float’ option.
  7. Right-click on the ‘Part1’ file and choose ‘Float’ option.
  8. Drag the part and select it, choose ‘Edit Part’ option from the design window.
  9. Go to the model tree and open the visibility of ‘Axis1’.
  10. The Axis is not visible in the design window, so we will turn on the ‘Axes’ button.
  11. Now the axis is visible in the design window.
  12. Return back to the assembly environment.
  13. Apply a ‘Coincident’ mate between the Top Plane of Assembly and Top Plane of ‘Part1’.
  14. Apply another ‘Coincident’ mate between the Axis1 of ‘Part1’ and Origin point of the Assembly.
  15. Activate the ‘Insert Component’ command, place the ‘Part2’ file in the assembly.
  16. Rotate the part by using ‘Move with Triad’ command.
  17. Apply a ‘Concentric’ mate between the two holes of the Part.
  18. Apply a ‘Coincident’ mate between the inside face of the slot of ‘Part1’ and inside face of the slot of ‘Part2’.
  19. Place the ‘Revit’ file in the assembly.
  20. Select the ‘Revit’ file and rotate to the proper position.
  21. Apply a ‘Concentric’ mate between inside cylindrical face of ‘Revit’ and inside cylindrical face of the hole of ‘Part2’.
  22. Apply a ‘Coincident’ mate between inside face of the ‘Part2’ and back face of ‘Revit’.
  23. Apply a ‘Coincident’ mate between Front Plane of ‘Revit’ and Right Plane of the assembly.
  24. Drag the ‘Part1’ file and activate the Mate command.
  25. Different types of mates are available here, choose any mate as you need according to your design.
  26. Select the ‘Angle’ mate option and set the angle value 0 deg.
  27. Select the face of ‘Part1’ and Right Plane of assembly, select the ‘Anti-Aligned’ button under the Mate alignment option.
  28. Choose the ‘Flip dimension’ option and click OK to execute the command.
  29. In the same manner, apply another ‘Angle’ mate on the opposite side of the part.
  30. Now the assembly component is fulley defined in the assembly.
  31. Suppress the ‘Angle2’ mate.
  32. Activate the ‘Move Component’ command and select the ‘Collision Detection’ option.
  33. Drag the part until it touches the opposite part.
  34. Now highlighted face shows here to stop the motion of the component at the moment of touch of any other entity.
  35. Click OK to finish the command.
  36. Go to the Evaluate tab and activate the ‘Measure’ command.
  37. Measure the angle between these two edges of the part.
  38. Activate the ‘Interference Detection’ command.
  39. And check the interference between the two components.
  40. Unsuppress the ‘Angle2’ mate.
  41. Go to the ‘Motion Study’ tab, click the ‘Expand Motion Manager’ button.
  42. Right-click on the ‘Orientation and Camera Views’ option, select the ‘Disable Playback of View Keys’ option.
  43. Go to the ‘Mates’ folder, select the ‘Angle1’ mate and move the timebar at 10 second.
  44. Right-click on the animation timeline and place the new key by using ‘Place Key’ command.
  45. Modify this new key and paste the angle value 69.78676/2 deg. and click OK.
  46. Move the timebar at 13 second and place the new key.
  47. Pause the animation for 3 seconds.
  48. Move the timebar at 23 second and place the new key.
  49. Modify this new key, fill the value 0 deg. and click OK.
  50. Follow the same steps which were done earlier to create the animation for ‘Angle2’ mate.
  51. Click the ‘Calculate’ button to check the animation.
  52. Stop the animation and clear the screen to view full screen of the model.
  53. At the last, click ‘Play from Start’ button to see the result.

Wednesday, December 27, 2017

Animation displayed in 'Combination Pliers' Assembly--SolidWorks 2014 (with caption and audio narration)

Animation by Precise Positioning in Combination Pliers

Serial No. 33

Animation displayed in 'Combination Pliers' Assembly--SolidWorks 2014 (with caption and audio narration)

In this video, we will demonstrate how to apply the different type of mates in the assembly environment for creating the animation.

………………………………………………………………………………

To watch full sketching video of this model 'Combination Pliers', please visit on my another associated video named as 'Combination Pliers' (Video Tutorial) SolidWorks.

download-Link


Click the following link to get the model file: - http://bit.ly/2oyA2ti


Transcription of the Video

  1. Create a new assembly inside an English template.
  2. The ‘Begin Assembly’ command is preactivated in the assembly design window.
  3. Place the ‘Part1’ file in the assembly.
  4. When the first part file is placed in the assembly, the part remains as a grounded component.
  5. So we will do unground the part with the help of ‘Float’ option.
  6. Right-click on the ‘Part1’ file and choose ‘Float’ option.
  7. Rotate the part by using ‘Move with Triad’ command.
  8. Save the assembly, name it as ‘Combination Pliers with Animation’.
  9. Select the part file in the design window and choose ‘Edit Part’ option.
  10. Go to the design tree, open the visibility of ‘Axis1’ and go on the ‘View’ tab and turn on the ‘Axes’ button.
  11. The Axis is shown in the design window.
  12. Return back to the assembly environment.
  13. Apply a ‘Coincident’ mate between the Top Plane of Assembly and Top Plane of ‘Part1’.
  14. Apply another ‘Coincident’ mate between the Axis1 of ‘Part1’ and Origin point of the Assembly.
  15. Activate the ‘Insert Component’ command, place the ‘Part2’ file in the assembly.
  16. Apply a ‘Concentric’ mate between the two holes of the Part.
  17. Apply a ‘Coincident’ mate between the inside face of the slot of ‘Part2’ and inside face of the slot of ‘Part1’.
  18. Drag the Plier to see the effect, the part moves on its own axis.
  19. Place the ‘Part3’ file in the assembly.
  20. Select the ‘Part3’ file and rotate to the proper position.
  21. Apply a ‘Concentric’ mate between inside cylindrical face of ‘Part3’ and inside cylindrical face of the hole of ‘Part1’.
  22. Apply a ‘Coincident’ mate between inside face of the ‘Part1’ and back face of ‘Part3’.
  23. Close the visibility of ‘Axis1’.
  24. Go to the View tab and turn on the ‘Planes’ button.
  25. Open the visibility of Right Plane of the assembly.
  26. Apply an ‘Angle’ mate on this face and Right Plane of the assembly.
  27. Set the angle value 0 degree and click OK.
  28. In the same way, apply another ‘Angle’ mate on the opposite side of the part.
  29. Apply a ‘Coincident’ mate between Right Plane of the ‘Part3’ and Right Plane of the assembly.
  30. Go to the ‘Mates’ folder and Suppress the ‘Angle2’ mate.
  31. Activate the ‘Move Component’ command and select the ‘Collision Detection’ option.
  32. Drag the part until touch to the opposite part.
  33. Now highlighted face shows here to stop the motion of the component at the moment of touch of any other entity.
  34. Click OK to finish the command.
  35. Go to the ‘Evaluate’ tab, measure the angle between these two edges of the part by using ‘Measure’ command.
  36. Activate the ‘Interference Detection’ command and check interference between the two components.
  37. Unsuppress the ‘Angle2’ mate.
  38. Go to the ‘Motion Study’ tab and click on the ‘Disable Playback of View Keys’ option on the animation timeline.
  39. Go to the Mates folder, select ‘Angle1’ mate and drag the timebar at 10 second.
  40. Modify the ‘Angle1’ mate key, fill the angle value to 20.077055 deg. and click OK.
  41. Drag the timebar at 13 second and right-click on the timeline, click ‘Place Key’ option.
  42. Pause the animation for 3 seconds.
  43. Drag the timebar at 23 second, double click on the ‘Angle1’ mate and fill the value 0 deg. in the Modify dialogue box, click OK.
  44. Repeat same steps which were done earlier for creating the animation of ‘Angle2’ mate.
  45. Click the ‘Collapse Motion Manager’ button.
  46. Now start the animation to see the result.
  47. Save the assembly.

Monday, December 18, 2017

Animation displayed in Box (mini size) -- SolidWorks 2017 (with caption and audio narration)

Box (mini size) with Animation

Serial No. 215

Animation displayed in Box (mini size) -- SolidWorks 2017 (with caption and audio narration)

In this video, we will demonstrate how to apply the different type of mates in the assembly environment for creating the animation in SolidWorks 2017.

download-Link


Click the following link to get the model file: - http://bit.ly/30MboTG


Transcription of the Video

  1. Create a new assembly with an inch template.
  2. And place the ‘Part1’ file in the assembly.
  3. When the first part file is placed in the assembly, the part remains as a grounded component.
  4. This part does not need to place any mates.
  5. Go to the ‘View Orientation’ tab and choose an ‘Isometric’ view.
  6. Activate the ‘Insert Components’ command and place the ‘Part3’ file in the assembly.
  7. Apply a ‘Coincident’ mate between the Front face of ‘Part1’ and Back face of ‘Part3’.
  8. Apply a ‘Coincident’ mate between Front Plane of the assembly and Front Plane of ‘Part3’.
  9. Apply a ‘Distance’ mate between the top face of ‘Part3’ and ‘Part1’.
  10. Set the distance value 0.688 inches and click OK.
  11. Activate the ‘Insert Components’ command and place the ‘Part6’ file in the assembly.
  12. Apply a ‘Concentric’ mate between the inner circular face of ‘Part6’ and an outer circular ring of ‘Part1’.
  13. Apply a ‘Coincident’ mate between the back face of ‘Part1’ and back face of ‘Part6’.
  14. Save the assembly with the name ‘Base Assembly’.
  15. Apply a ‘Distance’ mate between the side face of ‘Part1’ and ‘Part6’.
  16. Set the distance value 2.564 inches and click OK.
  17. In the same manner, place a copy of ‘Part6’ in the assembly and mate it with ‘Part1’.
  18. Create another new assembly and place the ‘Part2’ file in the assembly.
  19. Open the visibility of Front Plane of assembly and turn on the ‘View Planes’ button.
  20. Open the visibility of Top Plane of ‘Part2’.
  21. Right-click on the ‘Part2’ file and select ‘Float’ option.
  22. Apply a ‘Coincident’ mate between the Top Plane of ‘Part2’ and Front Plane of Assembly.
  23. Turn off the visibility of planes.
  24. Apply a Coincident mate between Right Plane of ‘Part2’ and Right Plane of ‘Assembly2’.
  25. Save the assembly, name it as ‘Lid Assembly’.
  26. The part is not fully defined in the assembly, so that apply another ‘Coincident’ mate between the Top plane of Lid assembly and the Front plane of ‘Part2’.
  27. Activate the ‘Insert Components’ command and place the ‘Part7’ file in the assembly.
  28. Apply a ‘Coincident’ mate between the top face of ‘Part2’ and back face of ‘Part7’.
  29. Apply a ‘Coincident’ mate between Front Plane of Lid assembly and Front Plane of ‘Part7’.
  30. Apply a ‘Coincident’ mate between Right Plane of the ‘Part7’ and Right Plane of ‘Lid assembly’.
  31. Place the ‘Part5’ file in the assembly.
  32. Apply a ‘Concentric’ mate between the outer circular face of ‘Part5’ and inside face of the hole of ‘Part2’.
  33. Apply a ‘Coincident’ mate between Front Plane of ‘Part5’ and Front Plane of ‘Lid Assembly’.
  34. Apply a ‘Coincident’ mate between Right Plane of ‘Lid Assembly’ and Right Plane of ‘Part5’.
  35. Now the part is Fully Defined in the assembly.
  36. Go to the ‘Evaluate’ tab and check the interference between two components by using ‘Interference Detection’ command.
  37. Save and close all the assembly files.
  38. Create a new Assembly file, it is our main assembly to create animation, and place the ‘Base Assembly’ file in the assembly.
  39. Choose an Isometric View, right-click in the design area and activate the ‘View Orientation’ command.
  40. In the Orientation dialogue box, select the ‘New View’ option.
  41. Set the ‘Named View’ as ‘View-1’ and click OK.
  42. Save the assembly by the name ‘Box (mini size) with Animation’.
  43. Activate the ‘Insert Components’ command and place the ‘Lid Assembly’ file.
  44. Apply a ‘Concentric’ mate between inside hole of the hinge and outer circular face of wire.
  45. Apply a ‘Coincident’ mate between the side face of the hinge and face of slot of lid.
  46. Drag the Lid Assembly and see the result, the ‘Lid Assembly’ rotates on the base of the hinge.
  47. Place the ‘Part4’ file in the assembly.
  48. Apply a ‘Concentric’ mate between the hole of the ‘Part4’ and outer circular face of wire.
  49. Apply a ‘Coincident’ mate between the side face of ‘Part4’ and face of slot of lid.
  50. Apply a ‘Tangent’ mate between the bottom face of the lid and outer circular ring of ‘Part1’.
  51. Apply a ‘Coincident’ mate between the front face of ‘Base Assembly’ and back face of ‘Part4’.
  52. Place the ‘Part8’ file in the assembly.
  53. Turn off the visibility of the sketch of ‘Part8’ by using ‘View Sketches’ command.
  54. Apply a ‘Concentric’ mate between ‘Axis1’ of the Lid assembly and circular face of ‘Part8’.
  55. Apply a ‘Coincident’ mate between the Front Plane of ‘Part8’ and Front Plane of main assembly.
  56. Apply a ‘Tangent’ mate between the cylindrical face of ‘Part8’ and the top face of ‘Part7’.
  57. Check the interference between Handle and base.
  58. Suppress the ‘Tangent1’, ‘Coincident3’ and ‘Tangent2’ mates.
  59. Apply an ‘Angle’ mate between the Right Plane of ‘Part8’ and the top face of ‘Part7’.
  60. Set the angle value to 12.46923 degrees and Click OK.
  61. Change the name of the angle mate as ‘Drive-1’.
  62. Unsuppress the ‘Tangent1’ mate and apply an ‘Angle’ mate between the back face of the ‘Part4’ and the front face of the ‘Part1’.
  63. Set the angle value to 0 degree and Click OK.
  64. Change the name of the angle mate as ‘Drive-2’.
  65. Suppress the ‘Tangent1’ and ‘Drive-2’ mates.
  66. Drag the ‘Lid Assembly’ and turn on the ‘View Planes’ button.
  67. Apply the ‘Angle’ mate between Plane3 of ‘Part1’ and back face of ‘Lid Assembly’.
  68. Set the angle value to 0 degree and Click OK.
  69. Unsuppress the ‘Drive-2’ mate and change the name of the ‘Angle6’ mate as ‘Drive-3’.
  70. In the next section of this video, we will create three additional views with in alternate position of this model before entering the ‘Motion Study’ environment.
  71. These saved views will be used later in animation timeline.
  72. Click on the ‘Motion Study’ tab and click the ‘Collapse Motion Manager’ button.
  73. Choose ‘View-2’ in the Orientation dialog box.
  74. Click ‘Expand Motion Manager’ button.
  75. Go on the ‘Orientation and Camera’ tab in the animation timeline.
  76. Right-click the View-5 key and select ‘Replace Key’ option.
  77. Right-click on the animation timeline, move the time bar at 2 second.
  78. Copy the ‘View-2’ key and paste it.
  79. Pause 2 seconds on the ‘View-2’ position.
  80. Move the time bar at 7 second and place the new key.
  81. Choose ‘View-3’ in the Orientation dialogue box.
  82. Right-click on the View-2 key and select ‘Replace Key’ option.
  83. Time required 5 seconds in changing from View-2 to View-3 position.
  84. In the Mates folder, copy the ‘Drive-1’ mate key.
  85. Move the time bar at 9 second and paste the key.
  86. Pause 2 seconds on the ‘View-3’ position.
  87. Move the time bar at 24 second and place the new key.
  88. Double click on the new key to modify the key and set the specified angle 167.53077 degrees and click OK.
  89. Move the time bar at 26 second, copy the ‘View-3’ key and paste it.
  90. Move the time bar at 31 second and place the new key.
  91. Minimize the animation timeline and set the view as ‘View-4’ position.
  92. Expand the animation timeline and choose ‘Replace Key’ option.
  93. Time consume 5 seconds in changing from View-3 to View-4 position.
  94. Move the time bar at 33 second.
  95. Copy the ‘Drive-2’ mate key and paste the key.
  96. Move the time bar at 48 second and place the key.
  97. Modify the key and set the angle value to 90 degree.
  98. Move the time bar at 50 second, copy the ‘View-4’ key and paste the key.
  99. Move the time bar at 55 second and paste the key.
  100. Choose ‘View-5’ in the Orientation dialogue box.
  101. Right-click on the View-4 key and select ‘Replace Key’ option.
  102. Move the time bar at 57 second, copy the ‘Drive-3’ mate key and paste the key.
  103. Move the time bar at 72 second and place the new key.
  104. Modify the key and set the angle value to 90 degree.
  105. The time spent for each Drive mates will be of 15 seconds.
  106. Click ‘Calculate’ button to calculate the motion study.
  107. Stop the animation and click ‘Play from Start’ button and start the animation.
  108. Follow the same steps which were done earlier to create the animation in reverse direction.
  109. Now start the animation to see the result.
  110. Save the assembly.

Friday, December 1, 2017

Animation displayed in Ceiling Hook -- SolidWorks 2014 (with caption and audio narration)

Ceiling Hook---1

Serial No. 214


Animation displayed in Ceiling Hook -- SolidWorks 2014 (with caption and audio narration)

In this video, we will demonstrate how to apply the different type of mates in the assembly environment for creating the animation.
..................................................................................
To watch full sketching video of this model 'Ceiling Hook', please visit on my another associated video named as 'Ceiling Hook with Animation' (SolidWorks).


download-Link


Click the following link to get the model file: - http://bit.ly/31K8Bvu 


Transcription of the Video
  1. Create a new assembly file.
  2. The ‘Begin Assembly’ command is already activated in the assembly design window.
  3. Click Browse button, place the part file ‘Hook’.
  4. First of all, open the visibility of ‘View Origin’ of the assembly.
  5. Click the View Origin point button to place the file, centre of the assembly.
  6. Choose ‘Isometric View’.
  7. In the same way, place one more part file-name ‘Circular Ring.’
  8. Rotate the part by using ‘Move with Triad’ tool.
  9. Save the assembly with the name ‘Ceiling Hook’ and edit the ‘Hook’ part file.
  10. Create a new sketch over the ‘Front Plane’ and take a project of this circular edge by using ‘Convert Entities’ command.
  11. Finish the sketch and return back to the assembly environment.
  12. Select the Front Plane of assembly and Right Plane of Circular Ring and mate it.
  13. It will apply a Coincident mate.
  14. Move the Circular Ring slightly.
  15. Activate the ‘Mate’command, select tangent face of Circular Ring and arc along the path of hook, and apply the tangent mate.
  16. Select the Front Plane of Circular Ring, Right Plane of assembly and apply the Coincident mate.
  17. Edit the Circular Ring part and activate the Axis tool.
  18. Choose ‘Point and Face/Plane’ option as this particular type of selection.
  19. Many options available here, choose any option as you need.
  20. Select the origin point and Front Plane of assembly to create the axis.
  21. Click OK to execute the command.
  22. Open the visibility of axis by using ‘View Axes’ command.
  23. Return to the assembly view.
  24. Activate the ‘Mate’ command, select the assembly origin and Axis of Circular Ring and apply it.
  25. Select the Coincident2 mate and suppress the mate.
  26. Let see here, the Circular ring part rotates about the inner periphery of Hook with the help of tangent and axis mate.
  27. Create an Axis between origin point of assembly and end point of arc in assembly.
  28. Create a new work plane between front plane and this axis.
  29. A work plane has been created along the axis.
  30. Apply an angle mate between Front plane of Circular Ring and Plane1.
  31. Set the angle value to 0 degree.
  32. Go on the Evaluate tab and activate the ‘Measure’ command.
  33. Select the Top Plane and Plane1 and monitor the value.
  34. Copy the angle value and calculate the value as shown (290.39126 degree).
  35. In the next section, we will create animation on the Circular Ring its start value is 00 and end value 290.391260.
  36. Choose Front View, in the Orientation dialog box, activate the ‘New view’ command and set its name as ‘View2'.
  37. In the same manner, choose Isometric View, set its name as ‘View1’.
  38. These saved views will be used later in animation timeline.
  39. Select the Motion Study tab, click the Orientation and Camera button in the animation timeline.
  40. Right click on the time bar and select Move Time Bar option, set the time on 2 second.
  41. Copy the View-1 key and place the key on 2 seconds.
  42. Pause 2 seconds on the View-1 position.
  43. Move the time bar on 7 seconds and add the new key.
  44. Minimize the animation timeline and choose View-2, in the Orientation dialog box.
  45. Return back to the animation timeline and right click over the 7 seconds key and select ‘Replace Key’ option.
  46. Time taken 5 seconds in changing from view-1 to view-2 position.
  47. In the Mates folder, select the Angle1 mate and add the key in the timeline by using Add key button.
  48. Right click the animation timeline, move the time bar at 22 seconds.
  49. Right click on the Angle1 and select Edit Dimension option, paste the specified angle, click OK.
  50. Click the ‘Collapse Motion Manager’ button.
  51. Click play animation button to check the motion.
  52. Now we will create some modifications in the animation.
  53. Right click the start key point time of angle mate and move the key position at 9 seconds in the Edit time dialogue box.
  54. Right click the end key point time of angle mate and move the key position at 24 seconds.
  55. Stop the animation 2 seconds between View-2 and starting key point of Angle1 mate.
  56. Go on the Orientation and Camera tab, copy the View-2 key and paste the key over 24 seconds in the timeline.
  57. Move the time bar at 26 seconds, right click and paste View-2 key.
  58. Pause the animation for 2 seconds at View-1 position.
  59. Copy the end key point of Angle1 mate and paste key on 26 seconds.
  60. Stay in the still position for 2 seconds.
  61. Repeat the whole animation in reverse order to come back in starting position.
  62. Minimize the animation timeline and clear the screen.
  63. Click ‘Play from Start’ button and start the animation.
  64. Return back to the assembly environment and save the file.

Square Bend Tube through Sheet Metal -- SolidWorks 2014 Tutorial (with caption and audio narration)

Square Bend Tube created through Sheet Metal


Serial No. 15

Square Bend Tube through Sheet Metal -- SolidWorks 2014 Tutorial (with caption and audio narration)

Inside this video, viewers will watch the full detailed process of creating this model through SolidWorks Sheet Metal design functionality.


download-Link


Click the following link to get the model file: - http://bit.ly/2uvJjpt 


Transcription of the Video

  1. Create a new Part file.
  2. Go to the ‘Edit Document Units’ tab and select ‘MMGS’ option.
  3. Create a new sketch over the Front Plane.
  4. Create a centre rectangle coincident with the origin and affix the dimensions.
  5. Select a horizontal line and convert into construction geometry.
  6. Draw two horizontal lines and apply the dimensions.
  7. Finish the sketch and choose the Isometric view.
  8. Save the file with the name ‘Square Bend Tube’.
  9. Create a new sketch over the Right Plane.
  10. Select the Right Plane and choose ‘Normal To’ option to rotate the view along the plane.
  11. Create a horizontal line and Vertical line with the preferred dimension.
  12. Create another line and set the angular dimension.
  13. Select these two lines and apply the equal constraint.
  14. Convert the four lines into construction geometry.
  15. Create two arcs between the endpoint of lines.
  16. Finish the sketch and activate the ‘Swept Flange’ command.
  17. In the Profile selection area, select the rectangle in the graphics area.
  18. In the Path selection area, select the line.
  19. The preview of swept is visible in the design window.
  20. Set the thickness value 2mm and bend radius value 2mm.
  21. Click OK to execute the command.
  22. Change the colour of the model as according to your choice.
  23. Change the color of selected curved face of the model to distinguish it for Emboss text.
  24. Create a new sketch on this face.
  25. Activate the ‘Convert Entities’ command.
  26. Select the two vertical edges of the model.
  27. Create a horizontal line and apply dimensions.
  28. Activate the ‘Text’ command and select the line.
  29. Write the text as ‘Square Bend Tube’ and format the text.
  30. Click OK to create the text.
  31. Choose the Isometric View.
  32. Activate the ‘Wrap’ command, select the horizontal line which is based on the text.
  33. And select this face for wrap the text.
  34. ‘Emboss’ option is preselected, if you want to engrave the text you choose ‘Deboss’ option.
  35. You may also change height of embossed text.
  36. Click OK to execute the command.
  37. Change the color of face for good looking.
  38. In the same manner, emboss the text opposite side of the model.
  39. Save the Part file.

Friday, March 24, 2017

Mounting Bracket || SolidWorks Sheet Metal Tutorial

Mounting Bracket (1280x720)

This tutorial displays the modelling process of a model named 'Mounting Bracket' which is created by using Sheet Metal functionality of SolidWorks software.

The tutorial will give an intermediate level user of the software a good practice of following software tools:--

  1. Basic 2D sketching
  2. Base Flange/Tab
  3. Sketched Bend
  4. Edge Flange
  5. Break Corner
  6. Extrude Cut
  7. Simple Hole
  8. Circular Pattern
  9. Mirror
  10. Flat Pattern

The highlight of the tutorial is that we will apply different tools to create similar looking four legs of the model. Viewers may find this way of modelling process a bit tedious but it is deliberately done so that software users may know and learn about the application of different software tools.

To understand the video easily, focus over places where we have paused our mouse. This is done so as the viewers can easily read the tooltips generated by the software and understand what is being done and why.


download-Link


Visit the following link to get the model file…

http://bit.ly/31XO4D4


....................................................................................

Visit the following link to watch more sheet metal tutorials on SolidWorks by us

https://www.youtube.com/playlist?list=PLKWX3xUP3pPrJYXXG2_K2IlquWkPc59lf

....................................................................................

Visit the following link to watch basic tutorial on SolidWorks by us

https://www.youtube.com/playlist?list=PLb-IhKRMYSES3Zw3QHmQVqQ-rcFVzgYHy

.........................................................................

To watch more detailed tutorials on the same software visit the following link

https://www.youtube.com/playlist?list=PLKWX3xUP3pPo77gFCyy669sI76qJa5jKw

...................................................................................

Hope all of you enjoyed the tutorial. If you find the video useful please like it and share it with your friends/colleagues and do not forget to subscribe us to get latest updates about our new uploads.

http://www.youtube.com/user/nisheethsorjm?sub_confirmation=1

....................................................................................................

Friday, October 21, 2016

Chuck and Key || SolidWorks Tutorial

Chuck-and-Key----Siemens-Nx-Tutorial

In this SolidWorks 2015 Tutorial, we will create a Chuck and Key Assembly. First, we will create Chuck and Key parts and then assemble it. So viewers will learn the following Part and Assembly Modelling topics:--

Part Modelling

1. Creating a new model file with document units.

2. Basic Sketching

3. Extruded Cut Tool

4. Revolve Tool

5. Swept Surface Tool

6. Extend Surface Tool

7. Filled Surface Tool

8. Knit Surface Tool

9. Circular Pattern Tool

10. Combine Tool (Combining Multiple solid in parts)

11. Chamfer etc.

Assembly Modelling

1. Creating a new assembly file with specified units.

2. Inserting components in the assembly.

3. Applying Assembly Mates.

download-Link


Visit the following link to get the model file…
http://bit.ly/2N15r1m


....................................................................................

Visit the following link to watch basic tutorial on SolidWorks by us

https://www.youtube.com/playlist?list=PLb-IhKRMYSES3Zw3QHmQVqQ-rcFVzgYHy

.........................................................................

To watch more detailed tutorials on the same software visit the following link

https://www.youtube.com/playlist?list=PLKWX3xUP3pPo77gFCyy669sI76qJa5jKw

...................................................................................

Hope all of you will enjoyed the tutorial. If you find the video useful please like it and share it with your friends/colleagues and do not forget to subscribe us to get latest updates about our new uploads.

http://www.youtube.com/user/nisheethsorjm?sub_confirmation=1

Sunday, September 25, 2016

Creating Miter Flange (Video Tutorial with Caption) SolidWorks 2014

Creating Miter Flange

Serial No. 212

Creating Miter Flange (Video Tutorial with Caption) SolidWorks 2014

This tutorial shows how to create Miter Flange by selecting a linear edge of the sheet in solid works sheet metal environment.

download-Link
  

Click the following link to get the model file: -http://bit.ly/2OmYKYI


Transcription of the Video
  1. Creating Miter Flange in SolidWorks
  2. Activate the ‘Miter Flange’ command.
  3. Hold the mouse and read the message on dialog box.
  4. Draw two lines, perpendicular to each other on the front face of the model.
  5. Give the dimension to fully constraint the sketch.
  6. Uncheck the ‘Use default radius’ option in Miter Parameters panel, enter the value in the Bend Radius field.
  7. Select ‘Material Inside’ option under type 'Flange position'.
  8. Enter the value in the Gap distance field.
  9. Select the three inside linear edges to attach the miter flange.
  10. Finally the Miter Flange feature has been created successfully.